編輯:關於Android編程
前言
相信大家都知道知道,在AndroidOS中,提供了五中數據存儲方式,分別是:ContentProvider存儲、文件存儲、SharedPreference存儲、SQLite數據庫存儲、網絡存儲。那麼這一篇,我們介紹文件存儲。
1.Android文件的操作模式
學過Java的同學都知道,我們新建文件,然後就可以寫入數據了,但是Android卻不一樣,因為Android是 基於Linux的,我們在讀寫文件的時候,還需加上文件的操作模式,Android中的操作模式如下:
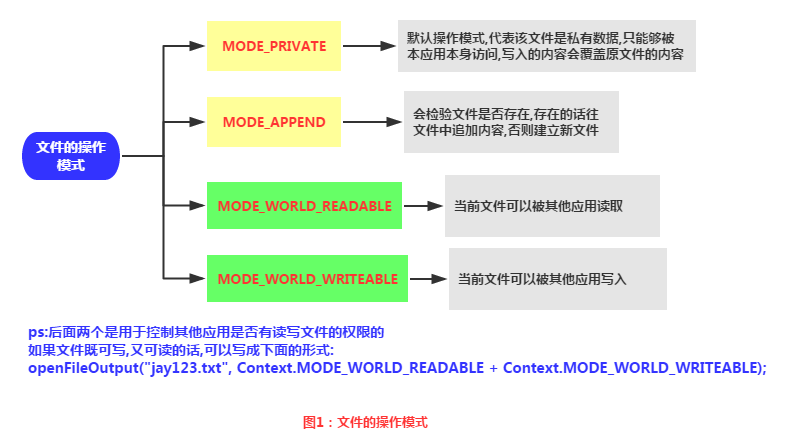
2、文件的操作模式
我們在學Java的時候都知道,Java中的IO操作來進行文件的保存和讀取,Android是基於Linux的,與Java不同的是Android在Context類中封裝好了輸入流和輸出流的獲取方法,分別是: FileInputStream openFileInput(String name); FileOutputStream(String name , int mode),這兩個方法第一個參數 用於指定文件名,第二個參數指定打開文件的模式。Android提供的文件模式有:
1.MODE_PRIVATE:Android提供的默認操作模式,代表該文件是私有數據,只能被應用本身訪問,在該模式下,寫入的內容會覆蓋原文件的內容。
2.MODE_APPEND:模式會檢查文件是否存在,存在就往文件追加內容,否則就創建新文件。
3.MODE_WORLD_READABLE:表示當前文件可以被其他應用讀取;
4.MODE_WORLD_WRITEABLE:表示當前文件可以被其他應用寫入。
此外,Android還提供了其它幾個重要的文件操作的方法:
1.getDir(String name , int mode):在應用程序的數據文件夾下獲取或者創建name對應的子目錄
2.File getFilesDir():獲取app的data目錄下的絕對路徑
3.String[] fileList():返回app的data目錄下數的全部文件
4.deleteFile(String fileName):刪除app的data目錄下的指定文件
3、讀寫文件
Android的讀寫文件和Java一樣,也是一樣通過IO操作實現,下面我們通過一個簡單的例子走一下這個流程:
布局文件代碼:
<?xml version="1.0" encoding="utf-8"?>
<LinearLayout xmlns:android="http://schemas.android.com/apk/res/android"
android:layout_width="match_parent"
android:layout_height="match_parent"
android:orientation="vertical"
android:padding="16dp">

<EditText
  android:id="@+id/ed_file_save"
  android:layout_width="match_parent"
  android:layout_height="wrap_content" />

<Button
  android:id="@+id/btn_file_save"
  android:layout_width="match_parent"
  android:layout_height="wrap_content"
  android:layout_marginTop="10dp"
  android:text="保存內容" />

<Button
  android:id="@+id/btn_file_read"
  android:layout_width="match_parent"
  android:layout_height="wrap_content"
  android:layout_marginTop="10dp"
  android:text="讀取內容" />

<TextView
  android:id="@+id/tv_read_file"
  android:layout_width="match_parent"
  android:layout_height="wrap_content"
  android:layout_marginTop="10dp"
  android:textColor="#000"
  android:textSize="14sp" />

</LinearLayout>
Activity代碼:
package com.example.datasave;

import android.content.Context;
import android.os.Bundle;
import android.support.annotation.Nullable;
import android.support.v7.app.AppCompatActivity;
import android.view.View;
import android.widget.Button;
import android.widget.EditText;
import android.widget.TextView;

import java.io.FileInputStream;
import java.io.FileOutputStream;
import java.io.IOException;

/**
 * Created by Devin on 2016/7/19.
 */
public class FileDataActivity extends AppCompatActivity {
private EditText ed_file_save;
private Button btn_file_save;
private Button btn_file_read;
private TextView tv_read_file;
private String fileName = " hello.txt";

@Override
protected void onCreate(@Nullable Bundle savedInstanceState) {
  super.onCreate(savedInstanceState);
  setContentView(R.layout.activity_file);
  ed_file_save = (EditText) findViewById(R.id.ed_file_save);
  btn_file_save = (Button) findViewById(R.id.btn_file_save);
  btn_file_read = (Button) findViewById(R.id.btn_file_read);
  tv_read_file = (TextView) findViewById(R.id.tv_read_file);

  btn_file_save.setOnClickListener(new View.OnClickListener() {
    @Override
    public void onClick(View view) {
      String fileContent = ed_file_save.getText().toString();
      try {
        save(fileContent);
        ToastUtils.showToast(FileDataActivity.this, "文件寫入成功");
      } catch (Exception e) {
        e.printStackTrace();
        ToastUtils.showToast(FileDataActivity.this, "文件寫入失敗");
      }
    }
  });
  btn_file_read.setOnClickListener(new View.OnClickListener() {
    @Override
    public void onClick(View view) {
      try {
        String content = read();
        tv_read_file.setText("文件的內容是:" + content);
      } catch (IOException e) {
        e.printStackTrace();
        ToastUtils.showToast(FileDataActivity.this, "讀取文件失敗!");
      }
    }
  });
}

public void save(String fileContent) throws Exception {
  FileOutputStream output = this.openFileOutput(fileName, Context.MODE_PRIVATE);
  output.write(fileContent.getBytes());
  output.close();
}

public String read() throws IOException {
  //打開文件輸入流
  FileInputStream input = this.openFileInput(fileName);
  byte[] temp = new byte[1024];
  StringBuffer stringBuffer = new StringBuffer("");
  int len = 0;
  while ((len = input.read(temp)) > 0) {
    stringBuffer.append(new String(temp, 0, len));
  }
  //關閉輸入流
  input.close();
  return stringBuffer.toString();
}
}
最後是實現效果圖:
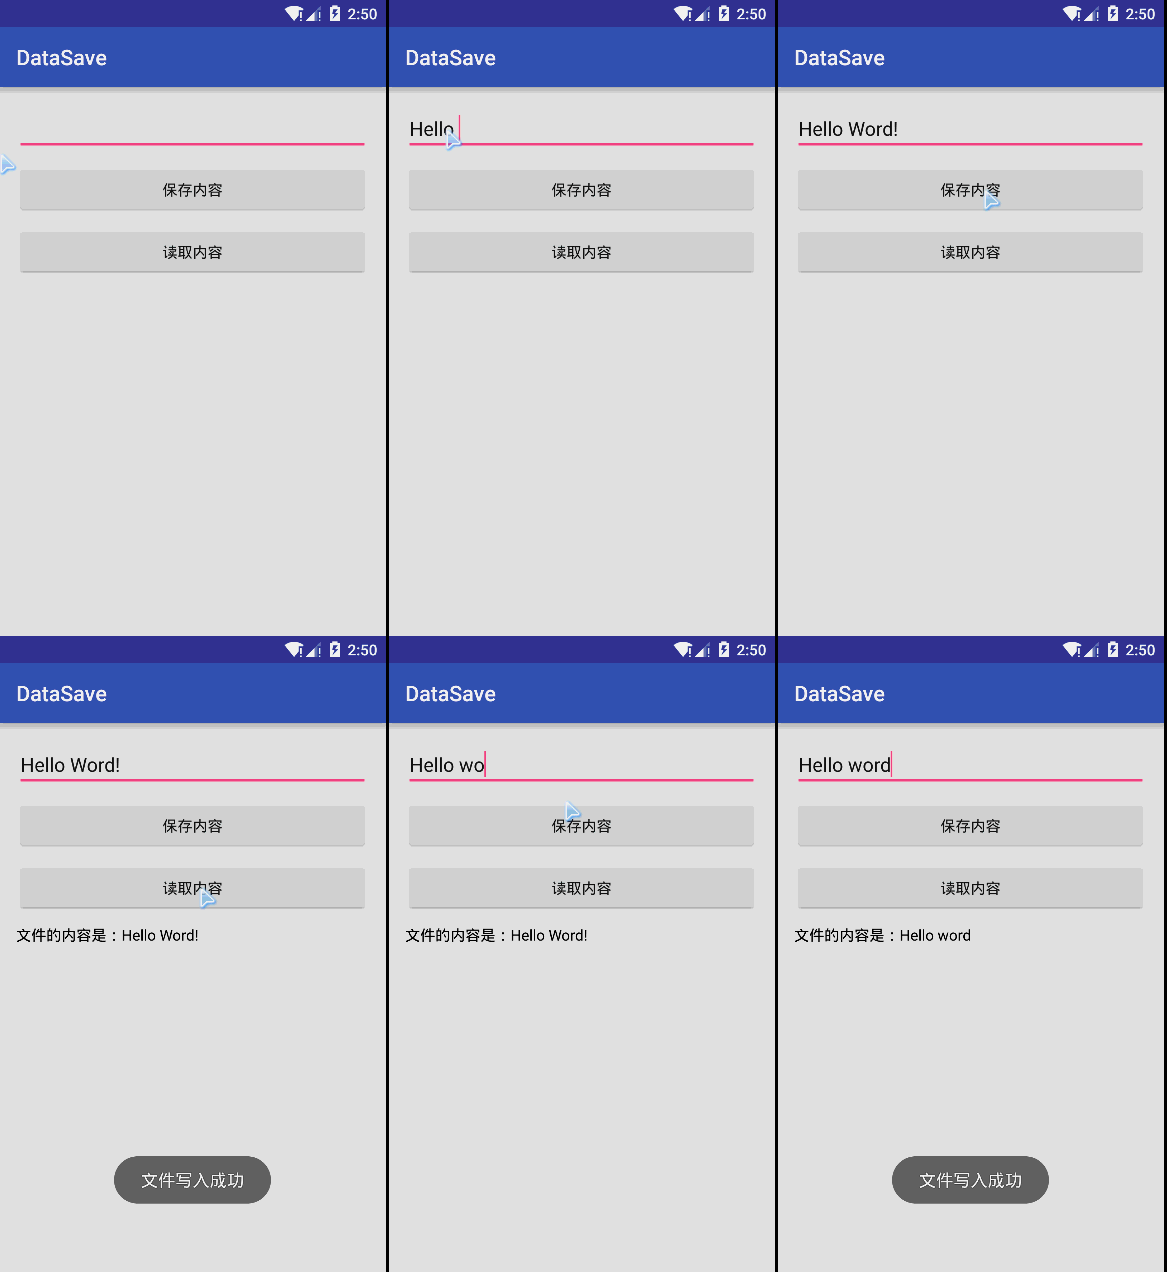
這裡文件使用的模式是私有模式,只能本應用讀取還會覆蓋原文件,這樣就可以實現簡單的文件讀寫。
4、讀寫SDcard的文件
讀寫SDCard需要權限:
<uses-permission android:name="android.permission.MOUNT_UNMOUNT_FILESYSTEMS" />
<uses-permission android:name="android.permission.WRITE_EXTERNAL_STORAGE" />
對設備讀寫SDCard的時候需要判斷SDCard是否存在,很多手機是不存在SDcard的,下面我們對SDCard的讀寫中會有體現,下面我們一起通過例子實現SDCard的讀寫操作
首先是布局文件代碼:
<EditText
  android:id="@+id/ed_file_save_sd"
  android:layout_width="match_parent"
  android:layout_height="wrap_content"
  android:layout_marginTop="20dp" />

<Button
  android:id="@+id/btn_file_save_sd"
  android:layout_width="match_parent"
  android:layout_height="wrap_content"
  android:layout_marginTop="10dp"
  android:text="寫入到SDcard" />

<Button
  android:id="@+id/btn_file_read_sd"
  android:layout_width="match_parent"
  android:layout_height="wrap_content"
  android:layout_marginTop="10dp"
  android:text="從SDcard讀取" />

<TextView
  android:id="@+id/tv_read_file_sd"
  android:layout_width="match_parent"
  android:layout_height="wrap_content"
  android:layout_marginTop="10dp"
  android:textColor="#000"
  android:textSize="14sp" />
Activity代碼:
  ed_file_save_sd = (EditText) findViewById(R.id.ed_file_save_sd);
  tv_read_file_sd = (TextView) findViewById(R.id.tv_read_file_sd);
  btn_file_read_sd = (Button) findViewById(R.id.btn_file_read_sd);
  btn_file_read_sd.setOnClickListener(new View.OnClickListener() {
    @Override
    public void onClick(View view) {
      try {
        String content = readFromSD();
        tv_read_file_sd.setText("從SDCard讀取到的內容是:" + content);
      } catch (Exception e) {
        e.printStackTrace();
        ToastUtils.showToast(FileDataActivity.this, "讀取文件失敗!");
      }
    }
  });
  btn_file_save_sd = (Button) findViewById(R.id.btn_file_save_sd);
  btn_file_save_sd.setOnClickListener(new View.OnClickListener() {
    @Override
    public void onClick(View view) {
      String content = ed_file_save_sd.getText().toString();
      try {
        save2SDCard(content);
        ToastUtils.showToast(FileDataActivity.this, "文件寫入SDCard成功");
      } catch (Exception e) {
        e.printStackTrace();
        ToastUtils.showToast(FileDataActivity.this, "文件寫入SDCard失敗");
      }
    }
  });

public void save2SDCard(String content) throws Exception {
  if (Environment.getExternalStorageState().equals(Environment.MEDIA_MOUNTED)) { // 如果sdcard存在
    String fileName3 = Environment.getExternalStorageDirectory().getCanonicalPath() + File.separator + "test" + File.separator + fileName2;
    File file = new File(fileName3);
    if (!file.getParentFile().exists()) {
      file.getParentFile().mkdir();
    }
    FileOutputStream fileOutputStream = new FileOutputStream(file);
    fileOutputStream.write(content.getBytes());
    fileOutputStream.close();
  } else {
    ToastUtils.showToast(this, "SDCard不存在");
  }

}
public String readFromSD() throws Exception {
  StringBuffer stringBuffer = new StringBuffer("");
  if (Environment.getExternalStorageState().equals(Environment.MEDIA_MOUNTED)) {
    String fileName3 = Environment.getExternalStorageDirectory().getCanonicalPath() + File.separator + "test" + File.separator + fileName2;
    File file = new File(fileName3);
    if (!file.getParentFile().exists()) {
      file.getParentFile().mkdir();
    }
    FileInputStream fileInputStream = new FileInputStream(file);
    byte[] temp = new byte[1024];
    int len = 0;
    while ((len = fileInputStream.read(temp)) > 0) {
      stringBuffer.append(new String(temp, 0, len));
    }
    fileInputStream.close();
  } else {
    ToastUtils.showToast(this, "SDCard不存在");
  }
  return stringBuffer.toString();
}
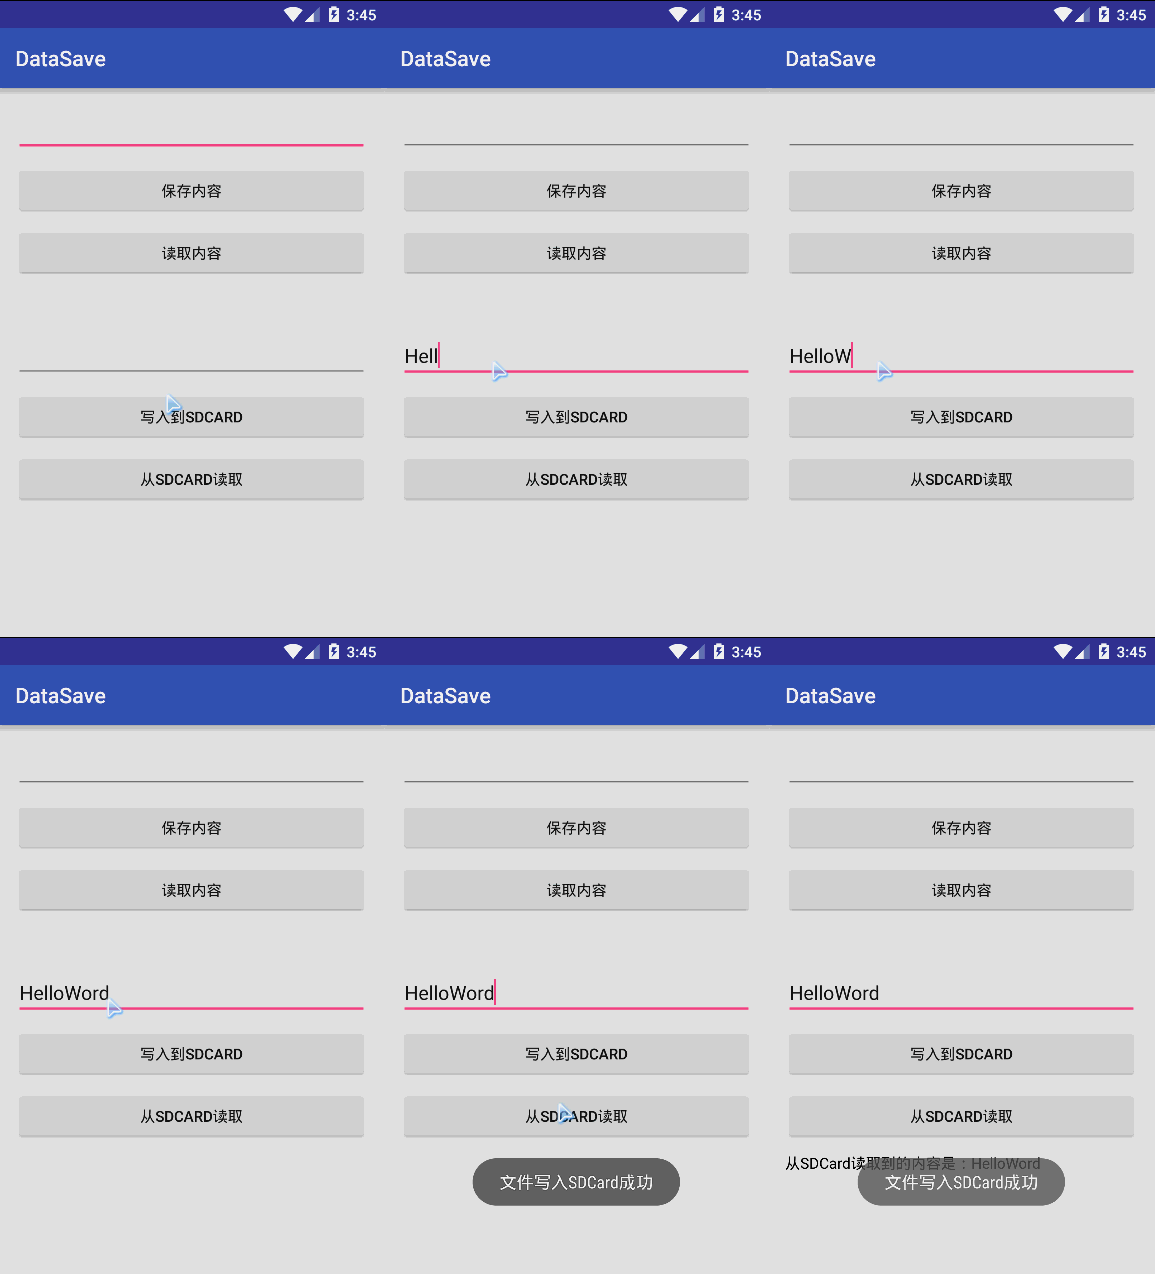
SDCard的讀取和文件操作差不多,需要判斷SDCard是否存在,最後是效果圖:
5、讀取raw和assets文件的數據
raw/res中的文件會被映射到Android的R文件中,我們直接通過R文件就可以訪問,這裡就不在過多介紹了。
assets中的文件不會像raw/res中的文件一樣被映射到R文件中,可以有目錄結構,Android提供了一個訪問assets文件的AssetManager對象,我們訪問也很簡單:
AssetManager assetsManager = getAssets();
InputStream inputStream = assetsManager.open("fileName");
這樣就可以直接獲取到assets目錄下的資源文件。
AndroidOS的文件存儲就簡單介紹到這裡,下面提供一些文件存儲的工具方法:
package com.example.datasave.io;

import android.content.Context;

import java.io.BufferedReader;
import java.io.BufferedWriter;
import java.io.ByteArrayOutputStream;
import java.io.FileInputStream;
import java.io.FileNotFoundException;
import java.io.FileOutputStream;
import java.io.IOException;
import java.io.InputStream;
import java.io.InputStreamReader;
import java.io.OutputStreamWriter;

/**
 * IO流 工具類<br>
 * 很簡單,僅支持文本操作
 */
public class IOUtils {

/**
 * 文本的寫入操作
 *
 * @param filePath 文件路徑。一定要加上文件名字 <br>
 *         例如:../a/a.txt
 * @param content 寫入內容
 * @param append  是否追加
 */
public static void write(String filePath, String content, boolean append) {
  BufferedWriter bufw = null;
  try {
    bufw = new BufferedWriter(new OutputStreamWriter(
        new FileOutputStream(filePath, append)));
    bufw.write(content);

  } catch (Exception e1) {
    e1.printStackTrace();
  } finally {
    if (bufw != null) {
      try {
        bufw.close();
      } catch (IOException e) {
        e.printStackTrace();
      }
    }
  }
}

/**
 * 文本的讀取操作
 *
 * @param path 文件路徑,一定要加上文件名字<br>
 *       例如:../a/a.txt
 * @return
 */
public static String read(String path) {
  BufferedReader bufr = null;
  try {
    bufr = new BufferedReader(new InputStreamReader(
        new FileInputStream(path)));
    StringBuffer sb = new StringBuffer();
    String str = null;
    while ((str = bufr.readLine()) != null) {
      sb.append(str);
    }
    return sb.toString();
  } catch (Exception e) {
    e.printStackTrace();
  } finally {
    if (bufr != null) {
      try {
        bufr.close();
      } catch (IOException e) {
        e.printStackTrace();
      }
    }
  }
  return null;
}

/**
 * 文本的讀取操作
 *
 * @param is 輸入流
 * @return
 */
public static String read(InputStream is) {
  BufferedReader bufr = null;
  try {
    bufr = new BufferedReader(new InputStreamReader(is));
    StringBuffer sb = new StringBuffer();
    String str = null;
    while ((str = bufr.readLine()) != null) {
      sb.append(str);
    }
    return sb.toString();
  } catch (Exception e) {
    e.printStackTrace();
  } finally {
    if (bufr != null) {
      try {
        bufr.close();
      } catch (IOException e) {
        e.printStackTrace();
      }
    }
  }
  return null;
}


/**
 * @param context 上下文
 * @param fileName 文件名
 * @return 字節數組
 */
public static byte[] readBytes(Context context, String fileName) {
  FileInputStream fin = null;
  byte[] buffer = null;
  try {
    fin = context.openFileInput(fileName);
    int length = fin.available();
    buffer = new byte[length];
    fin.read(buffer);
  } catch (FileNotFoundException e) {
    e.printStackTrace();
  } catch (IOException e) {
    e.printStackTrace();
  } finally {
    try {
      if (fin != null) {
        fin.close();
        fin = null;
      }
    } catch (IOException e) {
      e.printStackTrace();
    }
  }
  return buffer;
}

/**
 * 快速讀取程序應用包下的文件內容
 *
 * @param context 上下文
 * @param filename 文件名稱
 * @return 文件內容
 * @throws IOException
 */
public static String read(Context context, String filename)
    throws IOException {
  FileInputStream inStream = context.openFileInput(filename);
  ByteArrayOutputStream outStream = new ByteArrayOutputStream();
  byte[] buffer = new byte[1024];
  int len = 0;
  while ((len = inStream.read(buffer)) != -1) {
    outStream.write(buffer, 0, len);
  }
  byte[] data = outStream.toByteArray();
  return new String(data);
}


}
好的,關於Android的數據存儲與訪問的文件讀寫就到這裡,如果在學習本文中遇到什麼問題,或者覺得有些纰漏的地方,歡迎提出,萬分感激,謝謝~
 Android 信息中URL地址識別問題
ATCID主要用來處理PC端傳輸過來的AT命令,從AT命令實際處理的地方來說,主要分為3類: 1. 需要Modem來處理的AT命令; 2. 需要在nativ
 Android 手機無法連接mac解決辦法
Android 手機無法連接mac解決辦法一般的android連接mac 很方便不用安裝驅動就可以啦,可是不知道為什麼二般情況下有的android手機(小米2,華為等)就
 Android 個人理財工具六:顯示賬單明細 下
上一節的顯示賬單明細 上中,賬單明細的顯示已經基本實現,本文主要整理下代碼,實現此窗口的查詢和刪除功能;按下Menu菜單
 Android7.0 PackageManagerService (3) APK安裝
在本篇博客中,我們分析一下Android中的APK是如何安裝的,以及PKMS在這個過程中進行了哪些工作。APK的安裝方式有很多,我們先來看看如何用adb命令進行安裝。我們