編輯:關於Android編程
本文實例為大家分享了Android帶有記住密碼功能的登陸界面實現代碼,供大家參考,具體內容如下
1、設計思路
主要采用SharedPreferences來保存用戶數據,本Demo沒有經過加密,所有一旦Android系統被ROOT的話,其他用戶就可以查看用戶的私有目錄,密碼文件就很不安全。所以真正應用在軟件上面的,一定要經過加密才保存,可以選擇MD5加密。
SharedPreferences介紹可以參看這篇博文:http://www.jb51.net/article/84859.htm
TextWatcher的介紹可以參看這篇博文:http://www.jb51.net/article/84865.htm
2、功能介紹
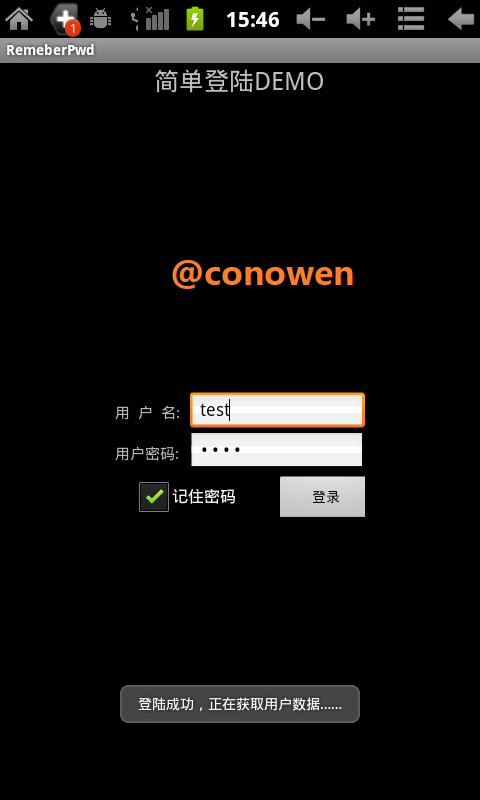
默認勾選“記住密碼”復選框,點擊“登陸”按鈕,一旦成功登陸,就保存用戶名和密碼到SharedPreferences文件中。
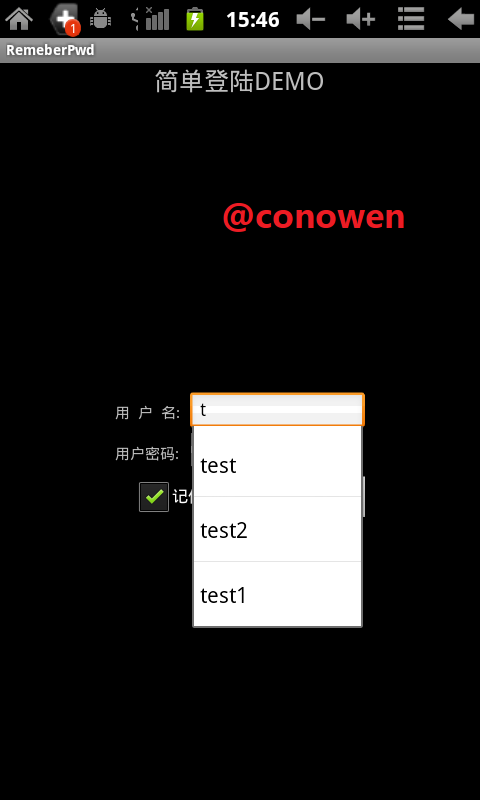
用戶名輸入時,通過TextWatcher不斷去讀取用戶數據,自動提示相應的“用戶名”,選擇了用戶名之後,就會讀取SharedPreferences的文件,然後自動完成密碼的輸入。
3、效果圖


4、代碼:詳細都在注釋裡面了
/*author: conowen
 * date: 2012.4.2
 *
 */
package com.conowen.remeberPwd;

import android.app.Activity;
import android.content.SharedPreferences;
import android.os.Bundle;
import android.text.Editable;
import android.text.InputType;
import android.text.TextWatcher;
import android.view.View;
import android.view.View.OnClickListener;
import android.widget.ArrayAdapter;
import android.widget.AutoCompleteTextView;
import android.widget.Button;
import android.widget.CheckBox;
import android.widget.EditText;
import android.widget.Toast;

public class RemeberPwdActivity extends Activity {

 AutoCompleteTextView cardNumAuto;
 EditText passwordET;
 Button logBT;

 CheckBox savePasswordCB;
 SharedPreferences sp;
 String cardNumStr;
 String passwordStr;

 /** Called when the activity is first created. */
 @Override
 public void onCreate(Bundle savedInstanceState) {
 super.onCreate(savedInstanceState);
 setContentView(R.layout.main);
 cardNumAuto = (AutoCompleteTextView) findViewById(R.id.cardNumAuto);
 passwordET = (EditText) findViewById(R.id.passwordET);
 logBT = (Button) findViewById(R.id.logBT);

 sp = this.getSharedPreferences("passwordFile", MODE_PRIVATE);
 savePasswordCB = (CheckBox) findViewById(R.id.savePasswordCB);
 savePasswordCB.setChecked(true);// 默認為記住密碼
 cardNumAuto.setThreshold(1);// 輸入1個字母就開始自動提示
 passwordET.setInputType(InputType.TYPE_CLASS_TEXT
 | InputType.TYPE_TEXT_VARIATION_PASSWORD);
 // 隱藏密碼為InputType.TYPE_TEXT_VARIATION_PASSWORD,也就是0x81
 // 顯示密碼為InputType.TYPE_TEXT_VARIATION_VISIBLE_PASSWORD,也就是0x91

 cardNumAuto.addTextChangedListener(new TextWatcher() {

 @Override
 public void onTextChanged(CharSequence s, int start, int before,
  int count) {
 // TODO Auto-generated method stub
 String[] allUserName = new String[sp.getAll().size()];// sp.getAll().size()返回的是有多少個鍵值對
 allUserName = sp.getAll().keySet().toArray(new String[0]);
 // sp.getAll()返回一張hash map
 // keySet()得到的是a set of the keys.
 // hash map是由key-value組成的

 ArrayAdapter<String> adapter = new ArrayAdapter<String>(
  RemeberPwdActivity.this,
  android.R.layout.simple_dropdown_item_1line,
  allUserName);

 cardNumAuto.setAdapter(adapter);// 設置數據適配器

 }

 @Override
 public void beforeTextChanged(CharSequence s, int start, int count,
  int after) {
 // TODO Auto-generated method stub

 }

 @Override
 public void afterTextChanged(Editable s) {
 // TODO Auto-generated method stub
 passwordET.setText(sp.getString(cardNumAuto.getText()
  .toString(), ""));// 自動輸入密碼

 }
 });

 // 登陸
 logBT.setOnClickListener(new OnClickListener() {

 @Override
 public void onClick(View v) {
 // TODO Auto-generated method stub

 cardNumStr = cardNumAuto.getText().toString();
 passwordStr = passwordET.getText().toString();

 if (!((cardNumStr.equals("test")) && (passwordStr
  .equals("test")))) {
  Toast.makeText(RemeberPwdActivity.this, "密碼錯誤,請重新輸入",
  Toast.LENGTH_SHORT).show();
 } else {
  if (savePasswordCB.isChecked()) {// 登陸成功才保存密碼
  sp.edit().putString(cardNumStr, passwordStr).commit();
  }
  Toast.makeText(RemeberPwdActivity.this, "登陸成功,正在獲取用戶數據……",
  Toast.LENGTH_SHORT).show();
  // 跳轉到另一個Activity
  // do something

 }

 }
 });

 }

}
布局文件:main.xml
<?xml version="1.0" encoding="utf-8"?>
<LinearLayout xmlns:android="http://schemas.android.com/apk/res/android"
 android:layout_width="fill_parent"
 android:layout_height="fill_parent"
 android:orientation="vertical" >

 <TextView
 android:layout_width="wrap_content"
 android:layout_height="wrap_content"
 android:layout_gravity="center_horizontal"
 android:text="簡單登陸DEMO"
 android:textSize="25px" />

 <LinearLayout
 xmlns:android="http://schemas.android.com/apk/res/android"
 android:layout_width="fill_parent"
 android:layout_height="fill_parent"
 android:gravity="center"
 android:orientation="vertical" >

 <LinearLayout
 android:layout_width="250dip"
 android:layout_height="wrap_content"
 android:layout_marginLeft="10dp"
 android:layout_marginRight="10dp"
 android:layout_marginTop="15dp"
 android:orientation="vertical" >

 <LinearLayout
 android:layout_width="fill_parent"
 android:layout_height="wrap_content"
 android:orientation="horizontal" >

 <LinearLayout
  android:layout_width="fill_parent"
  android:layout_height="80px"
  android:orientation="vertical" >

  <LinearLayout
  android:layout_width="fill_parent"
  android:layout_height="40px"
  android:orientation="horizontal" >

  <TextView
  android:id="@+id/tv_account"
  android:layout_width="wrap_content"
  android:layout_height="wrap_content"
  android:layout_marginRight="10dp"
  android:text="用 戶 名:"
  android:textSize="15px" />

  <AutoCompleteTextView
  android:id="@+id/cardNumAuto"
  android:layout_width="fill_parent"
  android:layout_height="40px" >
  </AutoCompleteTextView>
  </LinearLayout>

  <LinearLayout
  android:layout_width="fill_parent"
  android:layout_height="40px"
  android:orientation="horizontal" >

  <TextView
  android:layout_width="wrap_content"
  android:layout_height="wrap_content"
  android:layout_marginRight="10dp"
  android:text="用戶密碼:"
  android:textSize="15px" />

  <EditText
  android:id="@+id/passwordET"
  android:layout_width="fill_parent"
  android:layout_height="40px" >
  </EditText>
  </LinearLayout>
 </LinearLayout>
 </LinearLayout>

 <LinearLayout
 android:layout_width="wrap_content"
 android:layout_height="wrap_content"
 android:orientation="horizontal" >

 <CheckBox
  android:id="@+id/savePasswordCB"
  android:layout_width="wrap_content"
  android:layout_height="wrap_content"
  android:layout_marginLeft="20dp"
  android:text="記住密碼" >
 </CheckBox>

 <Button
  android:id="@+id/logBT"
  android:layout_width="100px"
  android:layout_height="wrap_content"
  android:layout_marginLeft="40dp"
  android:layout_marginRight="10dp"
  android:text="登錄" >
 </Button>
 </LinearLayout>
 </LinearLayout>
 </LinearLayout>

</LinearLayout>
SharedPreferences文件,在/data/data/包名/shared_prefs文件夾下面
<?xml version='1.0' encoding='utf-8' standalone='yes' ?>
<map>
<string name="test">test</string>
<string name="test2">test</string>
<string name="test1">test</string>
</map>
以上就是本文的全部內容,希望對大家學習Android軟件編程有所幫助。
 Android倒計時功能的實現
Android中的倒計時的功能(也可以直接使用CountDownTimer這個類直接實現,相關此Demo可查看我的博客),參考了網上寫的很好的一個倒計時Demo: 下
 Android Dex文件結構解析
Java源文件通過Java編譯器生成CLASS文件,再通過dx工具轉換為classes.dex文件。DEX文件從整體上來看是一個索引的結構,類名、方法名、字段名等信息都存
 android開發筆記之網絡編程—異步加載(AsyncTask)
看了前面的文章我們知道請求網絡的幾種方式:1.使用TCP協議和URL進行網絡編程 a)基於TCP協議:ServerSocket,Socket b)基於URL:
 Android中使用DownloadManager下載並安裝apk
在前面,我介紹了使用 Volley 傳輸網絡數據。戳這裡Volley是一個很好用的網絡框架,但是Volley 不適合用來下載大的數據文件。因為 Volley 會保持在解析