編輯:關於Android編程
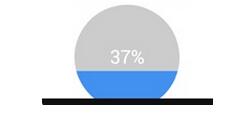
今天無意中發現一個圓形進度,想想自己實現一個,如下圖:

基本思路是這樣的:
1.首先繪制一個實心圓
2.繪制一個白色實心的正方形,遮住實心圓
3.在圓的中心動態繪制當前進度的百分比字符
4.繪制一個與之前實心圓相同顏色的空心圓
5.逐漸改變當前的百分比
6.根據百分比,逐漸改變正方形的大小,逐漸減小正方形的底部y軸的坐標,不斷重繪,直到達到100%
首先看看自定義的屬性
在values目錄下新建attrs.xml內容如下:
定義繪制圓形的背景色,和繪制圓形的半徑大小
<?xml version="1.0" encoding="utf-8"?>
<resources>

  <attr name="circlecolor" format="color"></attr>
  <attr name="half" format="dimension"></attr>

  <declare-styleable name="myCircleImage">
    <attr name="circlecolor"></attr>
    <attr name="half"></attr>
  </declare-styleable>

</resources>
自定義視圖
import android.annotation.SuppressLint;
import android.content.Context;
import android.content.res.TypedArray;
import android.graphics.Canvas;
import android.graphics.Color;
import android.graphics.Paint;
import android.text.TextPaint;
import android.util.AttributeSet;
import android.util.Log;
import android.view.View;

public class CirclePro extends View {

 private Paint paint;
 private int circleBack;//圓的背景色
 private int mschedual = 0;//用於控制動態變化
 float circleHalf; //圓的半徑
 String percent = "";//繪制百分比的字符串

 @SuppressLint("Recycle")
 public CirclePro(Context context, AttributeSet attrs, int defStyleAttr) {
 super(context, attrs, defStyleAttr);
 paint = new Paint();
 TypedArray array = context.getTheme().obtainStyledAttributes(attrs, R.styleable.myCircleImage, defStyleAttr,0);
 @SuppressWarnings("unused")
 int leng = array.length();
 //獲取自定義的屬性,這裡注意是R.styleable.myCircleImage_circlecolor而不是R.attr.circlecolor
 circleBack = array.getColor(R.styleable.myCircleImage_circlecolor,Color.GREEN);
 circleHalf = array.getDimension(R.styleable.myCircleImage_half,200.f);
 System.out.println(circleBack);

 }

 /**
 * 這個構造參數,當在布局文件中引用該view的時候,必須重寫該構造函數
 * @param context
 * @param attrs
 */
 public CirclePro(Context context, AttributeSet attrs) {
 this(context, attrs, 0);//調用自己的構造函數

 }

 /**
 * 根據文本的
 * @param text
 * @param textSize
 * @return
 */
 public float getTextWidth(String text,float textSize) {

 TextPaint textPaint = new TextPaint();
 textPaint.setTextSize(textSize);
 return textPaint.measureText(text);
 }

 @Override
 protected void onDraw(Canvas canvas) {
 // TODO Auto-generated method stub
 super.onDraw(canvas);

 float height = getHeight();
 float width = getWidth();
// float circleHalf = (float) (width*0.7/2);

 paint.setColor(circleBack);
 paint.setAntiAlias(true);
 paint.setStyle(Paint.Style.FILL);
 canvas.drawCircle(width/2,height/2,circleHalf, paint);//畫實心圓

 if (mschedual <= 100) {//,如果當前進度小於100,畫實心矩形
  paint.setColor(Color.WHITE);
  canvas.drawRect(width/2-circleHalf,height/2-circleHalf,width/2+circleHalf,height/2+circleHalf - mschedual*circleHalf/50, paint);
 }

 //畫當前進度的字符串
 paint.setColor(Color.BLACK);
 paint.setTextSize(30.f);
 percent = mschedual+" %";
 canvas.drawText(percent, width/2-getTextWidth(percent,30)/2,height/2+paint.getTextSize()*3/8, paint);//字體的高度=paint.getTextSize()*3/4

 //畫空心圓
 paint.setColor(circleBack);
 paint.setStyle(Paint.Style.STROKE);
 canvas.drawCircle(width/2,height/2,circleHalf, paint);

 if (mschedual < 100) {//更改當前進度值,並重繪
  mschedual++;
  invalidate();
 }
 }
}
在activity_main.xml中,需要用到自定義的屬性,首先添加命名空間: xmlns:liu=”http://schemas.android.com/apk/res/com.example.androidcirclepro”
其中liu是自定義的一個前綴,隨意命名的,com.example.androidcirclepro是我們的應用的包名
activity_main.xmln內容如下:
<RelativeLayout xmlns:android="http://schemas.android.com/apk/res/android"
  xmlns:tools="http://schemas.android.com/tools"
  xmlns:liu="http://schemas.android.com/apk/res/com.example.androidcirclepro"
  android:layout_width="match_parent"
  android:layout_height="match_parent"
  tools:context=".MainActivity" >

  <com.example.androidcirclepro.CirclePro
    android:layout_width="match_parent"
    android:layout_height="match_parent"
    liu:half="90dp"
    liu:circlecolor="#fff0f0"
    />

</RelativeLayout>
至此一個自定義的圓形進度條就完成了,是不是很簡單。
 Android官方下拉刷新控件SwipeRefreshLayout使用詳解
可能開發安卓的人大多數都用過很多下拉刷新的開源組件,但是今天用了官方v4支持包的SwipeRefreshLayout覺得效果也蠻不錯的,特拿出來分享。簡介:SwipeRe
 ListView(列表視圖)+BaseAdapter(基礎適配器)=android滑動列表
首先,我們要建一個layout,裡面放一個ListView,長寬皆適應屏幕即可。 然後,我們要在這個ListView裡顯示東西,顯示什麼樣的東西
 cxf 介紹 以及ant 工具的使用/cxf總結
ant 工具:1、為什麼要用到ant這個工具呢?Ant做為一種工具已經廣泛被使用,並且歷史悠久。使用ant的內置命令,可以編譯java源文件(javac),運行java文
 RecyclerView.ItemAnimator終極解讀(三)--繼承DefaultItemAnimator實現自定義動畫
DefaultItemAnimator是Android OS中一個默認的RecyclerView動畫實現類,如果產品需求沒有特別復雜的動畫要求,可以使用DefaultIt