編輯:關於Android編程
本文實例為大家分享了Android實現搜索功能,並且需要顯示搜索的歷史記錄,供大家參考,具體內容如下
效果圖:
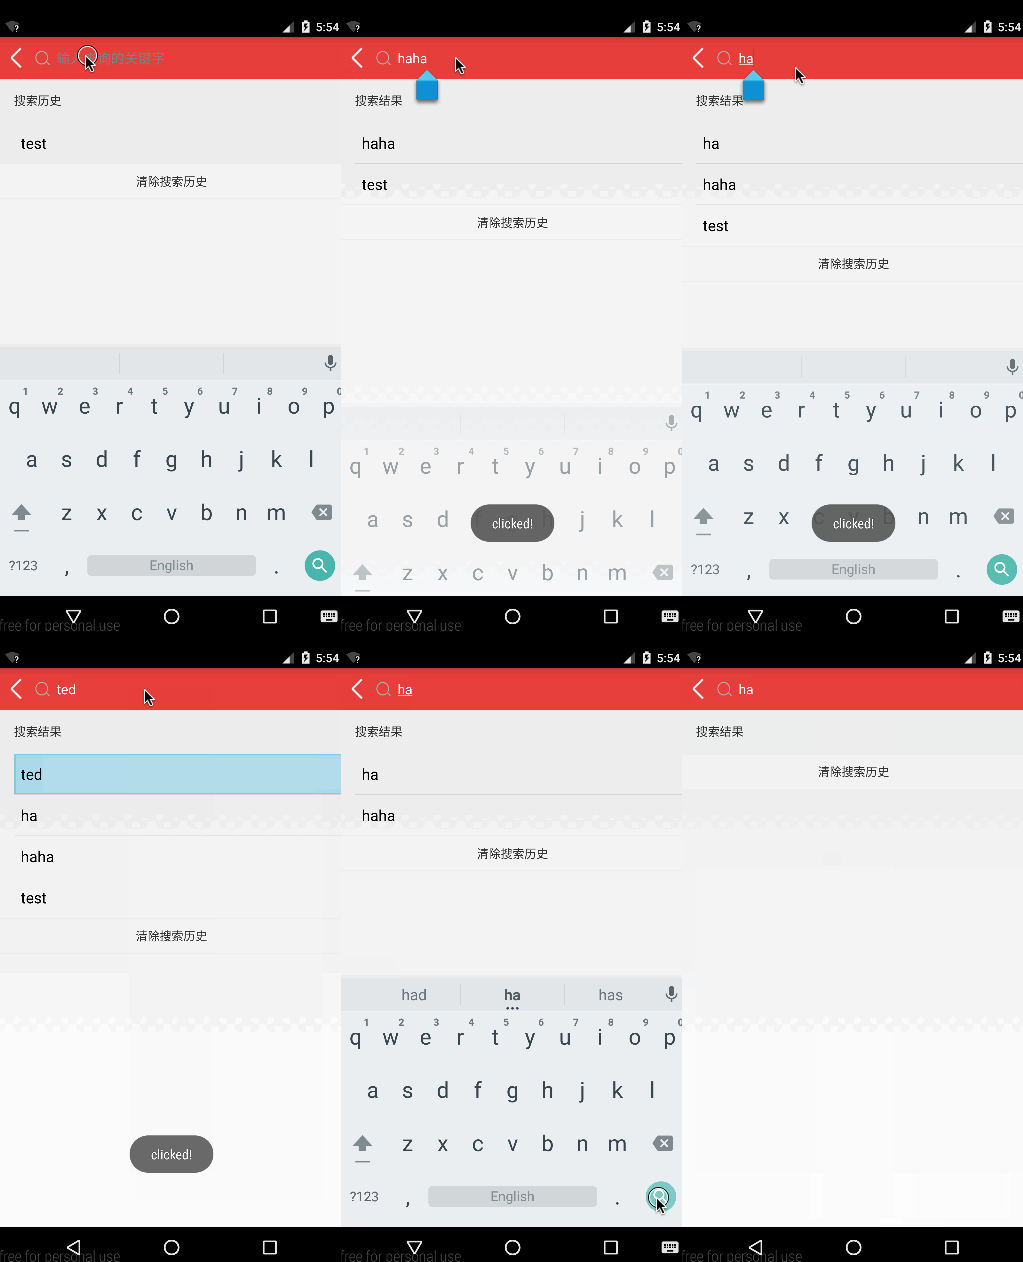
本案例實現起來很簡單,所以可以直接拿來嵌入項目中使用,涉及到的知識點:
- 數據庫的增刪改查操作
- ListView和ScrollView的嵌套沖突解決
- 監聽軟鍵盤回車按鈕設置為搜索按鈕
- 使用TextWatcher( )實時篩選
- 已搜索的關鍵字再次搜索不重復添加到數據庫
- 剛進入頁面設置軟鍵盤不因為EditText而自動彈出
代碼
RecordSQLiteOpenHelper.java
package com.cwvs.microlife;

import android.content.Context;
import android.database.sqlite.SQLiteDatabase;
import android.database.sqlite.SQLiteOpenHelper;

public class RecordSQLiteOpenHelper extends SQLiteOpenHelper {

  private static String name = "temp.db";
  private static Integer version = 1;

  public RecordSQLiteOpenHelper(Context context) {
    super(context, name, null, version);
  }

  @Override
  public void onCreate(SQLiteDatabase db) {
    db.execSQL("create table records(id integer primary key autoincrement,name varchar(200))");
  }

  @Override
  public void onUpgrade(SQLiteDatabase db, int oldVersion, int newVersion) {

  }


}
MainActivity.java
package com.cwvs.microlife;

import java.util.Date;

import android.app.Activity;
import android.content.Context;
import android.database.Cursor;
import android.database.sqlite.SQLiteDatabase;
import android.graphics.drawable.Drawable;
import android.os.Bundle;
import android.text.Editable;
import android.text.TextWatcher;
import android.view.KeyEvent;
import android.view.View;
import android.view.Window;
import android.view.inputmethod.InputMethodManager;
import android.widget.AdapterView;
import android.widget.BaseAdapter;
import android.widget.CursorAdapter;
import android.widget.EditText;
import android.widget.SimpleCursorAdapter;
import android.widget.TextView;
import android.widget.Toast;

public class MainActivity extends Activity {

  private EditText et_search;
  private TextView tv_tip;
  private MyListView listView;
  private TextView tv_clear;
  private RecordSQLiteOpenHelper helper = new RecordSQLiteOpenHelper(this);;
  private SQLiteDatabase db;
  private BaseAdapter adapter;

  @Override
  protected void onCreate(Bundle savedInstanceState) {
    super.onCreate(savedInstanceState);
    requestWindowFeature(Window.FEATURE_NO_TITLE);
    setContentView(R.layout.activity_main);
    // 初始化控件
    initView();

    // 清空搜索歷史
    tv_clear.setOnClickListener(new View.OnClickListener() {
      @Override
      public void onClick(View v) {
        deleteData();
        queryData("");
      }
    });

    // 搜索框的鍵盤搜索鍵點擊回調
    et_search.setOnKeyListener(new View.OnKeyListener() {// 輸入完後按鍵盤上的搜索鍵

      public boolean onKey(View v, int keyCode, KeyEvent event) {
        if (keyCode == KeyEvent.KEYCODE_ENTER && event.getAction() == KeyEvent.ACTION_DOWN) {// 修改回車鍵功能
          // 先隱藏鍵盤
          ((InputMethodManager) getSystemService(Context.INPUT_METHOD_SERVICE)).hideSoftInputFromWindow(
              getCurrentFocus().getWindowToken(), InputMethodManager.HIDE_NOT_ALWAYS);
          // 按完搜索鍵後將當前查詢的關鍵字保存起來,如果該關鍵字已經存在就不執行保存
          boolean hasData = hasData(et_search.getText().toString().trim());
          if (!hasData) {
            insertData(et_search.getText().toString().trim());
            queryData("");
          }
          // TODO 根據輸入的內容模糊查詢商品,並跳轉到另一個界面,由你自己去實現
          Toast.makeText(MainActivity.this, "clicked!", Toast.LENGTH_SHORT).show();

        }
        return false;
      }
    });

    // 搜索框的文本變化實時監聽
    et_search.addTextChangedListener(new TextWatcher() {
      @Override
      public void beforeTextChanged(CharSequence s, int start, int count, int after) {

      }

      @Override
      public void onTextChanged(CharSequence s, int start, int before, int count) {

      }

      @Override
      public void afterTextChanged(Editable s) {
        if (s.toString().trim().length() == 0) {
          tv_tip.setText("搜索歷史");
        } else {
          tv_tip.setText("搜索結果");
        }
        String tempName = et_search.getText().toString();
        // 根據tempName去模糊查詢數據庫中有沒有數據
        queryData(tempName);

      }
    });

    listView.setOnItemClickListener(new AdapterView.OnItemClickListener() {
      @Override
      public void onItemClick(AdapterView<?> parent, View view, int position, long id) {
        TextView textView = (TextView) view.findViewById(android.R.id.text1);
        String name = textView.getText().toString();
        et_search.setText(name);
        Toast.makeText(MainActivity.this, name, Toast.LENGTH_SHORT).show();
        // TODO 獲取到item上面的文字,根據該關鍵字跳轉到另一個頁面查詢,由你自己去實現
      }
    });

    // 插入數據,便於測試,否則第一次進入沒有數據怎麼測試呀?
    Date date = new Date();
    long time = date.getTime();
    insertData("Leo" + time);

    // 第一次進入查詢所有的歷史記錄
    queryData("");
  }

  /**
   * 插入數據
   */
  private void insertData(String tempName) {
    db = helper.getWritableDatabase();
    db.execSQL("insert into records(name) values('" + tempName + "')");
    db.close();
  }

  /**
   * 模糊查詢數據
   */
  private void queryData(String tempName) {
    Cursor cursor = helper.getReadableDatabase().rawQuery(
        "select id as _id,name from records where name like '%" + tempName + "%' order by id desc ", null);
    // 創建adapter適配器對象
    adapter = new SimpleCursorAdapter(this, android.R.layout.simple_list_item_1, cursor, new String[] { "name" },
        new int[] { android.R.id.text1 }, CursorAdapter.FLAG_REGISTER_CONTENT_OBSERVER);
    // 設置適配器
    listView.setAdapter(adapter);
    adapter.notifyDataSetChanged();
  }
  /**
   * 檢查數據庫中是否已經有該條記錄
   */
  private boolean hasData(String tempName) {
    Cursor cursor = helper.getReadableDatabase().rawQuery(
        "select id as _id,name from records where name =?", new String[]{tempName});
    //判斷是否有下一個
    return cursor.moveToNext();
  }

  /**
   * 清空數據
   */
  private void deleteData() {
    db = helper.getWritableDatabase();
    db.execSQL("delete from records");
    db.close();
  }

  private void initView() {
    et_search = (EditText) findViewById(R.id.et_search);
    tv_tip = (TextView) findViewById(R.id.tv_tip);
    listView = (com.cwvs.microlife.MyListView) findViewById(R.id.listView);
    tv_clear = (TextView) findViewById(R.id.tv_clear);

    // 調整EditText左邊的搜索按鈕的大小
    Drawable drawable = getResources().getDrawable(R.drawable.search);
    drawable.setBounds(0, 0, 60, 60);// 第一0是距左邊距離,第二0是距上邊距離,60分別是長寬
    et_search.setCompoundDrawables(drawable, null, null, null);// 只放左邊
  }
}
MyListView.java
package com.cwvs.microlife;

import android.content.Context;
import android.util.AttributeSet;
import android.widget.ListView;

public class MyListView extends ListView {
  public MyListView(Context context) {
    super(context);
  }

  public MyListView(Context context, AttributeSet attrs) {
    super(context, attrs);
  }

  public MyListView(Context context, AttributeSet attrs, int defStyle) {
    super(context, attrs, defStyle);
  }

  @Override
  protected void onMeasure(int widthMeasureSpec, int heightMeasureSpec) {
    int expandSpec = MeasureSpec.makeMeasureSpec(Integer.MAX_VALUE >> 2,
        MeasureSpec.AT_MOST);
    super.onMeasure(widthMeasureSpec, expandSpec);
  }

}
activity_main.xml
<LinearLayout xmlns:android="http://schemas.android.com/apk/res/android"
  xmlns:tools="http://schemas.android.com/tools"
  android:layout_width="match_parent"
  android:layout_height="match_parent"
  android:focusableInTouchMode="true"
  android:orientation="vertical"
  tools:context="${relativePackage}.${activityClass}">

  <LinearLayout
    android:layout_width="fill_parent"
    android:layout_height="50dp"
    android:background="#E54141"
    android:orientation="horizontal"
    android:paddingRight="16dp">

    <ImageView
      android:layout_width="45dp"
      android:layout_height="45dp"
      android:layout_gravity="center_vertical"
      android:padding="10dp"
      android:src="@drawable/back" />

    <EditText
      android:id="@+id/et_search"
      android:layout_width="0dp"
      android:layout_height="match_parent"
      android:layout_weight="1"
      android:background="@null"
      android:drawableLeft="@drawable/search"
      android:drawablePadding="8dp"
      android:gravity="start|center_vertical"
      android:hint="輸入查詢的關鍵字"
      android:imeOptions="actionSearch"
      android:singleLine="true"
      android:textColor="@android:color/white"
      android:textSize="16sp" />

  </LinearLayout>


  <ScrollView
    android:layout_width="wrap_content"
    android:layout_height="wrap_content">

    <LinearLayout
      android:layout_width="match_parent"
      android:layout_height="wrap_content"
      android:orientation="vertical">

      <LinearLayout
        android:layout_width="match_parent"
        android:layout_height="wrap_content"
        android:orientation="vertical"
        android:paddingLeft="20dp"

        >

        <TextView
          android:id="@+id/tv_tip"
          android:layout_width="match_parent"
          android:layout_height="50dp"
          android:gravity="left|center_vertical"
          android:text="搜索歷史" />

        <View
          android:layout_width="match_parent"
          android:layout_height="1dp"
          android:background="#EEEEEE"></View>

        <com.cwvs.microlife.MyListView
          android:id="@+id/listView"
          android:layout_width="match_parent"
          android:layout_height="wrap_content"></com.cwvs.microlife.MyListView>


      </LinearLayout>

      <View
        android:layout_width="match_parent"
        android:layout_height="1dp"
        android:background="#EEEEEE"></View>

      <TextView
        android:id="@+id/tv_clear"
        android:layout_width="match_parent"
        android:layout_height="40dp"
        android:background="#F6F6F6"
        android:gravity="center"
        android:text="清除搜索歷史" />

      <View
        android:layout_width="match_parent"
        android:layout_height="1dp"
        android:layout_marginBottom="20dp"
        android:background="#EEEEEE"></View>
    </LinearLayout>

  </ScrollView>
</LinearLayout>
以上就是本文的全部內容,希望對大家的學習有所幫助。
 Android應用開發中單元測試分析
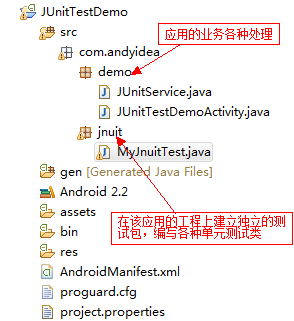
本文主要和大家分享如何在Android應用開發過程中如何進行單元測試,個人在做項目的過程中,覺得單元測試很有必要,以保證我們編寫程序的正確性。下面我們先大概了解下單元測試
 第四部分:UI開發常用控件(TextView、Button、EditText、ImageView、ProgressBar、AlertDialog、ProgressDialog)
1.TextView Textview在之前的學習中用到過好多次,就不再貼代碼了,在第四天學到的新知識是對齊方式,在activity_main中創建TextVi
 android開發之上傳圖片到七牛雲存儲服務器
相信很多開發者會把圖片存放到七牛上,我的web站點也是吧圖片存儲到七牛上,對於以圖片為主的站點,這樣可以節省很大帶寬。將圖片上傳到七牛服務器的重點就是獲得上傳憑證uplo
 Android UI設計系列之自定義SwitchButton開關實現類似IOS中UISwitch的動畫效果(2)
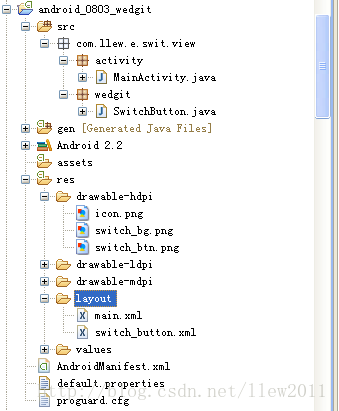
做IOS開發的都知道,IOS提供了一個具有動態開關效果的UISwitch組件,這個組件很好用效果相對來說也很絢麗,當我們去點擊開關的時候有動畫效果,但遺憾的是Androi
 我的Android進階之旅------)解決錯誤:You need to use a Theme.AppCompat theme (or descendant) with this activity.
#1、錯誤描述今天,想實現Activity不顯示標題欄的效果,在項目的A