編輯:關於Android編程
本文實例講述了Android EditText自定義樣式的方法。分享給大家供大家參考,具體如下:
1.去掉邊框
EditText的background屬性設置為@null就搞定了:android:background="@null"
style屬性倒是可加可不加
附原文:
@SlumberMachine, that's a great observation! But, it seems that there is more to making a TextView editable than just setting android:editable="true". It has to do with the "input method" - what ever that is - and that is where the real difference between TextView and EditText lies. TextView was designed with an EditText in mind, that's for sure. One would have to look at the EditText source code and probably EditText style to see what's really going on there. Documentation is simply not enough.
I have asked the same question back at android-developers group, and got a satisfactory answer. This is what you have to do:
XML:
<EditText android:id="@+id/title" android:layout_width="fill_parent"

   android:background="@null" android:textColor="@null"/>
Instead of you can also write , don't ask me why and what it means.
2.Android EditText 改變邊框顏色
第一步:為了更好的比較,准備兩個一模一樣的EditText(當Activity啟動時,焦點會在第一個EditText上,如果你不希望這樣只需要寫一個高度和寬帶為0的EditText即可避免,這裡就不這麼做了),代碼如下:
<EditText
  android:layout_width="fill_parent"
    android:layout_height="36dip"
    android:background="@drawable/bg_edittext"
    android:padding="5dip"
  android:layout_margin="36dip"
  android:textColorHint="#AAAAAA"
  android:textSize="15dip"
  android:singleLine="true"
  android:hint="請輸入..."
/>
接下來建立三個xml文件,分別為輸入框未獲得焦點時的背景,輸入框獲得焦點時的背景,selector背景選擇器(這裡能獲得輸入框什麼時候獲得和失去焦點),代碼如下:
bg_edittext_normal.xml(未獲得焦點時)
<?xml version="1.0" encoding="UTF-8"?>
<shape xmlns:android="http://schemas.android.com/apk/res/android">
  <solid android:color="#FFFFFF" />
  <corners android:radius="3dip"/>
  <stroke
    android:width="1dip"
    android:color="#BDC7D8" />
</shape>
bg_edittext_focused.xml(獲得焦點時)
<?xml version="1.0" encoding="UTF-8"?>
<shape xmlns:android="http://schemas.android.com/apk/res/android">
  <solid android:color="#FFFFFF" />
  <corners android:radius="3dip"/>
  <stroke
    android:width="1dip"
    android:color="#728ea3" />
</shape>
bg_edittext.xml(selector選擇器,這方面資料網上很多)
<?xml version="1.0" encoding="UTF-8"?>
<selector xmlns:android="http://schemas.android.com/apk/res/android">
    <item android:state_window_focused="false" android:drawable="@drawable/contact_edit_edittext_normal" />
    <item android:state_focused="true" android:drawable="@drawable/contact_edit_edittext_focused" />
</selector>
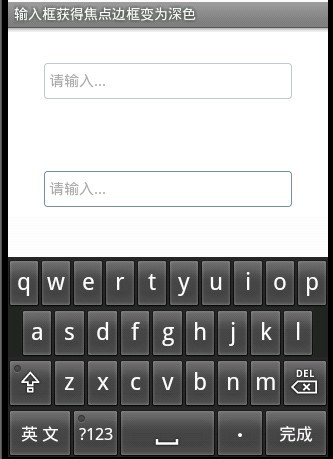
這樣就OK了,效果圖如下:

第二個輸入框邊框變為深色,是不是這樣更友好點。
更多關於Android相關內容感興趣的讀者可查看本站專題:《Android開發入門與進階教程》、《Android通信方式總結》、《Android基本組件用法總結》、《Android視圖View技巧總結》、《Android布局layout技巧總結》及《Android控件用法總結》
希望本文所述對大家Android程序設計有所幫助。
 初識Servlet生命周期及核心API
Servlet概述首先得知道,Servlet=Server+Applet,Servlet主要用於處理各種業務邏輯,它比JSP更具有業務邏輯層的意義。最初的JSP開發模式為
 Android常用命令集錦(圖文並茂適應於初學者)
大家好,今天我們要講的是android開發中,比較常用的名令集錦, 在我們開發中難免用到Android命令,有些確實命令確實很有用處。特別對於一些初學者來說,命令根本沒有
 手機相冊太多太亂?利用時間牆管理這些圖片!
如今的人們幾乎每天都會用手機拍攝無數張照片,但是照片一多管理就是一件麻煩事。一般來說,用戶管理照片不是系統的圖庫就是快圖應用,後者雖然浏覽速度快但管理功能卻
 Android中WebView的相關使用
最近做的項目中,遇到個很棘手的問題: 客戶給我的數據是有限制的,因此,在返回某條具體頁面內容的時候,他只能給我一個html片段,裡面包含 文字,圖片以及附件的下載地址。如