編輯:關於Android編程
Retrofit 2.0
先來說一下Retrofit 2.0版本中一些引人注意的地方。
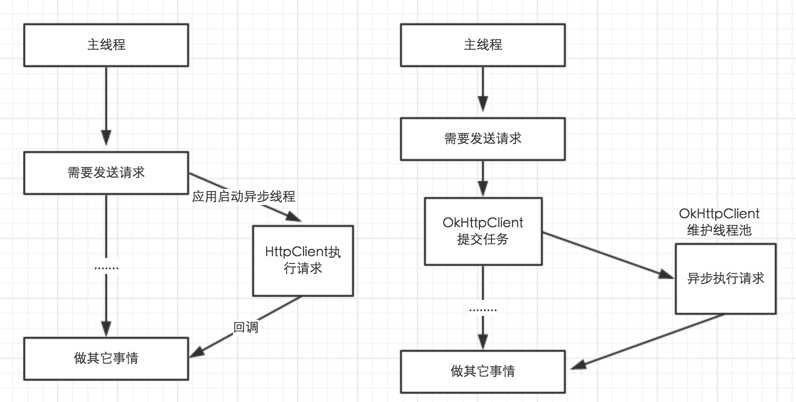
在Retrofit 2.0中,最大的改動莫過於減小庫的體積,首先,Retrofit 2.0去掉了對所有的HTTP客戶端的兼容,而鐘情於OkHttpClient一個,極大地減少了各種適配代碼,原因一會兒說;其次,拆庫,比如將對RxJava的支持設置為可選(需要額外引入庫);再比如將各個序列化反序列化轉換器支持設置為可選(需要額外引入庫)。於2.0拋棄HttpClient和HttpURLConnection,為了減小庫體積是一方面,另外一個重要的原因作為一個專門為Android&Java 應用量身打造的Http棧,OkHttpClient越來越受到各個大的開源項目的青睐,畢竟它本身就是開源的。
此外,OkHttpClient與HttpClient相比,它最大的改進是自帶工作線程池,所以上層應用無需自己去維護復雜的並發模型,而HttpClient僅僅提供了一個線程安全的類,所以還需要上層應用去處理並發的邏輯(實際上Volley一部分工作就是干這個)。從這個角度來說,Retrofit得益於OkHttpClient的優勢,較之於Volley是一種更加先進的網絡框架。

由於Retrofit不需要去關心並發工作線程的維護,所以它可以全力關注於如何精簡發送一個請求的代價,實際上使用Retrofit發送一個請求實在是太easy了!
簡單示例
首先定義請求接口,即程序中都需要什麼請求操作
public interface GitHubService {
 @GET("/users/{user}/repos")
 List<Repo> listRepos(@Path("user") String user);
}
然後通過RestAdapter生成一個剛才定義的接口的實現類,使用的是動態代理。
RestAdapter restAdapter = new RestAdapter.Builder()
  .setEndpoint("https://api.github.com")
  .build();


GitHubService service = restAdapter.create(GitHubService.class);
現在就可以調用接口進行請求了
List<Repo> repos = service.listRepos("octocat");
使用就是這麼簡單,請求時直接調用接口就行了,甚至不用封裝參數,因為參數的信息已經在定義接口時通過Annotation定義好了。
從上面的例子可以看到接口直接返回了需要的Java類型,而不是byte[]或String,解析數據的地方就是Converter,這個是可以自定義的,默認是用Gson解析,也就是說默認認為服務器返回的是Json數據,可以通過指定不同的Convert使用不同的解析方法,如用Jackson解析Json,或自定義XmlConvert解析xml數據。
Retrofit的使用就是以下幾步:
Annotation
以上面的示例中的接口來看
@GET("/group/{id}/users")
List<User> groupList(@Path("id") int groupId);
先看@GET
/** Make a GET request to a REST path relative to base URL. */
@Documented
@Target(METHOD)
@Retention(RUNTIME)
@RestMethod("GET")
public @interface GET {
 String value();
}
@GET本身也被幾個Anotation注解,@Target表示@GET注解是用於方法的,value方法就返回這個注解的value值,在上例中就是/group/{id}/users,然後就是@RestMethod
@Documented
@Target(ANNOTATION_TYPE)
@Retention(RUNTIME)
public @interface RestMethod {
 String value();
 boolean hasBody() default false;
}
RestMethod是一個用於Annotation的Annotation,比如上面的例子中用來注解的@GET,value方法就返回GET,hasBody表示是否有Body,對於POST這個方法就返回true
@Documented
@Target(METHOD)
@Retention(RUNTIME)
@RestMethod(value = "POST", hasBody = true)
public @interface POST {
 String value();
}
Retrofit的Annotation包含請求方法相關的@GET、@POST、@HEAD、@PUT、@DELETA、@PATCH,和參數相關的@Path、@Field、@Multipart等。
定義了Annotation要就有解析它的方法,在Retrofit中解析的位置就是RestMethodInfo,但在這之前需要先看哪裡使用了RestMethodInfo,前面說了Retrofit使用了動態代理生成了我們定義的接口的實現類,而這個實現類是通過RestAdapter.create返回的,所以使用動態代理的位置就是RestAdapter,接下來就看一下RestAdapter。
RestAdapter
RestAdapter restAdapter = new RestAdapter.Builder()
  .setEndpoint("https://api.github.com")
  .build();

GitHubService service = restAdapter.create(GitHubService.class);

public RestAdapter build() {
 if (endpoint == null) {
  throw new IllegalArgumentException("Endpoint may not be null.");
 }

 ensureSaneDefaults();

 return new RestAdapter(endpoint, clientProvider, httpExecutor, callbackExecutor,
   requestInterceptor, converter, profiler, errorHandler, log, logLevel);
}
setEndPoint就不說了,接口中定義的都是相對Url,EndPoint就是域名,build方法調用ensureSaneDefaults()方法,然後就構造了一個RestAdapter對象,構造函數的參數中傳入了EndPoint外的幾個對象,這幾個對象就是在ensureSaneDefaults()中初始化的。
private void ensureSaneDefaults() {
 if (converter == null) { converter = Platform.get().defaultConverter(); }
 if (clientProvider == null) { clientProvider = Platform.get().defaultClient(); }
 if (httpExecutor == null) { httpExecutor = Platform.get().defaultHttpExecutor(); }
 if (callbackExecutor == null) { callbackExecutor = Platform.get().defaultCallbackExecutor(); }
 if (errorHandler == null) { errorHandler = ErrorHandler.DEFAULT; }
 if (log == null) { log = Platform.get().defaultLog(); }
 if (requestInterceptor == null) { requestInterceptor = RequestInterceptor.NONE; }
}
ensureSaneDefaults()中初始化了很多成員,errorHandler、log就不看了,其他的除了requestInterceptor都是通過Platform對象獲得的,所以要先看下Platform
Platform
private static final Platform PLATFORM = findPlatform();
 static final boolean HAS_RX_JAVA = hasRxJavaOnClasspath();

 static Platform get() {
  return PLATFORM;
 }

 private static Platform findPlatform() {
  try {
   Class.forName("android.os.Build");
   if (Build.VERSION.SDK_INT != 0) {
    return new Android();
   }
  } catch (ClassNotFoundException ignored) {
  }

  if (System.getProperty("com.google.appengine.runtime.version") != null) {
   return new AppEngine();
  }

  return new Base();
 }
使用了單例的PLATFORM,通過findPlatform()初始化實例,如果是Android平台就使用Platform.Android,如果是Google AppEngine就使用Platform.AppEngine,否則使用Platform.Base,這些都是Platform的子類,其中AppEngine又是Base的子類。
Platform是一個抽象類,定義了以下幾個抽象方法,這幾個方法的作用就是返回一些RestAdapter中需要要用到成員的默認實現
abstract Converter defaultConverter(); // 默認的Converter,用於將請求結果轉化成需要的數據,如GsonConverter將JSON請求結果用Gson解析成Java對象
 abstract Client.Provider defaultClient(); // Http請求類,如果是AppEngine就使用`UrlFetchClient`,否則如果有OKHttp就使用OKHttp,如果是Android,2.3以後使用HttpURLConnection,2.3以前使用HttpClient
 abstract Executor defaultHttpExecutor(); // 用於執行Http請求的Executor
 abstract Executor defaultCallbackExecutor(); // Callback調用中用於執行Callback的Executor(可能是同步的)
 abstract RestAdapter.Log defaultLog(); // Log接口,用於輸出Log
看完Platform的接口再看ensureSaneDefaults就清楚了,初始化轉化數據的Converter、執行請求的Client、執行請求的Executor、執行Callback的Executor、Log輸出類、錯誤處理類和用於在請求前添加額外處理的攔截請求的Interceptor。
Converter默認都是用的GsonConverter,就不看了,defaultClient返回執行網絡請求的Client
Platform.Android
@Override Client.Provider defaultClient() {
 final Client client;
 if (hasOkHttpOnClasspath()) {
  client = OkClientInstantiator.instantiate();
 } else if (Build.VERSION.SDK_INT < Build.VERSION_CODES.GINGERBREAD) {
  client = new AndroidApacheClient();
 } else {
  client = new UrlConnectionClient();
 }
 return new Client.Provider() {
  @Override public Client get() {
   return client;
  }
 };
}
Platform.Base
@Override Client.Provider defaultClient() {
 final Client client;
 if (hasOkHttpOnClasspath()) {
  client = OkClientInstantiator.instantiate();
 } else {
  client = new UrlConnectionClient();
 }
 return new Client.Provider() {
  @Override public Client get() {
   return client;
  }
 };
}
Platform.AppEngine
@Override Client.Provider defaultClient() {
 final UrlFetchClient client = new UrlFetchClient();
 return new Client.Provider() {
  @Override public Client get() {
   return client;
  }
 };
}
對於Android,優先使用OKHttp,否則2.3以後使用HttpUrlConnection,2.3以前使用HttpClient
defaultHttpExecutor就是返回一個Executor,執行請求的線程在這個Executor中執行,就做了一件事,把線程設置為後台線程
defaultCallbackExecutor用於執行Callback類型的請求時,提供一個Executor執行Callback的Runnable
Platform.Base
@Override Executor defaultCallbackExecutor() {
  return new Utils.SynchronousExecutor();
}
Platform.Android

@Override Executor defaultCallbackExecutor() {
  return new MainThreadExecutor();
}
SynchronousExecutor
static class SynchronousExecutor implements Executor {
  @Override public void execute(Runnable runnable) {
   runnable.run();
  }
}
MainThreadExecutor
public final class MainThreadExecutor implements Executor {
 private final Handler handler = new Handler(Looper.getMainLooper());

 @Override public void execute(Runnable r) {
  handler.post(r);
 }
}
如果是Android,通過Handler將回調發送到主線程執行,如果非Android,直接同步執行。
Platform看完了,RestAdapter的成員初始化完成,就要看怎麼通過RestAdapter.create生成我們定義的接口的實現類了
RestAdapter.create
 public <T> T create(Class<T> service) {
  Utils.validateServiceClass(service);
  return (T) Proxy.newProxyInstance(service.getClassLoader(), new Class<?>[] { service },
    new RestHandler(getMethodInfoCache(service)));
 }

 Map<Method, RestMethodInfo> getMethodInfoCache(Class<?> service) {
  synchronized (serviceMethodInfoCache) {
   Map<Method, RestMethodInfo> methodInfoCache = serviceMethodInfoCache.get(service);
   if (methodInfoCache == null) {
    methodInfoCache = new LinkedHashMap<Method, RestMethodInfo>();
    serviceMethodInfoCache.put(service, methodInfoCache);
   }
   return methodInfoCache;
  }
 }
使用了動態代理,InvocationHandler是RestHandler,RestHandler有一個參數,是Method->RestMethodInfo的映射,初始化時這個映射是空的。重點就是這兩個了:RestHandler,RestMethodInfo,
@Override public Object invoke(Object proxy, Method method, final Object[] args)
  throws Throwable {
 // If the method is a method from Object then defer to normal invocation.
 if (method.getDeclaringClass() == Object.class) { // 1
  return method.invoke(this, args);
 }

 // Load or create the details cache for the current method.
 final RestMethodInfo methodInfo = getMethodInfo(methodDetailsCache, method); // 2

 if (methodInfo.isSynchronous) { // 3
  try {
   return invokeRequest(requestInterceptor, methodInfo, args);
  } catch (RetrofitError error) {
   Throwable newError = errorHandler.handleError(error);
   if (newError == null) {
    throw new IllegalStateException("Error handler returned null for wrapped exception.",
      error);
   }
   throw newError;
  }
 }

 if (httpExecutor == null || callbackExecutor == null) {
  throw new IllegalStateException("Asynchronous invocation requires calling setExecutors.");
 }

 // Apply the interceptor synchronously, recording the interception so we can replay it later.
 // This way we still defer argument serialization to the background thread.
 final RequestInterceptorTape interceptorTape = new RequestInterceptorTape();
 requestInterceptor.intercept(interceptorTape); // 4

 if (methodInfo.isObservable) { // 5
  if (rxSupport == null) {
   if (Platform.HAS_RX_JAVA) {
    rxSupport = new RxSupport(httpExecutor, errorHandler);
   } else {
    throw new IllegalStateException("Observable method found but no RxJava on classpath");
   }
  }

  return rxSupport.createRequestObservable(new Callable<ResponseWrapper>() {
   @Override public ResponseWrapper call() throws Exception {
    return (ResponseWrapper) invokeRequest(interceptorTape, methodInfo, args);
   }
  });
 }

 Callback<?> callback = (Callback<?>) args[args.length - 1]; // 6
 httpExecutor.execute(new CallbackRunnable(callback, callbackExecutor, errorHandler) {
  @Override public ResponseWrapper obtainResponse() {
   return (ResponseWrapper) invokeRequest(interceptorTape, methodInfo, args);
  }
 });

 return null; // Asynchronous methods should have return type of void.
}
執行請求時會調用RestHandler的invoke方法,如上所示,主要是上面代碼中標注有6點
如果調用的是Object的方法,不做處理直接調用。
通過getMethodInfo獲取調用的Method對應的RestMethodInfo,前面說了,構造RestHandler對象時傳進來了一個Method->RestMethodInfo的映射,初始時是空的。
 static RestMethodInfo getMethodInfo(Map<Method, RestMethodInfo> cache, Method method) {
  synchronized (cache) {
   RestMethodInfo methodInfo = cache.get(method);
   if (methodInfo == null) {
    methodInfo = new RestMethodInfo(method);
    cache.put(method, methodInfo);
   }
   return methodInfo;
  }
在getMethodInfo中判斷如果相應的映射不存在,就建立這個映射,並如名字所示緩存起來
接口中的每一個Method有一個對應的RestMethodInfo,關於接口中Annotation信息的處理就都在這裡了
RestMethodInfo
private enum ResponseType {
  VOID,
  OBSERVABLE,
  OBJECT
}
RestMethodInfo(Method method) {
  this.method = method;
  responseType = parseResponseType();
  isSynchronous = (responseType == ResponseType.OBJECT);
  isObservable = (responseType == ResponseType.OBSERVABLE);
}
在構造函數中調用了parseResponseType,parseResponseType解析了方法簽名,根據方法的返回值類型及最後一個參數的類型判斷方法的類型是哪種ResponseType
無論是哪種ResponseType,最終都是調用invokeRequest執行實際的請求,接下來依次看下invokeRequest的執行步驟
RestAdapter.invokeRequest
第一步是調用methodInfo.init()解析調用的方法,方法裡有做判斷,只在第一次調用時解析,因為處一次解析後這個對象就被緩存起來了,下次調同一個方法時可以直接使用
 synchronized void init() {
  if (loaded) return;

  parseMethodAnnotations();
  parseParameters();

  loaded = true;
 }
在RestMethodInfo.init中分別調用
for (Annotation methodAnnotation : method.getAnnotations()) {
 Class<? extends Annotation> annotationType = methodAnnotation.annotationType();
 RestMethod methodInfo = null;
 // Look for a @RestMethod annotation on the parameter annotation indicating request method.
 for (Annotation innerAnnotation : annotationType.getAnnotations()) {
  if (RestMethod.class == innerAnnotation.annotationType()) {
   methodInfo = (RestMethod) innerAnnotation;
   break;
  }
 }
 ...
}
在parseMethodAnnotations中,會獲取方法所有的Annotation並遍歷:
對於每一個Annotation,也會獲取它的Annotation,看它是否是被RestMethod注解的Annotation,如果是,說明是@GET,@POST類型的注解,就調用parsePath解析請求的Url,requestParam(URL中問號後的內容)及Url中需要替換的參數名(Url中大括號括起來的部分)
尋找Headers Annotation解析Header參數
解析RequestType:SIMPLE,MULTIPART,FORM_URL_ENCODED
parseParameters解析請求參數,即參數的Annotation,@PATH、@HEADER、@FIELD等
第二步是RequestBuilder和Interceptor,這兩個是有關聯的,所以一起看。
RequestBuilder requestBuilder = new RequestBuilder(serverUrl, methodInfo, converter);
requestBuilder.setArguments(args);
requestInterceptor.intercept(requestBuilder);
Request request = requestBuilder.build();
先說RequestInterceptor,作用很明顯,當執行請求時攔截請求以做一些特殊處理,比如添加一些額外的請求參數。
/** Intercept every request before it is executed in order to add additional data. */
public interface RequestInterceptor {
 /** Called for every request. Add data using methods on the supplied {@link RequestFacade}. */
 void intercept(RequestFacade request);

 interface RequestFacade {
  void addHeader(String name, String value);
  void addPathParam(String name, String value);
  void addEncodedPathParam(String name, String value);
  void addQueryParam(String name, String value);
  void addEncodedQueryParam(String name, String value);
 }

 /** A {@link RequestInterceptor} which does no modification of requests. */
 RequestInterceptor NONE = new RequestInterceptor() {
  @Override public void intercept(RequestFacade request) {
   // Do nothing.
  }
 };
}
RequestInterceptor只有一個方法intercept,接收一個RequestFacade參數,RequestFacade是RequestInterceptor內部的一個接口,這個接口的方法就是添加請求參數,Query、Header什麼的。大概可以看出RequestInterceptor的作用了,如果RequestFacade表示一個請求相關的數據,RequestInteceptor.intercept的作用就是向這個RequestFacade中添加額外Header,Param等參數。
RequestFacade的一個子類叫RequestBuilder,用來處理Request請求參數,在invokeRequest中會對RequestBuilder調用intercept方法向RequestBuilder添加額外的參數。
有一個叫RequestInterceptorTape的類,同時實現了RequestFacade與RequestInterceptor,它的作用是:
當作為RequestFacade使用時作為參數傳給一個RequestInteceptor,這個RequestInterceptor調用它的addHeader等方法時,它把這些調用及參數記錄下來
然後作為RequestInterceptor使用時,將之前記錄的方法調用及參數重新應用到它的intercept參數RequestFacade中
在RestHandler.invoke中,如果判斷方法的調用不是同步調用,就通過下面的兩行代碼將用戶設置的interceptor需要添加的參數記錄到RequestInterceptorTape,然後在invokeRequest中再實際執行參數的添加。
// Apply the interceptor synchronously, recording the interception so we can replay it later.
// This way we still defer argument serialization to the background thread.
final RequestInterceptorTape interceptorTape = new RequestInterceptorTape();
requestInterceptor.intercept(interceptorTape);
RequestBuilder.setArguments()解析調用接口時的實際參數。然後通過build()方法生成一個Request對象
第三步執行請求,Response response = clientProvider.get().execute(request);
第四步就是解析並分發請求結果了,成功請求時返回結果,解析失敗調用ErrorHandler給用戶一個自定義異常的機會,但最終都是通過異常拋出到invoke()中的,如果是同步調用,直接拋異常,如果是Callback調用,會回調Callback.failure
CallbackRunnable
請求類型有同步請求,Callback請求,Observable請求,來看下Callback請求:
Callback<?> callback = (Callback<?>) args[args.length - 1];
httpExecutor.execute(new CallbackRunnable(callback, callbackExecutor, errorHandler) {
  @Override public ResponseWrapper obtainResponse() {
   return (ResponseWrapper) invokeRequest(interceptorTape, methodInfo, args);
  }
});
Callback請求中函數最後一個參數是一個Callback的實例,httpExecutor是一個Executor,用於執行Runnable請求,我們看到,這裡new了一個CallbackRunnable執行,並實現了它的obtainResponse方法,看實現:
abstract class CallbackRunnable<T> implements Runnable {
 private final Callback<T> callback;
 private final Executor callbackExecutor;
 private final ErrorHandler errorHandler;

 CallbackRunnable(Callback<T> callback, Executor callbackExecutor, ErrorHandler errorHandler) {
  this.callback = callback;
  this.callbackExecutor = callbackExecutor;
  this.errorHandler = errorHandler;
 }

 @SuppressWarnings("unchecked")
 @Override public final void run() {
  try {
   final ResponseWrapper wrapper = obtainResponse();
   callbackExecutor.execute(new Runnable() {
    @Override public void run() {
     callback.success((T) wrapper.responseBody, wrapper.response);
    }
   });
  } catch (RetrofitError e) {
   Throwable cause = errorHandler.handleError(e);
   final RetrofitError handled = cause == e ? e : unexpectedError(e.getUrl(), cause);
   callbackExecutor.execute(new Runnable() {
    @Override public void run() {
     callback.failure(handled);
    }
   });
  }
 }

 public abstract ResponseWrapper obtainResponse();
}
就是一個普通的Runnable,在run方法中首先執行obtailResponse,從名字可以看到是執行請求返回Response,這個從前面可以看到執行了invokeRequest,和同步調用中一樣執行請求。
緊接著就提交了一個Runnable至callbackExecutor,在看Platform時看到了callbackExecotor是通過Platform.get().defaultCallbackExecutor()返回的,Android中是向主線程的一個Handler發消息
值得注意的事,對於同步調用,如果遇到錯誤是直接拋異常,而對於異步調用,是調用Callback.failure()
Mime
執行網絡請求,需要向服務端發送請求參數,如表單數據,上傳的文件等,同樣需要解析服務端返回的數據,在Retrofit中對這些做了封裝,位於Mime包中,也只有封裝了,才好統一由指定的Converter執行數據的轉換
TypedInput和TypedOutput表示輸入輸出的數據,都包含mimeType,並分別支持讀入一個InputStream或寫到一個OutputStrem
/**
 * Binary data with an associated mime type.
 *
 * @author Jake Wharton ([email protected])
 */
public interface TypedInput {

 /** Returns the mime type. */
 String mimeType();

 /** Length in bytes. Returns {@code -1} if length is unknown. */
 long length();

 /**
  * Read bytes as stream. Unless otherwise specified, this method may only be called once. It is
  * the responsibility of the caller to close the stream.
  */
 InputStream in() throws IOException;
}

/**
 * Binary data with an associated mime type.
 *
 * @author Bob Lee ([email protected])
 */
public interface TypedOutput {
 /** Original filename.
  *
  * Used only for multipart requests, may be null. */
 String fileName();

 /** Returns the mime type. */
 String mimeType();

 /** Length in bytes or -1 if unknown. */
 long length();

 /** Writes these bytes to the given output stream. */
 void writeTo(OutputStream out) throws IOException;
}

TypedByteArray,內部數據是一個Byte數組

 private final byte[] bytes;

 @Override public long length() {
  return bytes.length;
 }

 @Override public void writeTo(OutputStream out) throws IOException {
  out.write(bytes);
 }

 @Override public InputStream in() throws IOException {
  return new ByteArrayInputStream(bytes);
 }

TypedString,繼承自TypedByteArray,內部表示是一樣的

public TypedString(String string) {
  super("text/plain; charset=UTF-8", convertToBytes(string));
 }

 private static byte[] convertToBytes(String string) {
  try {
   return string.getBytes("UTF-8");
  } catch (UnsupportedEncodingException e) {
   throw new RuntimeException(e);
  }
 }
其他的也一樣,從名字很好理解:TypedFile,MultipartTypedOutput,FormEncodedTypedOutput。
其他
Retrofit對輸入和輸出做了封裝,通過TypedOutput向服務器發送數據,通過TypedInput讀取服務器返回的數據。
通過MultipartTypedOutput支持文件上傳,讀取服務器數據時,如果要求直接返回未解析的Response,Restonse會被轉換為TypedByteArray,所以不能是大文件類的
Retrofit支持不同的Log等級,當為LogLevel.Full時會把Request及Response的Body打印出來,所以如果包含文件就不行了。
Retrofit默認使用GsonConverter,所以要想獲取原始數據不要Retrofit解析,要麼自定義Conveter,要麼直接返回Response了,返回Response也比較麻煩
總體來說Retrofit看起來很好用,不過要求服務端返回數據最好要規范,不然如果請求成功返回一種數據結構,請求失敗返回另一種數據結構,不好用Converter解析,接口的定義也不好定義,除非都返回Response,或自定義Converter所有接口都返回String
 Android 關於 OnScrollListener 事件順序次數的簡要分析
在 Android 的 OnScrollListener 整個事件我主要分析下他的執行順序: 實現滾動事件的監聽接口 new AbsListView.OnScrol
 Activity啟動模式及Intent的Flag屬性對Intent傳值的影響
原因一:Activity的啟動模式那麼Activity以哪種啟動模式進行跳轉時,會導致目標Activity獲取不到傳遞過來的數據呢?在上一篇博客中講到Activity以不
 Android事件分發機制
一、View、ViewGroup的基本屬性1,View事件:public boolean dispatchTouchEvent(MotionEvent event)
 Android控件之TabHost用法實例分析
本文實例講述了Android控件之TabHost用法。分享給大家供大家參考。具體如下:以下通過TabHost實現android選項卡。main.xml布局文件:<&