編輯:關於Android編程
LinearLayout是線性布局控件:要麼橫向排布,要麼豎向排布
常用屬性:
android:gravity------------設置的是控件自身上面的內容位置
android:layout_gravity-----設置控件本身相對於父控件的顯示位置
android:layout_weight----- 給控件分配剩余空間
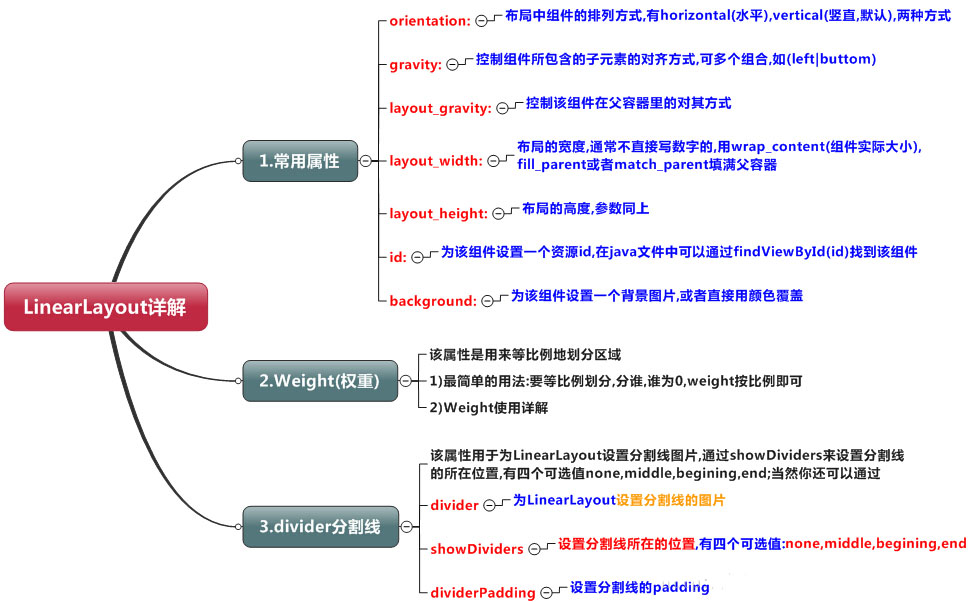
先給大家展示一下導圖:

知識點詳解(演示效果方便組件沒有設置id)
(1)gravity和Layout_gravity
android:gravity 屬性是對該view中內容的限定.比如一個button 上面的text. 你可以設置該text 相對於view的靠左,靠右等位置.
android:layout_gravity是用來設置該view相對與父view 的位置.比如一個button 在linearlayout裡,你想把該button放在linearlayout裡靠左、靠右等位置就可以通過該屬性設置.
(2)weight權重(以水平為例)
(a)當width = 0或者 width = wrap_content的時候,按照權重比例計算!:2: 3
<?xml version="1.0" encoding="utf-8"?>
<LinearLayout
xmlns:android="http://schemas.android.com/apk/res/android"
android:layout_width="match_parent"
android:layout_height="match_parent"
android:orientation="horizontal">
<TextView
android:id="@+id/text1"
android:layout_width="0dp"
android:layout_height="match_parent"
android:layout_weight="1"
android:background="@android:color/holo_red_dark"
android:text="Text1"/>
<TextView
android:id="@+id/text2"
android:layout_width="0dp"
android:layout_height="match_parent"
android:layout_weight="2"
android:background="@android:color/holo_blue_bright"
android:text="Text2"/>
<TextView
android:id="@+id/text3"
android:layout_width="0dp"
android:layout_height="match_parent"
android:background="@android:color/white"
android:layout_weight="3"
android:text="Text3"/>
</LinearLayout>
(b)當width = fill_parent/match_parent的時候
第一步:當三個都為match_parent的時候屏幕只有一個 1 -3 = -2;
第二步:計算每個TextView占有的比例 1/6,2/6,3/6;
第三步: 1 -2*1/6 = 2/3; 1 - 2*2/6 = 1/3; 1 - 2*3/6 = 0;
第四步:2:1:0
<?xml version="1.0" encoding="utf-8"?>
<LinearLayout
xmlns:android="http://schemas.android.com/apk/res/android"
android:layout_width="match_parent"
android:layout_height="match_parent"
android:orientation="horizontal">
<TextView
android:id="@+id/text1"
android:layout_width="match_parent"
android:layout_height="match_parent"
android:layout_weight="1"
android:background="@android:color/holo_red_dark"
android:text="Text1"
android:gravity="center"
android:textSize="40sp"/>
<TextView
android:id="@+id/text2"
android:layout_width="match_parent"
android:layout_height="match_parent"
android:layout_weight="2"
android:background="@android:color/holo_blue_bright"
android:text="Text2"
android:gravity="center"
android:textSize="40sp"/>
<TextView
android:id="@+id/text3"
android:layout_width="match_parent"
android:layout_height="match_parent"
android:background="@android:color/white"
android:layout_weight="3"
android:text="Text3"
android:gravity="center"
android:textSize="40sp"/>
</LinearLayout>
(3)分割線
<View
android:layout_marginLeft="20sp"
android:layout_marginRight="20sp"
android:layout_width="3"
android:layout_height="match_parent"
android:background="#ff00ee" />
案例(底部導航)
<?xml version="1.0" encoding="utf-8"?>
<LinearLayout
xmlns:android="http://schemas.android.com/apk/res/android"
android:layout_width="match_parent"
android:layout_height="match_parent"
android:orientation="horizontal"
>
<LinearLayout
android:layout_width="match_parent"
android:layout_height="80sp"
android:layout_gravity="bottom"
android:background="@android:color/holo_purple">
<LinearLayout
android:layout_width="0sp"
android:layout_height="match_parent"
android:layout_weight="1"
android:orientation="vertical"
android:gravity="center">
<ImageView
android:layout_width="60dp"
android:layout_height="60dp"
android:src="@mipmap/ic_launcher"/>
<TextView
android:layout_width="wrap_content"
android:layout_height="wrap_content"
android:text="one"
android:textSize="20sp"/>
</LinearLayout>
<View
android:layout_marginLeft="20sp"
android:layout_marginRight="20sp"
android:layout_width="3"
android:layout_height="match_parent"
android:background="#ff00ee" />
<LinearLayout
android:layout_width="0sp"
android:layout_height="match_parent"
android:layout_weight="1"
android:orientation="vertical"
android:gravity="center">
<ImageView
android:layout_width="60dp"
android:layout_height="60dp"
android:src="@mipmap/ic_launcher"/>
<TextView
android:layout_width="wrap_content"
android:layout_height="wrap_content"
android:text="two"
android:textSize="20sp"/>
</LinearLayout>
<View
android:layout_marginLeft="20sp"
android:layout_marginRight="20sp"
android:layout_width="3"
android:layout_height="match_parent"
android:background="#ff00ee" />
<LinearLayout
android:layout_width="0sp"
android:layout_height="match_parent"
android:layout_weight="1"
android:orientation="vertical"
android:gravity="center">
<ImageView
android:layout_width="60dp"
android:layout_height="60dp"
android:src="@mipmap/ic_launcher"/>
<TextView
android:layout_width="wrap_content"
android:layout_height="wrap_content"
android:text="three"
android:textSize="20sp"/>
</LinearLayout>
</LinearLayout>
</LinearLayout>
以上內容給大家介紹了Android布局之LinearLayout線性布局的相關知識,希望大家喜歡。
 android - UI知識
前言對ios和android使用同一套ios的交互設計這種做法不置可否,畢竟很多人都這麼干,對此我們在開發中就要能夠換算出適合分辨率的尺寸大小,我們可直接對比雙方的分辨率
 android SlidingTabLayout實現ViewPager頁卡滑動效果
先來張效果圖(可以滑動切換頁卡) 主頁面布局文件 remind_auction_new_list.xml : 主頁面代碼: public c
 自定義控件——可拖拽排序的ListView
前言最經研究了一下拖拽排序的ListView,跟酷狗裡的播放列表排序一樣,但因為要添加自己特有的功能,所以研究了好長時間。一開始接觸的是GitHub的開源項目&mdash
 Activity啟動模式
最近學習了Activity的啟動模式,這裡記錄下,以便以後回顧Activity有四種啟動模式,分別為:* standard* singleTop* singleTask*