編輯:關於Android編程
本文實例講述了Android基於API的Tabs3實現仿優酷tabhost效果。分享給大家供大家參考,具體如下:
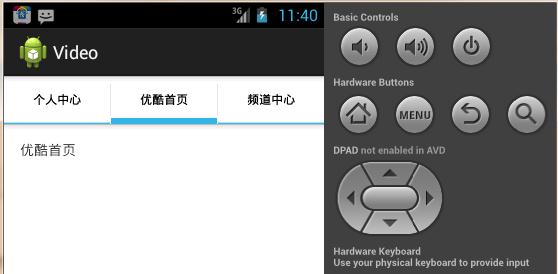
前兩天老師就讓自己寫個視頻播放器客戶端,這個是他上課講的一個小小demo,通過查看安卓API的tabs3,實現仿優酷視頻客戶端的tabhost效果。我的API路徑是D:\android\sdk\samples\android-17\ApiDemos\src\com\example\android\apis\view下的Tabs3,下面是實現效果:

廢話不多說了,直接上碼:
MainActivity.java
package com.example.video;
import android.os.Bundle;
import android.R.layout;
import android.app.Activity;
import android.app.TabActivity;
import android.content.Intent;
import android.view.LayoutInflater;
import android.view.Menu;
import android.widget.TabHost;
public class MainActivity extends TabActivity {
  public TabHost tabHost;
  @Override
  protected void onCreate(Bundle savedInstanceState) {
    super.onCreate(savedInstanceState);
    //獲取對象
    tabHost = getTabHost();
    tabHost.addTab(tabHost.newTabSpec("myself")
        .setIndicator("個人中心")
        .setContent(new Intent(this, MySelfActivity.class)));
    tabHost.addTab(tabHost.newTabSpec("myindex")
        .setIndicator("優酷首頁")
        .setContent(new Intent(this, MyIndexActivity.class)));
    tabHost.addTab(tabHost.newTabSpec("mycenter")
        .setIndicator("頻道中心")
        .setContent(new Intent(this, MyCenterActivity.class)));
    //指定的當前的tab
    //通過索引指定 索引從0開始
    tabHost.setCurrentTab(0); //從零開始
    //通過標識來激活
   // tabHost.setCurrentTabByTag("XXX1");
  }
  @Override
  public boolean onCreateOptionsMenu(Menu menu) {
    // Inflate the menu; this adds items to the action bar if it is present.
    getMenuInflater().inflate(R.menu.main, menu);
    return true;
  }
}
MyCenterActivity.java
package com.example.video;
import android.app.Activity;
import android.os.Bundle;
public class MyCenterActivity extends Activity{
  @Override
  protected void onCreate(Bundle savedInstanceState) {
    super.onCreate(savedInstanceState);
    setContentView(R.layout.activity_mycenter);
  }
}
MyIndexActivity.java
package com.example.video;
import android.app.Activity;
import android.os.Bundle;
public class MyIndexActivity extends Activity{
  @Override
  protected void onCreate(Bundle savedInstanceState) {
    super.onCreate(savedInstanceState);
    setContentView(R.layout.activity_myindex);
  }
}
MySelfActivity.java
package com.example.video;
import android.app.Activity;
import android.os.Bundle;
public class MySelfActivity extends Activity{
  @Override
  protected void onCreate(Bundle savedInstanceState) {
    super.onCreate(savedInstanceState);
    setContentView(R.layout.activity_myself);
  }
}
下面是布局文件:
activity_mycenter.xml
<RelativeLayout xmlns:android="http://schemas.android.com/apk/res/android"
  xmlns:tools="http://schemas.android.com/tools"
  android:layout_width="match_parent"
  android:layout_height="match_parent"
  android:paddingBottom="@dimen/activity_vertical_margin"
  android:paddingLeft="@dimen/activity_horizontal_margin"
  android:paddingRight="@dimen/activity_horizontal_margin"
  android:paddingTop="@dimen/activity_vertical_margin"
  tools:context=".MainActivity" >
  <TextView
    android:layout_width="wrap_content"
    android:layout_height="wrap_content"
    android:text="優酷中心" />
</RelativeLayout>
activity_myindex.xml
<TextView
  android:layout_width="wrap_content"
  android:layout_height="wrap_content"
  android:text="優酷首頁" />
activity_myself.xml
<TextView
    android:layout_width="wrap_content"
    android:layout_height="wrap_content"
    android:text="個人首頁" />
當然別忘了在清單文件中配置activity
<!-- 配置activity組件 -->
<activity android:name="com.example.video.MyIndexActivity"/>
<activity android:name="com.example.video.MySelfActivity"/>
<activity android:name="com.example.video.MyCenterActivity"/>
希望本文所述對大家Android程序設計有所幫助。
 安卓實現高斯模糊
關於如何對圖片進行模糊處理,網上方法比較多,常用而又便捷的方法就是使用高斯模糊,但網上的方法大多效果並不理想,今天分享一個之前項目中用到的模糊處理方法來實現高斯模糊,好了
 Android仿人人網滑動側邊欄效果
很多應用為了節省空間而又使界面能夠充足的顯示信息,大多數應用都采用了側邊欄的方式,如下圖: 來說說它
 UIView 繪制渲染機制
APP頁面優化對小編來說一直是難題,最近一直在不斷的學習和總結 ,發現APP頁面優化說到底離不開view的繪制和渲染機制。網上有很多精彩的博客,小編借鑒之前N多大牛研究成
 android http——OkHttp使用詳解
okhttp已經被google認定為推薦的android請求框架,我們也可以在as中直接加入:okhttp的依賴庫是:compile 'com.squareup.