編輯:關於Android編程
本文實例分析了Android編程中activity的完整生命周期。分享給大家供大家參考,具體如下:
android中 activity有自己的生命周期,對這些知識的學習可以幫助我們在今後寫程序的時候,更好的理解其中遇到的一些錯誤。這篇文章很長,希望不要耽誤大家的時間~
今天不會涉及太多關於activity棧的東西,主要說activity自身的生命周期
區分幾個概念
1 Activity 官方解釋為 “An Activity is an application component that provides a screen with which users can interact in order to do something, such as dial the phone, take a photo, send an email, or view a map. Each activity is given a window in which to draw its user interface. ”也就是用戶用來交互的每一個窗口,用戶當前正在進行的一個操作。
2 back-stack 用戶通過觸摸程序會通過application launcher來啟動一個activity A,啟動的activity A會被壓入棧頂,如果當前的activity A再啟動一個新的activity B,那麼此時A調用onStop函數,系統會維護這個activity信息.當用戶按下back鍵的時候,back stack會進行一個pop的操作,並且調用A的onResume() 具體的進出棧細節,以後會詳細介紹。
3 Tasks 當用戶處於某個activi提: Activity A在名稱為"TaskOne應用ty的時候,按下HOME鍵用戶返回到launcher,此時,如果用戶再觸摸新的應用,則新建一個Task,一個back stack就代表一個task.不同程序的activity可以壓入同一個棧中,也就是說可以組成一個task,比如你的程序啟動了一個系統自帶的發短信的activity,給用戶的感覺就是發短信好像是你的程序中的一個功能一樣。
注釋:以上的行為均為系統的默認設置,有兩種方式可以改變activity的行為,加入A啟動B,一是在B的manifest設置中,改變行為,另一種是在Activity發起的intent中指定要啟動的activity設置,其中Intent的優先級要高於manifest.xml文件,並且有些mode在並不是同時都存在於兩種方式中。
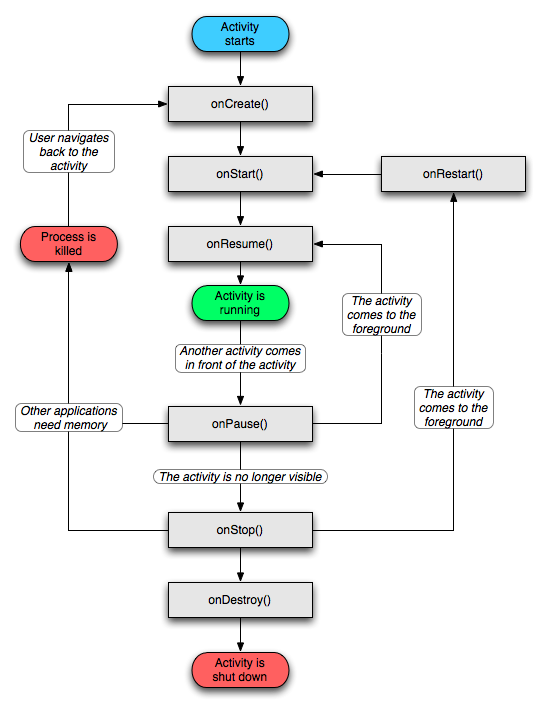
android的生命周期包括 onCreate onStart onRestart onResume onPause onStop onDestroy ,activity在聲明周期中會調用以上方法來執行不同狀態對應的操作,下面介紹各個方法的調用時間
onCreate() 次狀態下activity不可被終結
Called when the activity is first created. This is where you should do all of your normal static set up: create views, bind data to lists, etc. This method also provides you with a Bundle containing the activity's previously frozen state, if there was one.
Always followed by onStart().
//當activity第一次被創建的時候調用。你應該在這個方法裡進行所有的靜態創建,創建views,(通過setContnetView方法)向lists綁定數據等等。如果存在保存的狀態的話,該方法也提供給你一個包含activity最近狀態的一個bundle。onStart方法總是在此方法之後調用
onRestart() 次狀態下activity不可被終結
Called after your activity has been stopped, prior to it being started again.
Always followed by onStart()
//在你的activity停止後被調用,在重新開始之前調用
onResume() 次狀態下activity不可被終結
Called when the activity will start interacting with the user. At this point your activity is at the top of the activity stack, with user input going to it.
Always followed by onPause().
//當activity將被啟動與用戶交互的時候被調用。此刻你的activity處於activity棧的頂端,用於用戶輸入,永遠///在onPause之後被調用
onPause() 次狀態下activity不可被終結 ,android HoneyComb系統除外
Called when the system is about to start resuming a previous activity. This is typically used to commit unsaved changes to persistent data, stop animations and other things that may be consuming CPU, etc. Implementations of this method must be very quick because the next activity will not be resumed until this method returns.
Followed by either onResume() if the activity returns back to the front, or onStop() if it becomes invisible to the user.
//當系統即將重新開始以前的activity的時候被調用(不懂,自己的理解是:當當前activity要啟動新的activity的時候被調用),典型的應用是用來將還未保存的數據提交到當前的數據,(意思就是保存數據更新),停止animations和其他可能耗費CPU的操作。對此方法的實現必須快速因為下個activity直到此方法返回才會被重新開始。
當activity從back(翻譯後台不合適)轉到front(與用戶交互的狀態)的時候,onResume方法會在onPause方法之後被調用
當activity變為不可見的時候,onStop方法會在onPause之後被調用
onStop() 次狀態下activity可以被終結
Called when the activity is no longer visible to the user, because another activity has been resumed and is covering this one. This may happen either because a new activity is being started, an existing one is being brought in front of this one, or this one is being destroyed.
Followed by either onRestart() if this activity is coming back to interact with the user, or onDestroy() if this activity is going away.
//當activity對用戶不再可見時被調用,因為另一個activity已經重新開始並且覆蓋了當前activity(在棧中)。當有新的activity被啟動,或者一個存在的activity重新回到前台狀態,又或者當前的activity將被銷毀。如果activity要返回前台和用戶進行交互則在此方法後調用onReatart方法,如果當前activity要消亡,則onDestroy方法將在此方法後被調用
onDestroy() 次狀態下activity可以被終結
The final call you receive before your activity is destroyed. This can happen either because the activity is finishing (someone called finish() on it, or because the system is temporarily destroying this instance of the activity to save space. You can distinguish between these two scenarios with the isFinishing() method.
這是當你的activity被消亡時接收到的最後一個方法。調用此方法有兩種情形:一是 activity將要完成,可通過調用finish方法實現。而是系統銷毀activity的實例來釋放空間。可以使用isFinish方法來區別兩種情形。這個方法常用在onPause方法中,來判斷activity是暫停還是將終止。後面的demo將會演示這個功能。
下圖是官網的一個生命周期的演示

好了 看一下我寫的一個演示的例子吧,
MainFest.xml
<?xml version="1.0" encoding="utf-8"?>
<manifest xmlns:android="http://schemas.android.com/apk/res/android"
   package="uni.activity"
   android:versionCode="1"
   android:versionName="1.0">
  <uses-sdk android:minSdkVersion="7" />
  <application android:icon="@drawable/icon" android:label="@string/app_name">
    <activity android:name=".ActivityDemoActivity"
         android:label="@string/app_name">
      <intent-filter>
        <action android:name="android.intent.action.MAIN" />
        <category android:name="android.intent.category.LAUNCHER" />
      </intent-filter>
    </activity>
    <activity android:name=".Activity01"
         android:label="@string/app_name">
    </activity>
  </application>
</manifest>
布局文件 main.xml
<?xml version="1.0" encoding="utf-8"?>
<LinearLayout xmlns:android="http://schemas.android.com/apk/res/android"
  android:orientation="vertical"
  android:layout_width="fill_parent"
  android:layout_height="fill_parent"
  >
<TextView
  android:layout_width="fill_parent"
  android:layout_height="wrap_content"
  android:text="@string/hello"
  />
 <Button
  android:id="@+id/Button_A"
  android:text="GO to activity 2"
  android:layout_width="fill_parent"
  android:layout_height="wrap_content"
  />
</LinearLayout>
activity01.xml
<?xml version="1.0" encoding="utf-8"?>
<LinearLayout xmlns:android="http://schemas.android.com/apk/res/android"
  android:orientation="vertical"
  android:layout_width="fill_parent"
  android:layout_height="fill_parent"
  >
<TextView
  android:layout_width="fill_parent"
  android:layout_height="wrap_content"
  android:text="@string/hello"
  />
 <Button
  android:id="@+id/Button_A"
  android:text="GO to activity 2"
  android:layout_width="fill_parent"
  android:layout_height="wrap_content"
  />
</LinearLayout>
String.xml
<?xml version="1.0" encoding="utf-8"?>
<resources>
  <string name="hello">Hello World, ActivityDemoActivity!</string>
  <string name="app_name">ActivityDemo</string>
  <string name="activity01">this is activity 01</string>
</resources>
ActivityDemoActivity.java
/*
 * @author octobershiner
 * 2011 07 29
 * SE.HIT
 * 演示完整的activity的聲明周期,以及isFinish方法的調用
 * 此activity為程序入口activity
 * */
package uni.activity;
import android.app.Activity;
import android.content.Intent;
import android.os.Bundle;
import android.util.Log;
import android.view.View;
import android.view.View.OnClickListener;
import android.widget.Button;
public class ActivityDemoActivity extends Activity {
  /** Called when the activity is first created. */
  private static final String TAG = "demo";
  private Button button_A;
  @Override
  public void onCreate(Bundle savedInstanceState) {
    super.onCreate(savedInstanceState);
    setContentView(R.layout.main);
    button_A = (Button)this.findViewById(R.id.Button_A);
    button_A.setOnClickListener(new myButtonListener());
  }
  private class myButtonListener implements OnClickListener{
    @Override
    public void onClick(View v) {
      // TODO Auto-generated method stub
      Intent intent = new Intent();
      intent.setClass(ActivityDemoActivity.this, Activity01.class);
      ActivityDemoActivity.this.startActivity(intent);
      //感興趣的朋友可以取消下面的代碼注釋,來測試finish方法的使用,會發現第一個activity會被強制終止
      //ActivityDemoActivity.this.finish();
    }
  };
  protected void onStart(){
    super.onStart();
    Log.i(TAG, "The activityDemo state---->onStart");
  }
  protected void onRestart(){
    super.onRestart();
    Log.i(TAG, "The activityDemo state---->onReatart");
  }
  protected void onResume(){
    super.onResume();
    Log.i(TAG, "The activityDemo state---->onResume");
  }
  protected void onPause(){
    super.onPause();
    //調用isFinishing方法,判斷activity是否要銷毀
    Log.i(TAG, "The activityDemo state---->onPause");
    if(isFinishing()){
      Log.w(TAG, "The activityDemo will be destroyed!");
    }else{
      Log.w(TAG, "The activityDemo is just pausing!");
    }
  }
  protected void onStop(){
    super.onStop();
    Log.i(TAG, "The activityDemo state---->onStop");
  }
  protected void onDestroy(){
    super.onDestroy();
    Log.i(TAG, "The activityDemo state---->onDestroy");
  }
}
Activity01.java
/*
 * @author octobershiner
 * 2011 07 29
 * SE.HIT
 * 演示完整的activity的聲明周期,以及isFinish方法的調用
 * 此activity可由ActivityDemoActivity啟動
 * */
package uni.activity;
import android.app.Activity;
import android.os.Bundle;
import android.util.Log;
public class Activity01 extends Activity{
  private static final String TAG = "demo";
  @Override
  protected void onCreate(Bundle savedInstanceState) {
    // TODO Auto-generated method stub
    super.onCreate(savedInstanceState);
    setContentView(R.layout.activity01);
    Log.d(TAG, "The activity01 state---->onStart");
  }
   protected void onStart(){
      super.onStart();
      Log.d(TAG, "The activity01 state---->onStart");
    }
    protected void onRestart(){
      super.onRestart();
      Log.d(TAG, "The activity01 state---->onReatart");
    }
    protected void onResume(){
      super.onResume();
      Log.d(TAG, "The activity01 state---->onResume");
    }
    protected void onPause(){
      super.onPause();
      Log.d(TAG, "The activity01 state---->onPause");
      //調用isFinishing方法,判斷activity是否要銷毀
      if(isFinishing()){
        Log.w(TAG, "The activity01 will be destroyed!");
      }else{
        Log.w(TAG, "The activity01 is just pausing!");
      }
    }
    protected void onStop(){
      super.onStop();
      Log.d(TAG, "The activity01 state---->onStop");
    }
    protected void onDestroy(){
      super.onDestroy();
      Log.d(TAG, "The activity01 state---->onDestroy");
    }
}
下面是演示的結果,
操作過程是:啟動ActivityDemoActivity

然後單擊按鈕進入Activity01

(可見activity先暫停並且不會被釋放,實際是個新activity壓棧過程,然後新的activity開始,應該是onCreate然後onStart,我打印語句寫錯了,細心朋友應該看到了,當舊的activity不可見時,調用其onStop方法)
再按返回鍵回到ActivityDemoActivity

(返回後,處於棧頂的activity01會執行彈棧操作,顯示將會被destroy)
再按返回鍵 回到桌面

其實並不復雜的東邪寫的有些長了,但是基本上的顯示了activity的完整的生命周期。
希望本文所述對大家Android程序設計有所幫助。
 Android JNI的第一步——從HelloWorld開始
第一步:配置NDK運行環境 兩個工具包: com.android.ide.eclipse.ndk_23.0.2.1259578.jar android-ndk-r10(當
 Android開發之OkHttp的使用
本篇記錄的是Android開發中OkHttp框架的使用,下面介紹OkHttp庫的用法,本篇會給出OkHttp的使用demo,demo中包含了常用的get請求、post請求
 用draw9patch.bat繪制的氣泡圖片用在Android程序中有黑線
安卓開發,對話消息的氣泡框處理。如下圖所示:問題描述:1.邊緣有黑線。2.氣泡雖然能夠根據內容長短自由伸縮,但是並不能讓內容顯示在氣泡內部。 問題解決後的截圖:
 Android framwork 分析之智能指針LightRefBase ,sp,wp,RefBase
Android的framework層都是由c++來實現的 大家都知道c++最令人頭痛的莫過於內存洩漏了 ,如果是一個人開發還好 當new出來一個對象後 應該會記得dele