編輯:關於Android編程
本文實例講述了Android編程之界面跳動提示動畫效果實現方法。分享給大家供大家參考,具體如下:
上一個效果圖:
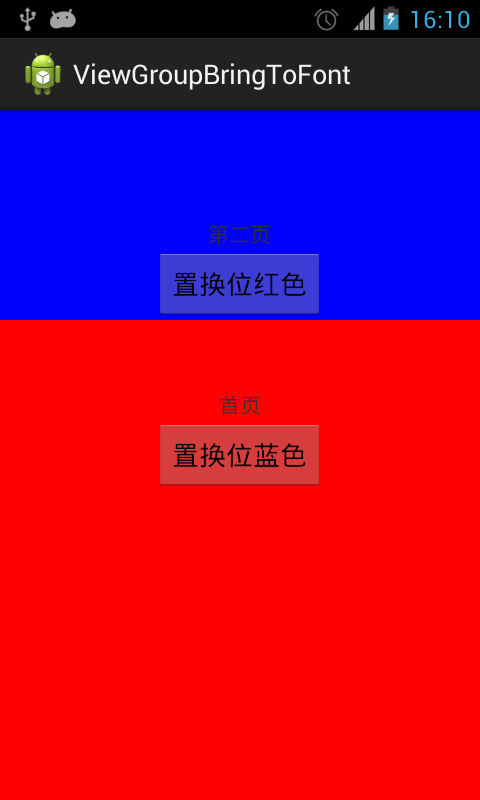
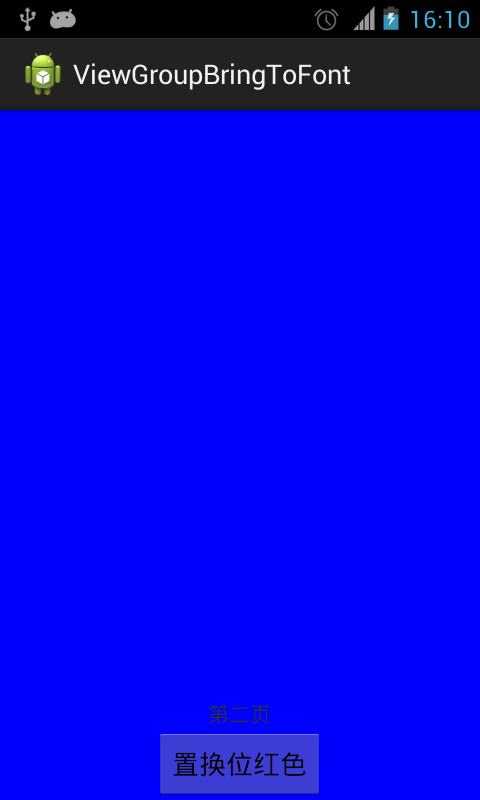
先上布局:
<RelativeLayout xmlns:android="http://schemas.android.com/apk/res/android"
 xmlns:tools="http://schemas.android.com/tools"
 android:layout_width="match_parent"
 android:layout_height="match_parent" >
 <RelativeLayout
  android:id="@+id/red"
  android:layout_width="match_parent"
  android:layout_height="match_parent"
  android:background="#ff0000" >
  <TextView
   android:layout_width="wrap_content"
   android:layout_height="wrap_content"
   android:layout_above="@+id/switch2blue"
   android:layout_centerHorizontal="true"
   android:text="首頁" />
  <Button
   android:id="@+id/switch2blue"
   android:layout_width="wrap_content"
   android:layout_height="wrap_content"
   android:layout_centerInParent="true"
   android:text="置換位藍色" />
 </RelativeLayout>
 <RelativeLayout
  android:id="@+id/blue"
  android:layout_width="match_parent"
  android:layout_height="match_parent"
  android:background="#0000ff" >
  <TextView
   android:layout_width="wrap_content"
   android:layout_height="wrap_content"
   android:layout_above="@+id/switch2red"
   android:layout_centerHorizontal="true"
   android:text="第二頁" />
  <Button
   android:id="@+id/switch2red"
   android:layout_width="wrap_content"
   android:layout_height="wrap_content"
   android:layout_alignParentBottom="true"
   android:layout_centerHorizontal="true"
   android:text="置換位紅色" />
 </RelativeLayout>
</RelativeLayout>
代碼如下:
import java.lang.reflect.Field;
import android.app.Activity;
import android.os.Bundle;
import android.os.Handler;
import android.util.DisplayMetrics;
import android.view.GestureDetector;
import android.view.MotionEvent;
import android.view.View;
import android.view.GestureDetector.OnGestureListener;
import android.view.View.OnClickListener;
import android.view.View.OnTouchListener;
import android.view.animation.AccelerateDecelerateInterpolator;
import android.view.animation.AccelerateInterpolator;
import android.view.animation.Animation;
import android.view.animation.AnimationSet;
import android.view.animation.TranslateAnimation;
import android.view.animation.Animation.AnimationListener;
import android.widget.Button;
import android.widget.RelativeLayout;
public class MainActivity extends Activity implements OnClickListener,
  OnTouchListener, OnGestureListener {
 private RelativeLayout red, blue;
 private Button switch2blue, switch2red;
 private float thisDelta = 0.05f;
 private static boolean hasEverPulled = false;
 private boolean pulled = false;
 private static int height;
 private GestureDetector gestureDetector;
 private static int statusHeight = 0;
 @Override
 protected void onCreate(Bundle savedInstanceState) {
  super.onCreate(savedInstanceState);
  setContentView(R.layout.activity_main);
  DisplayMetrics metrics = getResources().getDisplayMetrics();
  height = metrics.heightPixels;
  statusHeight = getStatusHeight();
  initView();
  // 跳動提示可以上拉
  final Handler handler = new Handler();
  handler.postDelayed(new Runnable() {
   @Override
   public void run() {
    jump(thisDelta);
    // handler.postDelayed(this, 3000);
   }
  }, 3000);
 }
 private void initView() {
  red = (RelativeLayout) findViewById(R.id.red);
  blue = (RelativeLayout) findViewById(R.id.blue);
  switch2blue = (Button) findViewById(R.id.switch2blue);
  switch2red = (Button) findViewById(R.id.switch2red);
  switch2blue.setOnClickListener(this);
  switch2red.setOnClickListener(this);
  blue.setOnTouchListener(this);
  blue.setLongClickable(true);
  gestureDetector = new GestureDetector(this, this);
 }
 @Override
 public void onClick(View arg0) {
  // TODO Auto-generated method stub
  switch (arg0.getId()) {
  case R.id.switch2blue:
   red2BlueUI();
   break;
  case R.id.switch2red:
   blue2RedUI();
   break;
  }
 }
 // 從紅頁面轉到藍頁面
 private void red2BlueUI() {
  blue.bringToFront();
  blue.requestLayout();
  blue.invalidate();
 }
 // 從藍頁面轉到紅頁面
 private void blue2RedUI() {
  red.bringToFront();
  red.requestLayout();
  red.invalidate();
 }
 // 獲取狀態欄的高度
 private int getStatusHeight() {
  Class<?> c = null;
  Object obj = null;
  Field field = null;
  int x = 0;
  int height = 0;
  try {
   c = Class.forName("com.android.internal.R$dimen");
   obj = c.newInstance();
   field = c.getField("status_bar_height");
   x = Integer.parseInt(field.get(obj).toString());
   height = getResources().getDimensionPixelSize(x);
  } catch (Exception e) {
   e.printStackTrace();
  }
  return height;
 }
 // 主頁面跳動
 private void jump(float delta) {
  if (thisDelta - 0.03f < 0.001f) {
   thisDelta = 0.05f;
   return;
  }
  thisDelta = delta;
  if (hasEverPulled) {
   return;
  }
  playJumpAnimation(thisDelta);
 }
 // 上拉/下拉主頁面
 private void pull(boolean upward) {
  if (upward && pulled) {
   return;
  }
  if (!upward && !pulled) {
   return;
  }
  float originalY;
  float finalY;
  if (!pulled) {
   originalY = 0;
   finalY = (float) (0 - height + 0.4 * height);
  } else {
   originalY = (float) (0 - height + 0.4 * height);
   finalY = 0;
  }
  pulled = !pulled;
  AnimationSet animationSet = new AnimationSet(true);
  animationSet.addAnimation(new TranslateAnimation(0, 0, originalY,
    finalY));
  animationSet.setDuration(300);
  animationSet.setInterpolator(new AccelerateDecelerateInterpolator());
  animationSet.setFillAfter(true);
  animationSet.setAnimationListener(new AnimationListener() {
   @Override
   public void onAnimationStart(Animation animation) {
    if (!pulled) {
     red2BlueUI();
    }
   }
   @Override
   public void onAnimationRepeat(Animation animation) {
   }
   @Override
   public void onAnimationEnd(Animation animation) {
    // if (pulled) {
    // blue2RedUI();
    // }
   }
  });
  blue.startAnimation(animationSet);
  hasEverPulled = true;
 }
 // 跳起動畫
 private void playJumpAnimation(final float delta) {
  float originalY = 0;
  float finalY = 0 - height * delta;
  AnimationSet animationSet = new AnimationSet(true);
  animationSet.addAnimation(new TranslateAnimation(0, 0, originalY,
    finalY));
  animationSet.setDuration(300);
  animationSet.setInterpolator(new AccelerateDecelerateInterpolator());
  animationSet.setFillAfter(true);
  animationSet.setAnimationListener(new AnimationListener() {
   @Override
   public void onAnimationStart(Animation animation) {
   }
   @Override
   public void onAnimationRepeat(Animation animation) {
   }
   @Override
   public void onAnimationEnd(Animation animation) {
    playLandAnimation(delta);
   }
  });
  blue.startAnimation(animationSet);
 }
 // 落下動畫
 private void playLandAnimation(final float delta) {
  float originalY = 0 - height * delta;
  float finalY = 0;
  AnimationSet animationSet = new AnimationSet(true);
  animationSet.addAnimation(new TranslateAnimation(0, 0, originalY,
    finalY));
  animationSet.setDuration(200);
  animationSet.setInterpolator(new AccelerateInterpolator());
  animationSet.setFillAfter(true);
  animationSet.setAnimationListener(new AnimationListener() {
   @Override
   public void onAnimationStart(Animation animation) {
   }
   @Override
   public void onAnimationRepeat(Animation animation) {
   }
   @Override
   public void onAnimationEnd(Animation animation) {
    jump(0.03f);
   }
  });
  blue.startAnimation(animationSet);
 }
 @Override
 public boolean onDown(MotionEvent e) {
  pull(false);
  return false;
 }
 @Override
 public boolean onFling(MotionEvent e1, MotionEvent e2, float velocityX,
   float velocityY) {
  // 手勢滑動達到100才觸發
  if (e1.getY() - e2.getY() > 100) {
   pull(true);
  } else if (e2.getY() >= e1.getY()) {
   pull(false);
  }
  return false;
 }
 @Override
 public void onLongPress(MotionEvent e) {
 }
 @Override
 public boolean onScroll(MotionEvent e1, MotionEvent e2, float distanceX,
   float distanceY) {
  return false;
 }
 @Override
 public void onShowPress(MotionEvent e) {
 }
 @Override
 public boolean onSingleTapUp(MotionEvent e) {
  return false;
 }
 @Override
 public boolean onTouch(View v, MotionEvent event) {
  if (pulled) {
   // 首張頁可觸控點
   if (event.getY() > height * 0.4 - statusHeight) {
    return false;
   }
  }
  return gestureDetector.onTouchEvent(event);
 }
}
希望本文所述對大家Android程序設計有所幫助。
 android事件分發流程
1.描述說到android事件的分發機制,真的是感覺既熟悉又陌生,因為每次需要用到的時候查看相關的源碼,總能找到一些所以然來,但是要根據自己理解從頭到尾說一遍,卻一點都說
 Android系統開發(2)——GDB調試工具
調試的過程我們在eclipse中來看一下一般調試的過程:1、debug模式編譯2、打上斷點3、運行調試4、單步調試step into:跳到函數體內部step over:不
 android Spinner控件詳解
Spinner提供了從一個數據集合中快速選擇一項值的辦法。默認情況下Spinner顯示的是當前選擇的值,點擊Spinner會彈出一個包含所有可選值的dropdown菜單,
 米SIM卡怎麼使用?米SIM卡怎麼設置?米SIM介紹及常見問題解答
米SIM卡是小米MIUI8升級後的一個功能,米SIM卡是一款虛擬的sim卡,小伙伴們可以不插卡就能上網,不過很多小伙伴對米SIM卡還不是很了解,那麼米SIM