編輯:關於Android編程
本文實例講述了Android普通對話框用法。分享給大家供大家參考。具體如下:
main.xml布局文件:
<?xml version="1.0" encoding="utf-8"?>
<LinearLayout xmlns:android="http://schemas.android.com/apk/res/android"
 android:orientation="vertical" android:layout_width="fill_parent"
 android:layout_height="fill_parent">
 <EditText android:text=""
  android:id="@+id/editText"
  android:layout_width="fill_parent"
  android:layout_height="wrap_content"
  android:editable="false"
  android:cursorVisible="false" />
 <Button android:text="顯示普通對話框"
  android:id="@+id/button"
  android:layout_width="fill_parent"
  android:layout_height="wrap_content" />
</LinearLayout>
AlertDialog類:
package com.ljq.dialog;
import android.app.Activity;
import android.app.Dialog;
import android.app.AlertDialog.Builder;
import android.content.DialogInterface;
import android.content.DialogInterface.OnClickListener;
import android.os.Bundle;
import android.view.View;
import android.widget.Button;
import android.widget.EditText;
public class AlertDialog extends Activity {
 private EditText editText;
 private final static int DIALOG=1;
 @Override
 public void onCreate(Bundle savedInstanceState) {
  super.onCreate(savedInstanceState);
  setContentView(R.layout.main);
  editText=(EditText)findViewById(R.id.editText);
  Button button = (Button) findViewById(R.id.button);
  button.setOnClickListener(new View.OnClickListener() {
   public void onClick(View v) {
    // 顯示對話框
    showDialog(DIALOG);
   }
  });
 }
 /**
  * 創建普通對話框
  */
 @Override
 protected Dialog onCreateDialog(int id) {
  Dialog dialog=null;
  switch (id) {
  case DIALOG:
   Builder builder=new android.app.AlertDialog.Builder(this);
   //設置對話框的圖標
   builder.setIcon(R.drawable.header);
   //設置對話框的標題
   builder.setTitle("普通對話框");
   //設置對話框的顯示內容
   builder.setMessage("這是普通對話框中的內容!!");
   //添加按鈕,android.content.DialogInterface.OnClickListener.OnClickListener
   builder.setPositiveButton(" 確 定 ", new OnClickListener(){
    public void onClick(DialogInterface dialog, int which) {
     editText.setText("這是普通對話框中的內容!!");
    }
   });
   //創建一個普通對話框
   dialog=builder.create();
   break;
  }
  return dialog;
 }
}
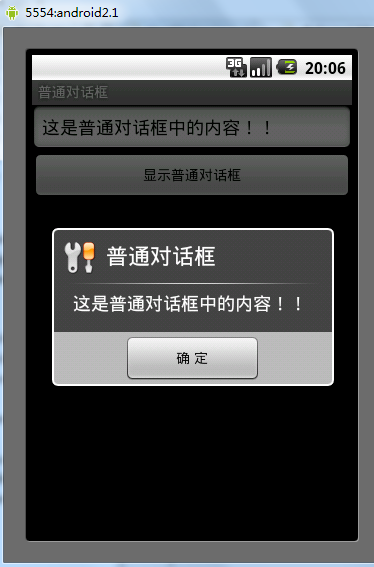
運行結果:

希望本文所述對大家的Android程序設計有所幫助。
 Android NDK——配置NDK及使用Android studio開發Hello JNI並簡單打包so庫
引言盡管Android Studio已經越來越流行了,但很多人還是習慣於Eclipse或源碼環境下開發JNI應用。筆者是從以前在學校參加谷歌大學學術合作項目的時候接觸JN
 自定義View之帶進度百分比ProgressBar
先上幾張自定義所實現的效果圖吧,有興趣的可以繼續往下看 實現思路,前四張圖呢在自定義progressbar時沒有加入text文本,文本是在xml布局時加
 Android RecyclerView添加上拉加載更多功能
上一篇文章已經介紹了如何為RecyclerView添加FootView,在此基礎上,要添加分頁加載的功能其實已經很簡單了。 上一篇文章地址:為RecyclerView添加
 Android拼圖游戲 玩轉從基礎到應用手勢變化
相信大家在小的時候都玩過拼圖游戲,現如今,手機普及,能在手機上玩的游戲越來越多,於是乎,重溫小時候,編寫這個簡易拼圖游戲,而且也能進一步加深Android的一些基礎知識。