編輯:關於Android編程
本文實例講述了Android之復選框對話框用法。分享給大家供大家參考。具體如下:
main.xml布局文件
<?xml version="1.0" encoding="utf-8"?>
<LinearLayout xmlns:android="http://schemas.android.com/apk/res/android"
 android:orientation="vertical" android:layout_width="fill_parent"
 android:layout_height="fill_parent">
 <EditText android:text=""
  android:id="@+id/editText"
  android:layout_width="fill_parent"
  android:layout_height="wrap_content"
  android:editable="false"
  android:cursorVisible="false" />
 <Button android:text="顯示復選框對話框"
  android:id="@+id/button"
  android:layout_width="fill_parent"
  android:layout_height="wrap_content" />
</LinearLayout>
array.xml數組
<?xml version="1.0" encoding="utf-8"?>
<resources>
 <string-array name="hobby">
  <item>游泳</item>
  <item>打籃球</item>
  <item>登山</item>
 </string-array>
</resources>
AlertActivity類
package com.ljq.dialog;
import android.app.Activity;
import android.app.Dialog;
import android.app.AlertDialog.Builder;
import android.content.DialogInterface;
import android.os.Bundle;
import android.view.View;
import android.widget.Button;
import android.widget.EditText;
public class AlertDialog extends Activity {
 private EditText editText;
 private final static int DIALOG=1;
 boolean[] flags=new boolean[]{false,false,false};//初始復選情況
 String[] items=null;
 @Override
 public void onCreate(Bundle savedInstanceState) {
  super.onCreate(savedInstanceState);
  setContentView(R.layout.main);
  items=getResources().getStringArray(R.array.hobby);
  editText=(EditText)findViewById(R.id.editText);
  Button button = (Button) findViewById(R.id.button);
  button.setOnClickListener(new View.OnClickListener() {
   public void onClick(View v) {
    // 顯示對話框
    showDialog(DIALOG);
   }
  });
 }
 /**
  * 創建復選框對話框
  */
 @Override
 protected Dialog onCreateDialog(int id) {
  Dialog dialog=null;
  switch (id) {
  case DIALOG:
   Builder builder=new android.app.AlertDialog.Builder(this);
   //設置對話框的圖標
   builder.setIcon(R.drawable.header);
   //設置對話框的標題
   builder.setTitle("復選框對話框");
   builder.setMultiChoiceItems(R.array.hobby, flags, new DialogInterface.OnMultiChoiceClickListener(){
    public void onClick(DialogInterface dialog, int which, boolean isChecked) {
     flags[which]=isChecked;
     String result = "您選擇了:";
     for (int i = 0; i < flags.length; i++) {
      if(flags[i]){
       result=result+items[i]+"、";
      }
     }
     editText.setText(result.substring(0, result.length()-1));
    }
   });
   //添加一個確定按鈕
   builder.setPositiveButton(" 確 定 ", new DialogInterface.OnClickListener(){
    public void onClick(DialogInterface dialog, int which) {
    }
   });
   //創建一個復選框對話框
   dialog=builder.create();
   break;
  }
  return dialog;
 }
}
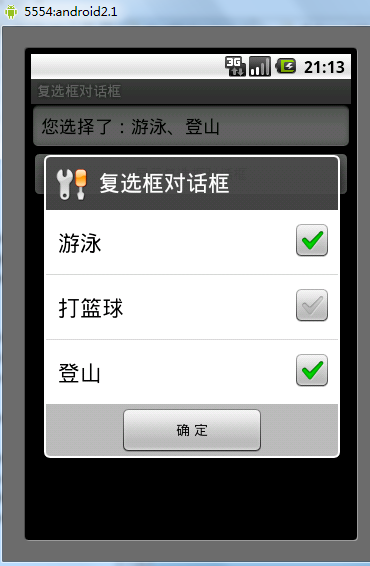
運行結果:

希望本文所述對大家的Android程序設計有所幫助。
 Android中Fragment管理及重疊問題的解決方法
一、Fragment介紹fragment在3.0被引入以後,項目使用fragment越來越多,特別是主界面是底部tab頁點擊切換更換內容,當然啦, Fragment 在項
 Android仿網易客戶端頂部導航欄效果
最近剛寫了一個網易客戶端首頁導航條的動畫效果,現在分享出來給大家學習學習。我說一下這個效果的核心原理。下面是效果圖: &nb
 從源碼上分析Android View保存數據狀態
在Android開發旅途中,經常會遇到系統控件無法滿足我們的視覺,交互效果,這個時候我們常常需要自己自定義控件來滿足我們的需求。在這個開發探索過程中,我們不可避免得遇到V
 Android-JSON簡單應用
JSON定義:JSON(JavaScript Object Notation) 是一種輕量級的數據交換格式。它基於JavaScript(Standard ECMA-262