編輯:關於Android編程
本文實例講述了Android控件之CheckBox、RadioButton用法。分享給大家供大家參考。具體如下:
CheckBox和RadioButton控件都只有選中和未選中狀態,不同的是RadioButton是單選按鈕,需要編制到一個RadioGroup中,同一時刻一個RadioGroup中只能有一個按鈕處於選中狀態。
以下為CheckBox和RadioButton常用方法及說明

以下為單選按鈕和復選按鈕的使用方法
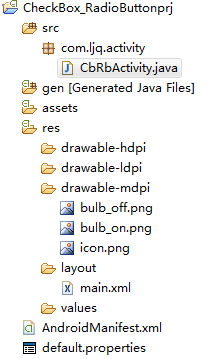
目錄結構:

main.xml布局文件:
<?xml version="1.0" encoding="utf-8"?>
<ScrollView xmlns:android="http://schemas.android.com/apk/res/android"
  android:layout_width="fill_parent"
  android:layout_height="fill_parent"
  android:scrollbars="vertical">
  <LinearLayout android:orientation="vertical"
  android:layout_width="fill_parent"
  android:layout_height="fill_parent">
    <!-- RadioButton控件演示 -->
    <ImageView android:id="@+id/imageView01"
      android:layout_width="wrap_content"
      android:layout_height="wrap_content"
      android:src="@drawable/bulb_on"
      android:layout_gravity="center_horizontal" />
    <RadioGroup android:id="@+id/radioGroup"
      android:orientation="horizontal"
      android:layout_width="wrap_content"
      android:layout_height="wrap_content"
      android:layout_gravity="center_horizontal">
      <RadioButton android:id="@+id/on"
        android:text="開燈"
        android:layout_width="wrap_content"
        android:layout_height="wrap_content"
        android:checked="true" />
      <RadioButton android:id="@+id/off"
        android:text="關燈"
        android:layout_width="wrap_content"
        android:layout_height="wrap_content" />
    </RadioGroup>
    <!-- CheckBox控件演示 -->
    <ImageView android:id="@+id/imageView02"
      android:layout_width="wrap_content"
      android:layout_height="wrap_content"
      android:src="@drawable/bulb_on"
      android:layout_gravity="center_horizontal" />
    <CheckBox android:id="@+id/checkBox"
      android:text="開燈"
      android:checked="true"
      android:layout_width="wrap_content"
      android:layout_height="wrap_content"
      android:layout_gravity="center_horizontal" />
  </LinearLayout>
</ScrollView>
CbRbActivity類:
package com.ljq.activity;
import android.app.Activity;
import android.os.Bundle;
import android.widget.CheckBox;
import android.widget.CompoundButton;
import android.widget.ImageView;
import android.widget.RadioButton;
import android.widget.CompoundButton.OnCheckedChangeListener;
public class CbRbActivity extends Activity {
  private ImageView imageView01=null;
  private ImageView imageView02=null;
  private CheckBox checkBox=null;
  private RadioButton on=null;//開燈
  @Override
  public void onCreate(Bundle savedInstanceState) {
    super.onCreate(savedInstanceState);
    setContentView(R.layout.main);
    imageView01=(ImageView)findViewById(R.id.imageView01);
    imageView02=(ImageView)findViewById(R.id.imageView02);
    checkBox=(CheckBox)findViewById(R.id.checkBox);
    on=(RadioButton)findViewById(R.id.on);
    on.setOnCheckedChangeListener(listener);
    checkBox.setOnCheckedChangeListener(listener);
  }
  OnCheckedChangeListener listener=new OnCheckedChangeListener(){
    public void onCheckedChanged(CompoundButton buttonView,
        boolean isChecked) {
      if(buttonView instanceof RadioButton){
        imageView01.setImageResource(isChecked?R.drawable.bulb_on:R.drawable.bulb_off);
      }else if(buttonView instanceof CheckBox){
        checkBox.setText(isChecked?"開燈":"關燈");
        imageView02.setImageResource(isChecked?R.drawable.bulb_on:R.drawable.bulb_off);
      }
    }
  };
}
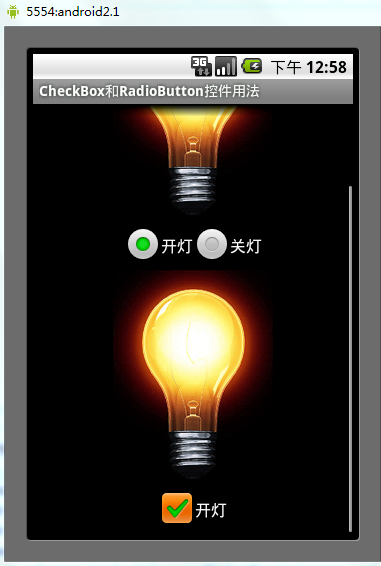
運行結果:

希望本文所述對大家的Android程序設計有所幫助。
 Android Matrix源碼詳解
Matrix的數學原理在Android中,如果你用Matrix進行過圖像處理,那麼一定知道Matrix這個類。Android中的Matrix是一個3 x 3的矩陣,其內容
 Android筆記之:onConfigurationChanged詳解
從事Android開發,免不了會在應用裡嵌入一些廣告SDK,在嵌入了眾多SDK後,發現幾乎每個要求在AndroidManifest.xml申明Activity的廣告SDK
 Android簡易實戰教程--第十話《模仿騰訊手機助手小火箭發射詳解》
首先,定義一個服務,在這個服務裡面,完成土司的創建(小火箭布局創建)煙的效果屬於動畫播放,而且要依托一個activity。(這個activity要定義為透明狀態)定義煙的
 unity 日志系統
我們在開發中,往往會覺得unity自帶的日志系統不是那麼好用,比如,不能篩選日志,不能打印在屏幕上,想生成自己的日志文件,等等等等的需求,這時候就需要自己來擴展編輯器的相