編輯:關於Android編程
本文實例講述了Android編程之藍牙測試。分享給大家供大家參考。具體分析如下:
一、軟件平台:
win7 + eclipse + sdk
二、設計思路:
配合倒計時定時器實現藍牙打開,可見,掃描三個功能
三、源代碼:
main.xml:
<?xml version="1.0" encoding="utf-8"?>
<LinearLayout xmlns:android="http://schemas.android.com/apk/res/android"
 android:layout_width="fill_parent"
 android:layout_height="fill_parent" android:orientation="vertical">
 <TextView android:id="@+id/textView1" android:layout_width="wrap_content" android:text="TextView" android:layout_height="wrap_content"></TextView>
 <LinearLayout android:layout_width="match_parent" android:layout_height="wrap_content" android:id="@+id/linearLayout1">
  <Button android:id="@+id/button1" android:text="OFF" android:layout_width="wrap_content" android:layout_height="wrap_content"></Button>
 </LinearLayout>
 <LinearLayout android:layout_width="match_parent" android:layout_height="wrap_content" android:id="@+id/linearLayout2">
  <Button android:id="@+id/button2" android:text="開啟可見 " android:layout_width="wrap_content" android:layout_height="wrap_content"></Button>
  <TextView android:id="@+id/textView2" android:layout_width="wrap_content" android:layout_height="wrap_content" android:text="設備不可見 "></TextView>
 </LinearLayout>
 <LinearLayout android:layout_width="match_parent" android:layout_height="wrap_content" android:id="@+id/linearLayout3">
  <Button android:id="@+id/button3" android:text="掃描:OFF" android:layout_width="wrap_content" android:layout_height="wrap_content"></Button>
  <TextView android:id="@+id/textView3" android:layout_width="wrap_content" android:layout_height="wrap_content" android:text="停止掃描 "></TextView>
 </LinearLayout>
 <ListView android:id="@+id/listView1" android:layout_height="wrap_content" android:layout_width="match_parent"></ListView>
</LinearLayout>
test_bluetooth.java:
package com.test_bluetooth;
import java.util.Set;
import android.app.Activity;
import android.bluetooth.BluetoothAdapter;
import android.bluetooth.BluetoothDevice;
import android.content.BroadcastReceiver;
import android.content.Context;
import android.content.Intent;
import android.content.IntentFilter;
import android.os.Bundle;
import android.os.CountDownTimer;
import android.view.View;
import android.widget.ArrayAdapter;
import android.widget.Button;
import android.widget.ListView;
import android.widget.TextView;
public class test_bluetooth extends Activity implements View.OnClickListener
{
 private static final int REQUEST_ENABLE_BT = 2;
 TextView txt;
 TextView txt_see;
 TextView txt_scan;
 BluetoothAdapter mBluetoothAdapter;
 ArrayAdapter<String> mArrayAdapter;
 Button btn_switch;
 Button btn_see;
 Button btn_scan;
 ListView list;
 CountDownTimer see_timer;
 CountDownTimer scan_timer;
 /** Called when the activity is first created. */
 @Override
 public void onCreate(Bundle savedInstanceState)
 {
  super.onCreate(savedInstanceState);
  setContentView(R.layout.main);
  txt = (TextView)findViewById(R.id.textView1);
  txt_see = (TextView)findViewById(R.id.textView2);
  txt_scan = (TextView)findViewById(R.id.textView3);
  //綁定XML中的ListView,作為Item的容器
  list = (ListView) findViewById(R.id.listView1);
  //獲取藍牙適配器
  mBluetoothAdapter = BluetoothAdapter.getDefaultAdapter();
  mArrayAdapter = new ArrayAdapter<String>(this,android.R.layout.simple_list_item_1);
  if (mBluetoothAdapter == null)
  {
   // Device does not support Bluetooth
   txt.setText("fail");
   //退出程序
   test_bluetooth.this.finish();
  }
  btn_switch = (Button)findViewById(R.id.button1);
  btn_switch.setOnClickListener(this);
  btn_see = (Button)findViewById(R.id.button2);
  btn_see.setOnClickListener(this);
  btn_see.setEnabled(false);
  btn_scan = (Button)findViewById(R.id.button3);
  btn_scan.setOnClickListener(this);
  btn_scan.setText("掃描:OFF");
  btn_scan.setEnabled(false);
  //判斷藍牙是否已經被打開
  if (mBluetoothAdapter.isEnabled())
  {
   //打開
   btn_switch.setText("ON");
   btn_see.setEnabled(true);
   btn_scan.setEnabled(true);
  }
  see_timer = new CountDownTimer(120000,1000)
  {
   @Override
   public void onTick( long millisUntilFinished)
   {
    txt_see.setText( "剩余可見時間" + millisUntilFinished / 1000 + "秒");
   }
   @Override
   public void onFinish()
   {
    //判斷藍牙是否已經被打開
    if (mBluetoothAdapter.isEnabled())
    {
     btn_see.setEnabled(true);
     txt_see.setText( "設備不可見");
    }
   }
  };
  scan_timer = new CountDownTimer(12000,1000)
  {
   @Override
   public void onTick( long millisUntilFinished)
   {
    txt_scan.setText( "剩余掃描時間" + millisUntilFinished / 1000 + "秒");
   }
   @Override
   public void onFinish()
   {
    //判斷藍牙是否已經被打開
    if (mBluetoothAdapter.isEnabled())
    {
     btn_scan.setEnabled(true);
     //關閉掃描
     mBluetoothAdapter.cancelDiscovery();
     btn_scan.setText("掃描:OFF");
     txt_scan.setText( "停止掃描");
    }
   }
  };
 }
 @Override
 protected void onDestroy() {
  super.onDestroy();
  android.os.Process.killProcess(android.os.Process.myPid());
 }
 @Override
 public void onClick(View v)
 {
  // TODO Auto-generated method stub
  switch (v.getId())
  {
  case R.id.button1:
   {
    String str = btn_switch.getText().toString();
    if (str == "OFF")
    {
     if (!mBluetoothAdapter.isEnabled())
     {
      //打開藍牙
      Intent enableBtIntent = new Intent(BluetoothAdapter.ACTION_REQUEST_ENABLE);
      startActivityForResult(enableBtIntent, REQUEST_ENABLE_BT);
      txt.setText("s1");
      btn_see.setEnabled(true);
      btn_scan.setText("掃描:OFF");
      btn_scan.setEnabled(true);
     }
    }
    else
    {
     //關閉藍牙
     mBluetoothAdapter.disable();
     btn_switch.setText("OFF");
     mArrayAdapter.clear();
     list.setAdapter(mArrayAdapter);
     btn_see.setEnabled(false);
     btn_scan.setEnabled(false);
    }
    break;
   }
  case R.id.button2:
  {
   //開啟可見
   Intent enableBtIntent_See = new Intent(BluetoothAdapter.ACTION_REQUEST_DISCOVERABLE);
   startActivityForResult(enableBtIntent_See, 3);
   txt.setText("s1");
   btn_see.setEnabled(false);
   see_timer.start();
   break;
  }
  case R.id.button3:
  {
   String str = btn_scan.getText().toString();
   if (str == "掃描:OFF")
   {
    txt.setText("s5");
    if (mBluetoothAdapter.isEnabled())
    {
     //開始掃描
     mBluetoothAdapter.startDiscovery();
     txt.setText("s6");
     btn_scan.setText("掃描:ON");
     // Create a BroadcastReceiver for ACTION_FOUND
     final BroadcastReceiver mReceiver = new BroadcastReceiver()
     {
      @Override
      public void onReceive(Context context, Intent intent)
      {
       // TODO Auto-generated method stub
       String action = intent.getAction();
       // When discovery finds a device
       mArrayAdapter.clear();
       if (BluetoothDevice.ACTION_FOUND.equals(action))
       {
        // Get the BluetoothDevice object from the Intent
        BluetoothDevice device = intent.getParcelableExtra(BluetoothDevice.EXTRA_DEVICE);
        // Add the name and address to an array adapter to show in a ListView
        mArrayAdapter.add(device.getName() + ":" + device.getAddress());
       }
       list.setAdapter(mArrayAdapter);
      }
     };
     // Register the BroadcastReceiver
     IntentFilter filter = new IntentFilter(BluetoothDevice.ACTION_FOUND);
     registerReceiver(mReceiver, filter); // Don't forget to unregister during onDestroy
     scan_timer.start();
    }
   }
   else
   {
    //關閉掃描
    mBluetoothAdapter.cancelDiscovery();
    btn_scan.setText("掃描:OFF");
    scan_timer.cancel();
    txt_scan.setText( "停止掃描");
   }
   break;
  }
  default:
   break;
  }
 }
 public void onActivityResult(int requestCode, int resultCode, Intent data)
 {
  switch (requestCode)
  {
  case REQUEST_ENABLE_BT:
   // When the request to enable Bluetooth returns
   if (resultCode == Activity.RESULT_OK)
   {
    // Bluetooth is now enabled, so set up a chat session
    btn_switch.setText("ON");
    txt.setText("s4");
    //獲取藍牙列表
    Set<BluetoothDevice> pairedDevices = mBluetoothAdapter.getBondedDevices();
    mArrayAdapter.clear();
    // If there are paired devices
    if (pairedDevices.size() > 0)
    {
     //txt.setText("s3");
     // Loop through paired devices
     for (BluetoothDevice device : pairedDevices)
     {
      // Add the name and address to an array adapter to show in a ListView
      mArrayAdapter.add(device.getName() + ":" + device.getAddress());
     }
     list.setAdapter(mArrayAdapter);
     }
   } else
   {
    finish();
   }
  }
 }
}
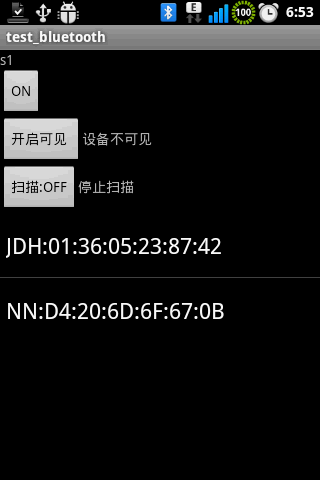
效果圖如下:

希望本文所述對大家的Android程序設計有所幫助。
 Android基礎入門教程——8.4.4 Android動畫合集之屬性動畫-又見
1.Evaluator自定義1)Evaluator介紹 上一節中的ValueAnimator的簡單實用,使用動畫的第一步都是: 調用ValueAn
 Android圖表庫MPAndroidChart(十三)——簡約的底部柱狀圖
Android圖表庫MPAndroidChart(十三)——簡約的底部柱狀圖。我們繼續上一講,今天還是說下柱狀圖,這個圖的話應該是用的比較多的,所
 ListView使用總結
雖然隨著RecyclerView的不斷普及,相應的資源也越來越多,許多的項目都在使用RecyclerView,但作為他的前輩ListView,加深對ListView的使用
 android studio 使用checkstyle全攻略
步驟:1.https://github.com/android/platform_development/blob/master/ide/intellij/codesty