編輯:關於Android編程
就目前的互聯網發展來看,已經有越來越多互聯網企業都在Android平台上部署其客戶端,並且為了提升用戶體驗,這些客戶端都做得布局合理而且美觀。本文所要介紹的Android的Style設計就是提升用戶體驗的關鍵之一。Android上的Style分為了兩個方面:
1.Theme是針對窗體級別的,改變窗體樣式;
2.Style是針對窗體元素級別的,改變指定控件或者Layout的樣式。
Android系統的themes.xml和style.xml(位於/base/core/res/res/values/)包含了很多系統定義好的style,建議在裡面挑個合適的,然後再繼承修改。以下的這段代碼屬性是在Themes中比較常見的,源自Android系統本身的themes.xml:
<!-- Window attributes -->
<item name="windowBackground">@android:drawable/screen_background_dark</item>
<item name="windowFrame">@null</item>
<item name="windowNoTitle">false</item>
<item name="windowFullscreen">false</item>
<item name="windowIsFloating">false</item>
<item name="windowContentOverlay">@android:drawable/title_bar_shadow</item>
<item name="windowTitleStyle">@android:style/WindowTitle</item>
<item name="windowTitleSize">25dip</item>
<item name="windowTitleBackgroundStyle">@android:style/WindowTitleBackground</item>
<item name="android:windowAnimationStyle">@android:style/Animation.Activity</item>
至於控件的Style設計就范圍大多了,看看Eclipse的Android控件屬性編輯器[Properties]就大概知道有哪些條目,而Android內置的style.xml也只是定義每個控件的默認樣式而已。不過控件的style不建議大改,耐看的style更能讓用戶長時間使用軟件。另外,控件的Style在很多情況下都用到9.png,學習9.png就必須到/base/core/res/res/drawable-hdpi裡面看看,裡面有很多系統內置的9.png。
注意:為了研究Android的Style和Theme,強烈建議下載Android的base.git!
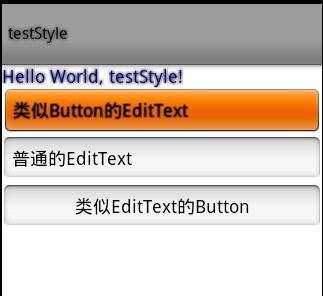
先來看看本文程序的效果,如下圖所示:

本文程序的themes.xml代碼如下,自定義了WindowTitle,:
<?xml version="1.0" encoding="UTF-8"?>
<resources>
 <!--繼承Android內置的Theme.Light,位於/base/core/res/res/values/themes.xml -->
 <style name="Theme" parent="android:Theme.Light">
 <item name="android:windowFullscreen">true</item>
 <item name="android:windowTitleSize">60dip</item>
 <item name="android:windowTitleStyle">@style/WindowTitle</item>
 </style>

 <style name="WindowTitle" parent="android:WindowTitle">
 <item name="android:singleLine">true</item>
 <item name="android:shadowColor">#BB000000</item>
 <item name="android:shadowRadius">2.75</item>
 </style>
</resources>
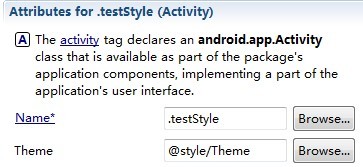
要為Activity使用theme,要麼使用代碼 setTheme(R.style.Theme),要麼在Application Manifest裡面設置如下:

本文程序的styles.xml代碼如下,background默認使用的是9.png,xml定義在/base/core/res/res/drawable/之下:
<?xml version="1.0" encoding="UTF-8"?>
<resources>
 <style name="TextView">
 <item name="android:textSize">18sp</item>
 <item name="android:textColor">#008</item>
 <item name="android:shadowColor">@android:color/black</item>
 <item name="android:shadowRadius">2.0</item>
 </style>

 <style name="EditText">
 <item name="android:shadowColor">@android:color/black</item>
 <item name="android:shadowRadius">1.0</item>
 <item name="android:background">@android:drawable/btn_default</item>
 <item name="android:textAppearance">?android:attr/textAppearanceMedium</item>
 </style>

  <style name="Button">
    <item name="android:background">@android:drawable/edit_text</item>
    <item name="android:textAppearance">?android:attr/textAppearanceMedium</item>
  </style>
</resources>
main.xml代碼如下:
<?xml version="1.0" encoding="utf-8"?>
<LinearLayout xmlns:android="http://schemas.android.com/apk/res/android"
 android:orientation="vertical" android:layout_width="fill_parent"
 android:layout_height="fill_parent">
 <TextView android:layout_width="fill_parent"
 android:layout_height="wrap_content" android:text="@string/hello"
  />
 <EditText android:id="@+id/EditText01" android:layout_height="wrap_content"
  android:layout_width="fill_parent"
 android:text="類似Button的EditText"></EditText>
 <EditText android:id="@+id/EditText02" android:layout_height="wrap_content"
 android:layout_width="fill_parent" android:text="普通的EditText"></EditText>
 <Button android:id="@+id/Button01" android:layout_height="wrap_content"
  android:layout_width="fill_parent" android:text="類似EditText的Button"></Button>
</LinearLayout>
 Android Scroller簡單用法
1.知識點 在了解Scorller類之前應先知道View的ScrollTo(int x, int y)/ScrollBy(int x, int y)之間的區別,了解什
 Android Ethernet從上至下解析一
最近遇到不少框架問題,比如關於網口的,開機後拔掉有線網,狀態欄和設置項中有線網顯示圖標不會更新,還有雙網口的需求,下面就帶著這個問題,以跟蹤網絡狀態問題為引線,本篇將貫穿
 Android 標題欄(一)
標題欄在每個應用中都有,有各種各樣的標題欄,今天我們就主要來說說標題欄怎麼做,主要內容涉及到自定義標題,ActionBar,Toolbar等知識。自定義標題幾年前開發安卓
 結合源碼分析ViewGroup中事件分發流程
序言這篇博文不是對事件分發機制全面的介紹,只是從源碼的角度分析ACTION_DOWN、ACTION_MOVE、ACTION_UP事件在ViewGroup中的分發邏輯,了解