編輯:關於Android編程
本文實例介紹一下PopupWindow對話框。PopupWindow是阻塞對話框,只有在外部線程 或者 PopupWindow本身做退出操作才可以執行。PopupWindow完全依賴Layout做外觀,在常見的開發中,PopupWindow應該會與AlertDialog常混用。
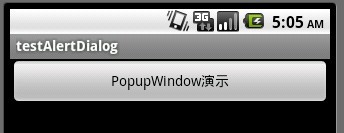
先貼出本例中運行的結果圖:

main.xml的源碼如下:
<?xml version="1.0" encoding="utf-8"?>
<LinearLayout xmlns:android="http://schemas.android.com/apk/res/android"
  android:orientation="vertical"
  android:layout_width="fill_parent"
  android:layout_height="fill_parent"
  >
<Button android:id="@+id/Button01" android:layout_height="wrap_content" android:layout_width="fill_parent" android:text="PopupWindow演示"></Button>
</LinearLayout>
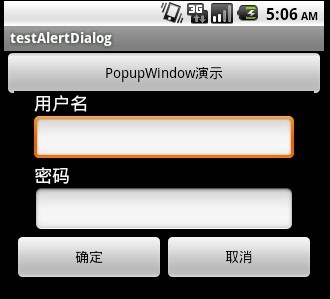
下圖所示是PopupWindow彈出的截圖,這裡的PopupWindow是個登錄框,點“確定”則自動填寫,點“取消”則關閉PopupWindow。

popupwindow.xml的源碼如下:
<?xml version="1.0" encoding="utf-8"?>

<LinearLayout xmlns:android="http://schemas.android.com/apk/res/android"
 android:layout_width="fill_parent" android:layout_height="wrap_content"
 android:orientation="vertical" android:background="#000000">

 <TextView android:id="@+id/username_view"
 android:layout_height="wrap_content"
 android:layout_marginLeft="20dip"
 android:layout_marginRight="20dip" android:text="用戶名"
 android:textAppearance="?android:attr/textAppearanceMedium" android:layout_width="fill_parent"/>

 <EditText android:id="@+id/username_edit"
 android:layout_height="wrap_content"
 android:layout_width="fill_parent" android:layout_marginLeft="20dip"
 android:layout_marginRight="20dip" android:capitalize="none"
 android:textAppearance="?android:attr/textAppearanceMedium" />

 <TextView android:id="@+id/password_view"
 android:layout_height="wrap_content"
 android:layout_marginLeft="20dip"
 android:layout_marginRight="20dip" android:text="密碼"
 android:textAppearance="?android:attr/textAppearanceMedium" android:layout_width="fill_parent"/>

 <EditText android:id="@+id/password_edit"
 android:layout_height="wrap_content"
 android:layout_width="fill_parent" android:layout_marginLeft="20dip"
 android:layout_marginRight="20dip" android:capitalize="none"
 android:password="true"
 android:textAppearance="?android:attr/textAppearanceMedium" />

<LinearLayout android:id="@+id/LinearLayout01" android:layout_height="wrap_content" android:layout_width="fill_parent" android:gravity="center"><Button android:layout_width="wrap_content" android:layout_height="wrap_content" android:id="@+id/BtnOK" android:layout_weight="100" android:text="確定"></Button><Button android:layout_width="wrap_content" android:layout_height="wrap_content" android:layout_weight="100" android:text="取消" android:id="@+id/BtnCancel"></Button></LinearLayout>
</LinearLayout>
接下來是Java程序源碼:
package com.testAlertDialog;

import android.app.Activity;
import android.app.AlertDialog;
import android.content.Context;
import android.content.DialogInterface;
import android.os.Bundle;
import android.text.Editable;
import android.view.Gravity;
import android.view.LayoutInflater;
import android.view.View;
import android.view.View.OnClickListener;
import android.widget.Button;
import android.widget.EditText;
import android.widget.PopupWindow;


public class testAlertDialog extends Activity {
 Button btnPopupWindow;
  /** Called when the activity is first created. */
  @Override
  public void onCreate(Bundle savedInstanceState) {
    super.onCreate(savedInstanceState);
    setContentView(R.layout.main);
    //定義按鈕
    btnPopupWindow=(Button)this.findViewById(R.id.Button01);
    btnPopupWindow.setOnClickListener(new ClickEvent());
  }


  //統一處理按鍵事件
  class ClickEvent implements OnClickListener{

   @Override
   public void onClick(View v) {
   // TODO Auto-generated method stub
   if(v==btnPopupWindow)
   {
    showPopupWindow(testAlertDialog.this,
     testAlertDialog.this.findViewById(R.id.Button01));
   }
   }
  }

 public void showPopupWindow(Context context,View parent){
 LayoutInflater inflater = (LayoutInflater)
    context.getSystemService(Context.LAYOUT_INFLATER_SERVICE);
   final View vPopupWindow=inflater.inflate(R.layout.popupwindow, null, false);
   final PopupWindow pw= new PopupWindow(vPopupWindow,300,300,true);

   //OK按鈕及其處理事件
    Button btnOK=(Button)vPopupWindow.findViewById(R.id.BtnOK);
    btnOK.setOnClickListener(new OnClickListener(){
  @Override
  public void onClick(View v) {
  //設置文本框內容
    EditText edtUsername=(EditText)vPopupWindow.findViewById(R.id.username_edit);
    edtUsername.setText("username");
    EditText edtPassword=(EditText)vPopupWindow.findViewById(R.id.password_edit);
    edtPassword.setText("password");
  }
    });

   //Cancel按鈕及其處理事件
    Button btnCancel=(Button)vPopupWindow.findViewById(R.id.BtnCancel);
    btnCancel.setOnClickListener(new OnClickListener(){
  @Override
  public void onClick(View v) {
  pw.dismiss();//關閉
  }
    });
    //顯示popupWindow對話框
   pw.showAtLocation(parent, Gravity.CENTER, 0, 0);
 }
}
 Android Dialog 設置字體大小的具體方法
先看下面圖片:這是我在做登錄頁面的時候,調用系統的ProgressDialog 進行等待,可是看起來很不協調,左邊的等待圖片過大,右邊文字過小,看起來老別扭,雖然功能上不
 Android入門之LinearLayout、AbsoluteLayout的用法實例講解
本文實例介紹了Android中LinearLayout、AbsoluteLayout的用法,希望能對於初學Android的朋友起到一點幫助作用。具體內容如下:Androi
 android調用web service(cxf)實例應用詳解
Google為ndroid平台開發Web Service提供了支持,提供了Ksoap2-android相關架包 1.下載該夾包可以直接登錄http://code.goog
 Android之旅十八 百度地圖環境搭建
在android中使用百度地圖,我們可以先看看百度地圖相應的SDK信息:http://developer.baidu.com/map/index.php?title=an