編輯:關於Android編程
本文實例講述的是AlertDialog,這種對話框會經常遇到。AlertDialog跟WIN32開發中的Dialog不一樣,AlertDialog是非阻塞的,而阻塞的對話框用的是PopupWindow。
先貼出該程序運行的截圖:
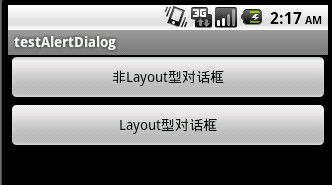
main.xml的源碼:
<?xml version="1.0" encoding="utf-8"?>
<LinearLayout xmlns:android="http://schemas.android.com/apk/res/android"
  android:orientation="vertical"
  android:layout_width="fill_parent"
  android:layout_height="fill_parent"
  >

<Button android:id="@+id/Button01" android:layout_height="wrap_content" android:text="非Layout型對話框" android:layout_width="fill_parent"></Button>
<Button android:id="@+id/Button02" android:layout_height="wrap_content" android:text="Layout型對話框" android:layout_width="fill_parent"></Button><View android:id="@+id/View01" android:layout_width="wrap_content" android:layout_height="wrap_content"></View>

</LinearLayout>
下圖是非Layout型對話框,直接使用AlertDialog
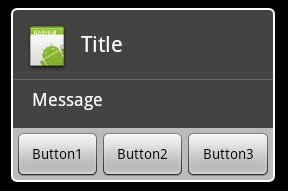
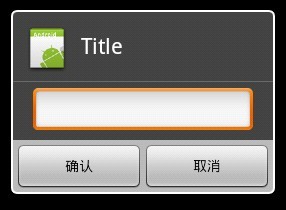
下圖是使用了Layout的對話框,可以自定義控件,實現更復雜的對話框
dialoglayout.xml的源碼:
<?xml version="1.0" encoding="utf-8"?>

<LinearLayout xmlns:android="http://schemas.android.com/apk/res/android"
 android:layout_width="fill_parent" android:layout_height="wrap_content"
 android:orientation="vertical">
 <EditText android:layout_height="wrap_content"
 android:layout_width="fill_parent" android:layout_marginLeft="20dip"
 android:layout_marginRight="20dip" android:textAppearance="?android:attr/textAppearanceMedium" android:id="@+id/edtInput"/>
</LinearLayout>
程序源碼:
package com.testAlertDialog;

import android.app.Activity;
import android.app.AlertDialog;
import android.content.Context;
import android.content.DialogInterface;
import android.os.Bundle;
import android.view.Gravity;
import android.view.LayoutInflater;
import android.view.View;
import android.view.View.OnClickListener;
import android.widget.Button;
import android.widget.EditText;
import android.widget.PopupWindow;


public class testAlertDialog extends Activity {
 Button btnShowDialog;
 Button btnShowDialog_Layout;
  /** Called when the activity is first created. */
  @Override
  public void onCreate(Bundle savedInstanceState) {
    super.onCreate(savedInstanceState);
    setContentView(R.layout.main);
    //定義按鈕
    btnShowDialog=(Button)this.findViewById(R.id.Button01);
    btnShowDialog.setOnClickListener(new ClickEvent());
    btnShowDialog_Layout=(Button)this.findViewById(R.id.Button02);
    btnShowDialog_Layout.setOnClickListener(new ClickEvent());
  }


  //統一處理按鍵事件
  class ClickEvent implements OnClickListener{

   @Override
   public void onClick(View v) {
   // TODO Auto-generated method stub
   if(v==btnShowDialog)
    showDialog(testAlertDialog.this);

   else if(v==btnShowDialog_Layout)
    showDialog_Layout(testAlertDialog.this);

   }

  }

  //顯示基本的AlertDialog
 private void showDialog(Context context) {
 AlertDialog.Builder builder = new AlertDialog.Builder(context);
 builder.setIcon(R.drawable.icon);
 builder.setTitle("Title");
 builder.setMessage("Message");
 builder.setPositiveButton("Button1",
  new DialogInterface.OnClickListener() {
   public void onClick(DialogInterface dialog, int whichButton) {
   setTitle("點擊了對話框上的Button1");
   }
  });
 builder.setNeutralButton("Button2",
  new DialogInterface.OnClickListener() {
   public void onClick(DialogInterface dialog, int whichButton) {
   setTitle("點擊了對話框上的Button2");
   }
  });
 builder.setNegativeButton("Button3",
  new DialogInterface.OnClickListener() {
   public void onClick(DialogInterface dialog, int whichButton) {
   setTitle("點擊了對話框上的Button3");
   }
  });
 builder.show();
 }


  //顯示基於Layout的AlertDialog
 private void showDialog_Layout(Context context) {
 LayoutInflater inflater = LayoutInflater.from(this);
 final View textEntryView = inflater.inflate(
  R.layout.dialoglayout, null);
 final EditText edtInput=(EditText)textEntryView.findViewById(R.id.edtInput);
 final AlertDialog.Builder builder = new AlertDialog.Builder(context);
 builder.setCancelable(false);
 builder.setIcon(R.drawable.icon);
 builder.setTitle("Title");
 builder.setView(textEntryView);
 builder.setPositiveButton("確認",
  new DialogInterface.OnClickListener() {
   public void onClick(DialogInterface dialog, int whichButton) {
   setTitle(edtInput.getText());
   }
  });
 builder.setNegativeButton("取消",
  new DialogInterface.OnClickListener() {
   public void onClick(DialogInterface dialog, int whichButton) {
   setTitle("");
   }
  });
 builder.show();
 }
}
 Android工程的目錄結構詳解
在搭建Android開發環境及簡單地建立一個HelloWorld項目後,本篇將通過HelloWorld項目來介紹Android項目的目錄結構。本文的主要主題如下: 1、H
 Android開發中Activity創建跳轉及傳值的方法
在Android系統的江湖中有四大組件:活動(Activity), 服務(Service), 廣播接收器(Broadcast Reciver)和內容提供者(Content
 Android開源框架Image-Loader詳解
如果說評價一下哪個圖片開源庫最被廣泛使用的話,我想應該可以說是Universal-Image-Loader,在主流的應用中如果你隨便去反編譯幾個,基本都能看到他的身影,它
 Android基於google Zxing實現各類二維碼掃描效果
隨著微信的到來,二維碼越來越火爆,隨處能看到二維碼,比如商城裡面,肯德基,餐廳等等,對於二維碼掃描我們使用的是google的開源框架Zxing,我們可以去http://c