編輯:關於Android編程
首先是布局文件,這裡需要兩個布局文件,一個是放置列表控件的Activity對應的布局文件 main.xml,另一個是ListView中每一行信息顯示所對應的布局 list_item.xml 這一步需要注意的問題是ListView 控件的id要使用Android系統內置的 android:id="@android:id/list" [注意形式]
main.xml
復制代碼 代碼如下:
<?xml version="1.0" encoding="utf-8"?>
<LinearLayout xmlns:android="http://schemas.android.com/apk/res/android"
android:layout_width="match_parent"
android:layout_height="match_parent"
android:orientation="vertical" >
<ListView
android:id="@android:id/list"
android:layout_width="match_parent"
android:layout_height="match_parent"
android:padding="20dip"/>
</LinearLayout>
list_item.xml
復制代碼 代碼如下:
<?xml version="1.0" encoding="utf-8"?>
<LinearLayout xmlns:android="http://schemas.android.com/apk/res/android"
android:layout_width="match_parent"
android:layout_height="match_parent"
android:orientation="horizontal" >
<TextView
android:id="@+id/user_name"
android:layout_width="match_parent"
android:layout_height="match_parent"
android:layout_weight="1"/>
<TextView
android:id="@+id/user_id"
android:layout_width="match_parent"
android:layout_height="match_parent"
android:layout_weight="1"/>
</LinearLayout>
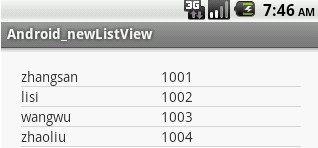
然後就設置MainActivity中的代碼了:基本思想就是先將數據添加到ArrayList中,然後在設置SimpleAdapter適配器完成設置,入下:
復制代碼 代碼如下:
package com.example.android_newlistview;
import java.util.ArrayList;
import java.util.HashMap;
import java.util.Map;
import android.os.Bundle;
import android.app.Activity;
import android.app.ListActivity;
import android.view.Menu;
import android.widget.SimpleAdapter;
public class MainActivity extends ListActivity {
String[] from={"name","id"}; //這裡是ListView顯示內容每一列的列名
int[] to={R.id.user_name,R.id.user_id}; //這裡是ListView顯示每一列對應的list_item中控件的id
String[] userName={"zhangsan","lisi","wangwu","zhaoliu"}; //這裡第一列所要顯示的人名
String[] userId={"1001","1002","1003","1004"}; //這裡是人名對應的ID
ArrayList<HashMap<String,String>> list=null;
HashMap<String,String> map=null;
@Override
protected void onCreate(Bundle savedInstanceState) {
// TODO Auto-generated method stub
super.onCreate(savedInstanceState);
setContentView(R.layout.main); //為MainActivity設置主布局
//創建ArrayList對象;
list=new ArrayList<HashMap<String,String>>();
//將數據存放進ArrayList對象中,數據安排的結構是,ListView的一行數據對應一個HashMap對象,
//HashMap對象,以列名作為鍵,以該列的值作為Value,將各列信息添加進map中,然後再把每一列對應
//的map對象添加到ArrayList中
for(int i=0; i<4; i++){
map=new HashMap<String,String>(); //為避免產生空指針異常,有幾列就創建幾個map對象
map.put("id", userId[i]);
map.put("name", userName[i]);
list.add(map);
}
//創建一個SimpleAdapter對象
SimpleAdapter adapter=new SimpleAdapter(this,list,R.layout.list_item,from,to);
//調用ListActivity的setListAdapter方法,為ListView設置適配器
setListAdapter(adapter);
}
}
另外對點擊某一行作出響應的方法是覆寫onListItemClick方法,根據返回的position(從0開始):
復制代碼 代碼如下:
@Override
protected void onListItemClick(ListView l, View v, int position, long id) {
// TODO Auto-generated method stub
super.onListItemClick(l, v, position, id);
}
 Android事件分發機制總結
理解事件的分發機制,需要對View和ViewGroup事件的分發分別探討。View和ViewGroup的區別,一個View控件是指它裡面不能再包含子控件了,常見的如Tex
 Android studio使用grdle打包
1、gradle導入jar包的特點:(和libs文件夾導入jar包的區別)gradle導入jar包更方便,一行代碼即可搞定。不像後者那樣還要自己去官方下載。如果官方將ja
 Android RecyclerView 使用解析
RecyclerView出現已經有一段時間了,相信大家肯定不陌生了,大家可以通過導入support-v7對其進行使用。 據官方的介紹,該控件用於在有限的窗口中展示大量數
 Android:仿手機QQ好友動態的ListView
1.介紹:本博客使用XListView模仿Android版QQ好友動態的ListView效果。效果截圖如下:效果圖1效果圖2這裡面主要涉及的是ListView的布局問題,