編輯:關於Android編程
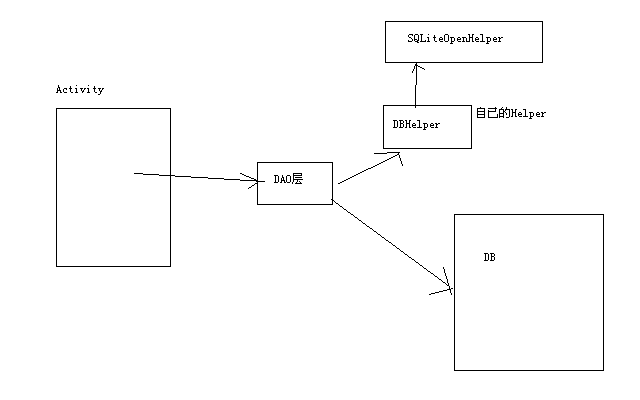
先畫個圖,了解下Android下數據庫操作的簡單流程:

1.首先,寫一個自己的數據庫操作幫助類,這個類繼承自Android自帶的SQLiteOpenHelper.
2.在自己的DAO層借助自己的Helper寫數據庫操作的一些方法
3.Activity調用DAO層的數據庫操作方法進行操作
下面例子是:
1.Helper
復制代碼 代碼如下:
package cn.learn.db.util;
import android.content.Context;
import android.database.sqlite.SQLiteDatabase;
import android.database.sqlite.SQLiteOpenHelper;
import android.database.sqlite.SQLiteDatabase.CursorFactory;
public class DBHelper extends SQLiteOpenHelper {
private final static String DB_NAME ="test.db";//數據庫名
private final static int VERSION = 1;//版本號
//自帶的構造方法
public DBHelper(Context context, String name, CursorFactory factory,
int version) {
super(context, name, factory, version);
}
//為了每次構造時不用傳入dbName和版本號,自己得新定義一個構造方法
public DBHelper(Context cxt){
this(cxt, DB_NAME, null, VERSION);//調用上面的構造方法
}
//版本變更時
public DBHelper(Context cxt,int version) {
this(cxt,DB_NAME,null,version);
}
//當數據庫創建的時候調用
public void onCreate(SQLiteDatabase db) {
String sql = "create table student(" +
"id integer primary key autoincrement," +
"name varchar(20)," +
"age int)";
db.execSQL(sql);
}
//版本更新時調用
public void onUpgrade(SQLiteDatabase db, int oldVersion, int newVersion) {
String sql = "update student ....";//自己的Update操作
db.execSQL(sql);
}
}
2.寫DAO層
復制代碼 代碼如下:
package cn.learn.db.dao;
import android.content.Context;
import android.database.sqlite.SQLiteDatabase;
import cn.learn.db.dao.domain.Student;
import cn.learn.db.util.DBHelper;
public class StudentDao {
DBHelper helper = null;
public StudentDao(Context cxt) {
helper = new DBHelper(cxt);
}
/**
* 當Activity中調用此構造方法,傳入一個版本號時,系統會在下一次調用數據庫時調用Helper中的onUpgrade()方法進行更新
* @param cxt
* @param version
*/
public StudentDao(Context cxt, int version) {
helper = new DBHelper(cxt, version);
}
// 插入操作
public void insertData(Student stu) {
String sql = "insert into student (name,age)values(?,?)";
SQLiteDatabase db = helper.getWritableDatabase();
db.execSQL(sql, new Object[] { stu.name, stu.age });
}
// 其它操作
}
完成這些,其它操作就簡單了....
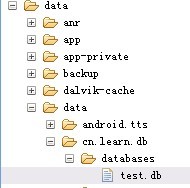
另外,數據庫文件放在這個目錄

 我的Android進階之旅------Android 5.0中出現警告的解決方法: Service Intent must be explicit:
1.錯誤描述今天在Android4.4 的小米4手機上運行我的程序的時候沒有報錯,而在Android 5.1的華為P7上運行我的程序的時候報了以下的錯誤,錯誤提示如下:E
 Android Ubuntu平台下ADB驅動的安裝
1. 確保設備已經連接正常 首先需要取得root權限,這個沒啥說的。然後用lsusb命令列一下所有USB設備,如下圖所示: 這裡可以比較清楚的看到有一個設
 Android自定義View之圖形圖像(模仿360的刷新球自定義一個SeekBar)
概述:360安全衛士的那個刷新球(姑且叫它刷新球,因為真的不知道叫什麼好,不是dota裡的刷新球!!),裡面像住了水一樣,生動可愛,看似簡單,寫起來不太簡單,本例程只是實
 Android中子線程真的不能更新UI嗎?
Android的UI訪問是沒有加鎖的,這樣在多個線程訪問UI是不安全的。所以Android中規定只能在UI線程中訪問UI。但是有沒有極端的情況?使得我們在子線程中訪問UI