編輯:關於Android編程
實驗中只需要編寫相應的xml的代碼,java代碼不需要更改,因為我們這裡只是練習android的界面設計。
線性布局:
線性布局就是將各種控件按照行或者列依次進行排列。
其中本實驗用到的各控件的屬性解釋如下:
android:layout_weight屬性是指不同的控件在activity中占有體積大小的比例。
android:paddingLeft指內邊距左的距離,即控件內文字離控件左邊邊界的距離。其它的類推。
android:gravity指控件內文字相對於控件本身的方向屬性,長度為dip,與像素獨立的長度。
android:background為控件內文字顏色的背景色,顏色采用rgb時前面需用”#”號.
android:textSize為文本的大小,單位為pt,即鎊。
android:id為該控件的id,即在此處可以設置控件的id。
android:layout_width為控件本身的寬度屬性,其它的類似。
實驗結果顯示2行字,分別設置了不同的屬性。
效果如下: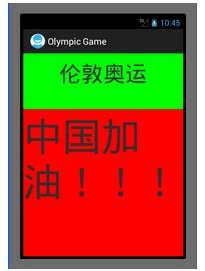
xml代碼如下:
復制代碼 代碼如下:
<LinearLayout xmlns:android="http://schemas.android.com/apk/res/android"
xmlns:tools="http://schemas.android.com/tools"
android:layout_width="match_parent"
android:layout_height="match_parent"
android:orientation="vertical" >
<!--
線性布局中
android:layout_weight屬性是指不同的控件在activity中占有體積大小的比例。
android:paddingLeft指內邊距左的距離,即控件內文字離控件左邊邊界的距離。其它的類推。
android:gravity指控件內文字相對於控件本身的方向屬性,長度為dip,與像素獨立的長度。
android:background為控件內文字顏色的背景色,顏色采用rgb時前面需用”#”號.
android:textSize為文本的大小,單位為pt,即鎊。
android:id為該控件的id,即在此處可以設置控件的id。
android:layout_width為控件本身的寬度屬性,其它的類似。
-->
<TextView
android:id="@+id/London"
android:layout_width="fill_parent"
android:layout_height="wrap_content"
android:text="倫敦奧運"
android:textSize="20pt"
android:background="#00ff00"
android:gravity="center_horizontal"
android:paddingLeft="10dip"
android:paddingRight="10dip"
android:paddingTop="10dip"
android:paddingBottom="10dip"
android:layout_weight="1"
/>
<TextView
android:id="@+id/China"
android:layout_width="fill_parent"
android:layout_height="wrap_content"
android:text="中國加油!!!"
android:textSize="35pt"
android:background="#ff0000"
android:layout_weight="3"
/>
</LinearLayout>
表格布局:
表格布局有點類似表單的意思,可以在activity中建立多行,每一行又可以設置為多列,所以看起來橫豎條理比較清晰,因此叫做表格布局。
表格布局各控件屬性與線性布局類似,本實驗用到的屬性解釋如下:
用TableRow來增加一行,然後該行內各列依次並排。
android:padding指的是內邊距的4個方向都采用同樣的間距。
android:stretchColumns屬性表示當該行屬性設置為填充屏幕時,指定將哪一列拉伸。
實驗結果為顯示2行,每一行又有4列。
效果如下: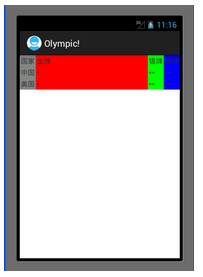
xml代碼如下:
復制代碼 代碼如下:
<TableLayout xmlns:android="http://schemas.android.com/apk/res/android"
xmlns:tools="http://schemas.android.com/tools"
android:layout_width="match_parent"
android:layout_height="match_parent"
android:stretchColumns="1"
>
<TableRow>
<TextView
android:text="國家"
android:background="#848484"
android:padding="2dip"
/>
<TextView
android:text="金牌"
android:background="#ff0000"
android:padding="2dip"
/>
<TextView
android:text="銀牌"
android:background="#00ff00"
android:padding="2dip"
/>
<TextView
android:text="銅牌"
android:background="#0000ff"
android:padding="2dip"
/>
</TableRow>
<TableRow >
<TextView
android:text="中國"
android:background="#848484"
android:padding="2dip"
/>
<TextView
android:text="*"
android:background="#ff0000"
android:padding="2dip"
/>
<TextView
android:text="**"
android:background="#00ff00"
android:padding="2dip"
/>
<TextView
android:text="***"
android:background="#0000ff"
android:padding="2dip"
/>
</TableRow>
<TableRow >
<TextView
android:text="美國"
android:background="#848484"
android:padding="2dip"
/>
<TextView
android:text="*"
android:background="#ff0000"
android:padding="2dip"
/>
<TextView
android:text="**"
android:background="#00ff00"
android:padding="2dip"
/>
<TextView
android:text="***"
android:background="#0000ff"
android:padding="2dip"
/>
</TableRow>
</TableLayout>
線性布局和表格布局混合:
混合布局原理類似,只是大的layout中嵌入小layout,且小layout中又可以嵌入不同的layout。
這次實驗將上面的2個實驗混合起來顯示的,即總的布局為垂直方向上的線性布局,上面那個布局內部又為垂直方向的布局,下面那個布局為也是一個線性布局,不過裡面嵌入了一個表格布局,所以總共有4個布局。
效果如下: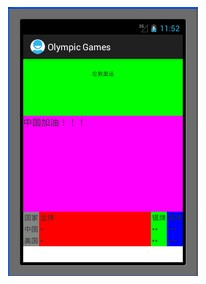
xml代碼如下:
復制代碼 代碼如下:
<LinearLayout xmlns:android="http://schemas.android.com/apk/res/android"
xmlns:tools="http://schemas.android.com/tools"
android:layout_width="match_parent"
android:layout_height="match_parent"
android:orientation="vertical">
<LinearLayout
android:layout_width="fill_parent"
android:layout_height="fill_parent"
android:orientation="vertical"
android:layout_weight="1" >
<TextView
android:id="@+id/London"
android:layout_width="fill_parent"
android:layout_height="wrap_content"
android:text="倫敦奧運"
android:textSize="5pt"
android:background="#00ff00"
android:gravity="center_horizontal"
android:padding="10pt"
android:layout_weight="1"
/>
<TextView
android:id="@+id/China"
android:layout_width="fill_parent"
android:layout_height="wrap_content"
android:text="中國加油!!!"
android:textSize="8pt"
android:background="#ff00ff"
android:layout_weight="3"
/>
</LinearLayout>
<LinearLayout
android:layout_width="fill_parent"
android:layout_height="fill_parent"
android:layout_weight="3">
<TableLayout
android:layout_width="match_parent"
android:layout_height="match_parent"
android:stretchColumns="1"
>
<TableRow>
<TextView
android:text="國家"
android:background="#848484"
android:padding="2dip"
/>
<TextView
android:text="金牌"
android:background="#ff0000"
android:padding="2dip"
/>
<TextView
android:text="銀牌"
android:background="#00ff00"
android:padding="2dip"
/>
<TextView
android:text="銅牌"
android:background="#0000ff"
android:padding="2dip"
/>
</TableRow>
<TableRow >
<TextView
android:text="中國"
android:background="#848484"
android:padding="2dip"
/>
<TextView
android:text="*"
android:background="#ff0000"
android:padding="2dip"
/>
<TextView
android:text="**"
android:background="#00ff00"
android:padding="2dip"
/>
<TextView
android:text="***"
android:background="#0000ff"
android:padding="2dip"
/>
</TableRow>
<TableRow >
<TextView
android:text="美國"
android:background="#848484"
android:padding="2dip"
/>
<TextView
android:text="*"
android:background="#ff0000"
android:padding="2dip"
/>
<TextView
android:text="**"
android:background="#00ff00"
android:padding="2dip"
/>
<TextView
android:text="***"
android:background="#0000ff"
android:padding="2dip"
/>
</TableRow>
</TableLayout>
</LinearLayout>
</LinearLayout>
實驗總結:
通過本次實驗對activity的簡單布局有了個初步的了解。
作者:tornadomeet
 Android自定義ViewGroup實戰-----流式布局
本文是參考了鴻神之後的文章之後做的一些修改與總結,添加了一些自己的筆記,增加對自定義ViewGroup的理解。文章後面會給出原文地址。首先,什麼是流式布局(FlowLay
 Android Design Support Library最新組件
Android 5.0 Lollipop是Android發布的最具意義的一個版本,這樣說的一個很重要的原因是Material Design的引入,一個新的設計語言刷新了整
 android下NDK開發環境搭建及TestJNI入門實例完整過程
1.先搭建好基本的ndk的開發環境在windows下安裝下面兩個軟件1、 Android NDK 安裝2、 安裝Cygwin與使用NDK編譯本文建立在已經完成Androi
 漫談android系統(7)-log系統1
前言羅升陽的《Android系統源代碼情景分析》一書,有關log是如何顯示,那麼真的在代碼中是如何實現的呢?就該問題我想需要細細分析bootloader層的log在fir