編輯:關於Android編程
1、xml代碼:
復制代碼 代碼如下:
<?xml version="1.0" encoding="utf-8"?>
<LinearLayout xmlns:android="http://schemas.android.com/apk/res/android"
android:orientation="vertical"
android:layout_width="fill_parent"
android:layout_height="fill_parent"
android:layout_weight="1.0"
android:background="@drawable/yellow"
>
<ImageView android:id="@+id/ImageView01"
android:layout_width="100sp"
android:layout_height="100sp"
android:layout_gravity="center_vertical"
android:background="@drawable/a"></ImageView>
<GridView
android:id="@+id/gridview"
android:layout_width="wrap_content"
android:layout_height="wrap_content"
android:numColumns="3"
android:verticalSpacing="30dip"
android:horizontalSpacing="10dip"
android:columnWidth="90dip"
android:stretchMode="columnWidth"
android:gravity="center"
android:listSelector="@drawable/c"
>
</GridView>
</LinearLayout>
其中android:numColumns="3" 代表九宮格的列數 auto_fit時為自動
2、實現代碼
復制代碼 代碼如下:
public class MainActivity extends Activity {
/** Called when the activity is first created. */
@Override
protected void onCreate(Bundle savedInstanceState) {
// TODO Auto-generated method stub
super.onCreate(savedInstanceState);
// 設置屏幕沒有標題
this.requestWindowFeature(Window.FEATURE_NO_TITLE);
// 去掉標題欄
this.getWindow().setFlags(WindowManager.LayoutParams.FLAG_FULLSCREEN,
WindowManager.LayoutParams.FLAG_FULLSCREEN);
setContentView(R.layout.activity_main);
GridView gridview = (GridView) findViewById(R.id.gridview);
// 創建一個數組列表對象
ArrayList<HashMap<String, Object>> lstImageItem = new ArrayList<HashMap<String, Object>>();
/**
* 為每個格子添加內容
*/
for (int i = 1; i < 10; i++) {
HashMap<String, Object> map = new HashMap<String, Object>();// 建立hashmap對象
if (i == 1) {
map.put("ItemImage", R.drawable.g11);
map.put("ItemText", getResources()
.getString(R.string.gridview1));
}
if (i == 2) {
map.put("ItemImage", R.drawable.g12);
map.put("ItemText", getResources()
.getString(R.string.gridview2));
}
if (i == 3) {
map.put("ItemImage", R.drawable.g13);
map.put("ItemText", getResources()
.getString(R.string.gridview3));
}
if (i == 4) {
map.put("ItemImage", R.drawable.g14);
map.put("ItemText", getResources()
.getString(R.string.gridview4));
}
if (i == 5) {
map.put("ItemImage", R.drawable.g15);
map.put("ItemText", getResources()
.getString(R.string.gridview5));
}
if (i == 6) {
map.put("ItemImage", R.drawable.g16);
map.put("ItemText", getResources()
.getString(R.string.gridview6));
}
if (i == 7) {
map.put("ItemImage", R.drawable.g17);
map.put("ItemText", getResources()
.getString(R.string.gridview7));
}
if (i == 8) {
map.put("ItemImage", R.drawable.g18);
map.put("ItemText", getResources()
.getString(R.string.gridview8));
}
if (i == 9) {
map.put("ItemImage", R.drawable.g19);
map.put("ItemText", getResources()
.getString(R.string.gridview9));
}
lstImageItem.add(map);
}
/**
* 為GridView建立SimpleAdapter適配器
*/
// SimpleAdapter()中的五個參數分別是:第一個context,第二個數據資源,第三個每一個子項的布局文件,第四個每一個子項中的Key數組
// 第五個每一個子項中的Value數組
SimpleAdapter saImageItems = new SimpleAdapter(this, lstImageItem,
R.layout.grid_item, new String[] { "ItemImage", "ItemText" },
new int[] { R.id.ItemImage, R.id.ItemText });
gridview.setAdapter(saImageItems);// 添加適配器
gridview.setOnItemClickListener(new ItemClickListener());// 為每一個子項設置監聽
}
class ItemClickListener implements OnItemClickListener {
@SuppressWarnings("unchecked")
public void onItemClick(AdapterView<?> arg0,// The AdapterView where the
// click happened
View arg1,// The view within the AdapterView that was clicked
int arg2,// The position of the view in the adapter
long arg3// The row id of the item that was clicked
) {
HashMap<String, Object> item = (HashMap<String, Object>) arg0
.getItemAtPosition(arg2);
if (item.get("ItemText").equals(
getResources().getString(R.string.gridview1))) {
Toast.makeText(MainActivity.this, R.string.gridview1,
Toast.LENGTH_LONG).show();
}
if (item.get("ItemText").equals(
getResources().getString(R.string.gridview2))) {
Toast.makeText(MainActivity.this, R.string.gridview2,
Toast.LENGTH_LONG).show();
}
if (item.get("ItemText").equals(
getResources().getString(R.string.gridview3))) {
Toast.makeText(MainActivity.this, R.string.gridview3,
Toast.LENGTH_LONG).show();
}
if (item.get("ItemText").equals(
getResources().getString(R.string.gridview4))) {
Toast.makeText(MainActivity.this, R.string.gridview4,
Toast.LENGTH_LONG).show();
}
if (item.get("ItemText").equals(
getResources().getString(R.string.gridview5))) {
Toast.makeText(MainActivity.this, R.string.gridview5,
Toast.LENGTH_LONG).show();
}
if (item.get("ItemText").equals(
getResources().getString(R.string.gridview6))) {
Toast.makeText(MainActivity.this, R.string.gridview6,
Toast.LENGTH_LONG).show();
}
if (item.get("ItemText").equals(
getResources().getString(R.string.gridview7))) {
Toast.makeText(MainActivity.this, R.string.gridview7,
Toast.LENGTH_LONG).show();
}
if (item.get("ItemText").equals(
getResources().getString(R.string.gridview8))) {
Toast.makeText(MainActivity.this, R.string.gridview8,
Toast.LENGTH_LONG).show();
}
if (item.get("ItemText").equals(
getResources().getString(R.string.gridview9))) {
Toast.makeText(MainActivity.this, R.string.gridview9,
Toast.LENGTH_LONG).show();
}
}
}
}
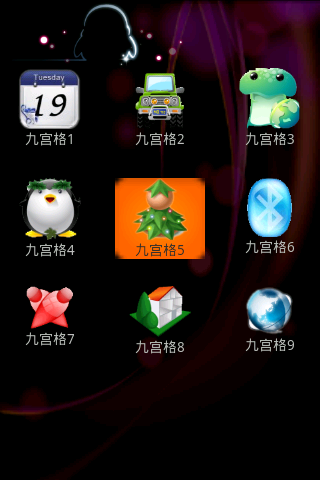
3、實現效果如圖所示

 Android textview 同時改變字符串中部分字體的顏色與大小
Android TextView 改變字體主要有兩種方法: 1、Html.fromHtml 獲取一個用html格式表示的Spanned。 2、另一種方式
 Android使用listview實現分頁刷新(線程休眠模擬)
當要顯示的數據過多時,為了更好的提升用戶感知,在很多APP中都會使用分頁刷新顯示,比如浏覽新聞,向下滑動到當前ListView的最後一條信息(item)時,會提示刷新加載
 當我們討論流暢度的時候,我們究竟在說什麼?
前言:那些年我們用過的顯示性能指標 相對其他 Android 性能指標(如內存、CPU、功耗等)而言,顯示性能(包括但不僅限於我們常說的“流暢度”)的概念本來就相對復雜
 Android ClassyShark vs ApkTool
引子作為程序員,借鑒可能是工作中所必須碰到的事情,程序員的世界裡,更多的不是從無到有,而是從有到優。那麼當我們在做一些需求或者架構調整時,可能需要參考別的成熟公司的做法,