編輯:關於Android編程
很多時候我們開發的軟件需要向用戶提供軟件參數設置功能,例如我們常用的QQ,用戶可以設置是否允許陌生人添加自己為好友。對於軟件配置參數的保存,如果是window軟件通常我們會采用ini文件進行保存,如果是 j2se應用,我們會采用properties屬性文件或者xml進行保存。如果是Android應用,我們最適合采用什麼方式保存軟件配置參數呢?Android 平台給我們提供了一個SharedPreferences類,它是一個輕量級的存儲類,特別適合用於保存軟件配置參數。使用 SharedPreferences保存數據,其背後是用xml文件存放數據,文件存放在/data/data/<package name>/shared_prefs目錄下:
SharedPreferences sharedPreferences = getSharedPreferences("ljq", Context.MODE_PRIVATE);
Editor editor = sharedPreferences.edit();//獲取編輯器
editor.putString("name", "林計欽");
editor.putInt("age", 24);
editor.commit();//提交修改
生成的ljq.xml文件內容如下:
<?xml version='1.0' encoding='utf-8' standalone='yes' ?>
<map>
<string name="name">林計欽</string>
<int name="age" value="24" />
</map>
因為SharedPreferences背後是使用xml文件保存數據,getSharedPreferences(name,mode)方法的第一個參數用於指定該文件的名稱,名稱不用帶後綴,後綴會由Android自動加上。方法的第二個參數指定文件的操作模式,共有四種操作模式,這四種模式前面介紹使用文件方式保存數據時已經講解過。如果希望SharedPreferences背後使用的xml文件能被其他應用讀和寫,可以指定Context.MODE_WORLD_READABLE和Context.MODE_WORLD_WRITEABLE權限。
另外Activity還提供了另一個getPreferences(mode)方法操作SharedPreferences,這個方法默認使用當前類不帶包名的類名作為文件的名稱。
訪問SharedPreferences中的數據
訪問SharedPreferences中的數據代碼如下:
SharedPreferences sharedPreferences = getSharedPreferences("ljq", Context.MODE_PRIVATE);
//getString()第二個參數為缺省值,如果preference中不存在該key,將返回缺省值
String name = sharedPreferences.getString("name", "");
int age = sharedPreferences.getInt("age", 1);
如果訪問其他應用中的Preference,前提條件是:該preference創建時指定了Context.MODE_WORLD_READABLE或者Context.MODE_WORLD_WRITEABLE權限。
如:有個<package name>為com.ljq.action的應用使用下面語句創建了preference。
getSharedPreferences("ljq", Context.MODE_WORLD_READABLE);
其他應用要訪問上面應用的preference,首先需要創建上面應用的Context,然後通過Context 訪問preference ,訪問preference時會在應用所在包下的shared_prefs目錄找到preference :
Context otherAppsContext = createPackageContext("com.ljq.action", Context.CONTEXT_IGNORE_SECURITY);
SharedPreferences sharedPreferences = otherAppsContext.getSharedPreferences("ljq", Context.MODE_WORLD_READABLE);
String name = sharedPreferences.getString("name", "");
int age = sharedPreferences.getInt("age", 0);
如果不通過創建Context訪問其他應用的preference,也可以以讀取xml文件方式直接訪問其他應用preference對應的xml文件,如:
File xmlFile = new File("/data/data/<package name>/shared_prefs/itcast.xml");//<package name>應替換成應用的包名
案例:
string.xml文件
復制代碼 代碼如下:
<?xml version="1.0" encoding="utf-8"?>
<resources>
<string name="hello">Hello World, SpActivity!</string>
<string name="app_name">軟件配置參數</string>
<string name="name">姓名</string>
<string name="age">年齡</string>
<string name="button">保存設置</string>
<string name="showButton">顯示</string>
</resources>
main.xml布局文件
復制代碼 代碼如下:
<?xml version="1.0" encoding="utf-8"?>
<LinearLayout xmlns:android="http://schemas.android.com/apk/res/android"
android:orientation="vertical"
android:layout_width="fill_parent"
android:layout_height="fill_parent">
<RelativeLayout
xmlns:android="http://schemas.android.com/apk/res/android"
android:layout_width="wrap_content"
android:layout_height="wrap_content">
<TextView android:layout_width="wrap_content"
android:layout_height="wrap_content"
android:text="@string/name"
android:textSize="20px"
android:id="@+id/nameLable" />
<EditText android:layout_width="80px"
android:layout_height="wrap_content"
android:layout_toRightOf="@id/nameLable"
android:layout_alignTop="@id/nameLable"
android:layout_marginLeft="10px"
android:id="@+id/name" />
</RelativeLayout>
<RelativeLayout
xmlns:android="http://schemas.android.com/apk/res/android"
android:layout_width="wrap_content"
android:layout_height="wrap_content">
<TextView android:layout_width="wrap_content"
android:layout_height="wrap_content"
android:textSize="20px"
android:text="@string/age"
android:id="@+id/ageLable" />
<EditText android:layout_width="80px"
android:layout_height="wrap_content"
android:layout_toRightOf="@id/ageLable"
android:layout_alignTop="@id/ageLable"
android:layout_marginLeft="10px"
android:id="@+id/age" />
</RelativeLayout>
<RelativeLayout
xmlns:android="http://schemas.android.com/apk/res/android"
android:layout_width="wrap_content"
android:layout_height="wrap_content">
<Button android:layout_width="wrap_content"
android:layout_height="wrap_content"
android:text="@string/button"
android:id="@+id/button" />
<Button android:layout_width="wrap_content"
android:layout_height="wrap_content"
android:text="@string/showButton"
android:layout_toRightOf="@id/button"
android:layout_alignTop="@id/button"
android:id="@+id/showButton" />
</RelativeLayout>
<TextView android:layout_width="fill_parent"
android:layout_height="wrap_content"
android:textSize="20px"
android:id="@+id/showText" />
</LinearLayout>
復制代碼 代碼如下:
package com.ljq.activity;
import android.app.Activity;
import android.content.Context;
import android.content.SharedPreferences;
import android.content.SharedPreferences.Editor;
import android.os.Bundle;
import android.view.View;
import android.widget.Button;
import android.widget.EditText;
import android.widget.TextView;
import android.widget.Toast;
public class SpActivity extends Activity {
private EditText nameText;
private EditText ageText;
private TextView resultText;
@Override
public void onCreate(Bundle savedInstanceState) {
super.onCreate(savedInstanceState);
setContentView(R.layout.main);
nameText = (EditText)this.findViewById(R.id.name);
ageText = (EditText)this.findViewById(R.id.age);
resultText = (TextView)this.findViewById(R.id.showText);
Button button = (Button)this.findViewById(R.id.button);
Button showButton = (Button)this.findViewById(R.id.showButton);
button.setOnClickListener(listener);
showButton.setOnClickListener(listener);
// 回顯
SharedPreferences sharedPreferences=getSharedPreferences("ljq123",
Context.MODE_WORLD_READABLE+Context.MODE_WORLD_WRITEABLE);
String nameValue = sharedPreferences.getString("name", "");
int ageValue = sharedPreferences.getInt("age", 1);
nameText.setText(nameValue);
ageText.setText(String.valueOf(ageValue));
}
private View.OnClickListener listener = new View.OnClickListener(){
public void onClick(View v) {
Button button = (Button)v;
//ljq123文件存放在/data/data/<package name>/shared_prefs目錄下
SharedPreferences sharedPreferences=getSharedPreferences("ljq123",
Context.MODE_WORLD_READABLE+Context.MODE_WORLD_WRITEABLE);
switch (button.getId()) {
case R.id.button:
String name = nameText.getText().toString();
int age = Integer.parseInt(ageText.getText().toString());
Editor editor = sharedPreferences.edit(); //獲取編輯器
editor.putString("name", name);
editor.putInt("age", age);
editor.commit();//提交修改
Toast.makeText(SpActivity.this, "保存成功", Toast.LENGTH_LONG).show();
break;
case R.id.showButton:
String nameValue = sharedPreferences.getString("name", "");
int ageValue = sharedPreferences.getInt("age", 1);
resultText.setText("姓名:" + nameValue + ",年齡:" + ageValue);
break;
}
}
};
}
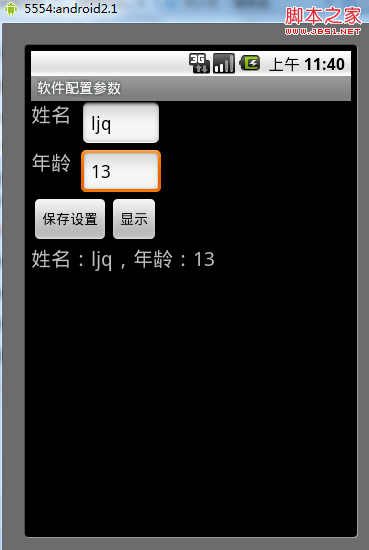
運行結果

如何訪問其他應用中的Preference?
復制代碼 代碼如下:
package com.ljq.sp;
import java.io.File;
import java.io.FileInputStream;
import android.content.Context;
import android.content.SharedPreferences;
import android.test.AndroidTestCase;
import android.util.Log;
public class AccessSharePreferenceTest extends AndroidTestCase{
private static final String TAG = "AccessSharePreferenceTest";
/**
* 訪問SharePreference的方式一,注:權限要足夠
* @throws Exception
*/
public void testAccessPreference() throws Exception{
String path = "/data/data/com.ljq.activity/shared_prefs/ljq123.xml";
File file = new File(path);
FileInputStream inputStream = new FileInputStream(file);
//獲取的是一個xml字符串
String data = new FileService().read(inputStream);
Log.i(TAG, data);
}
/**
* 訪問SharePreference的方式二,注:權限要足夠
* @throws Exception
*/
public void testAccessPreference2() throws Exception{
Context context = this.getContext().createPackageContext("com.ljq.activity",
Context.CONTEXT_IGNORE_SECURITY);
SharedPreferences sharedPreferences = context.getSharedPreferences("ljq123",
Context.MODE_WORLD_READABLE+Context.MODE_WORLD_WRITEABLE);
String name = sharedPreferences.getString("name", "");
int age = sharedPreferences.getInt("age", 1);
Log.i(TAG, name + " : " +age);
}
}
 Android可循環顯示圖像的Android Gallery組件用法實例
本文實例分析了Android可循環顯示圖像的Android Gallery組件用法。分享給大家供大家參考,具體如下:Gallery組件主要用於橫向顯示圖像列表,不過按常規
 Android研究之游戲開發處理按鍵的響應
1.onKeyDown 方法 onKeyDown 方法是KeyEvent.Callback 接口中的一個抽象方法,重寫onKeyDown 方法可以監聽到按鍵被按下的事件,
 Android實現自定義加載框的代碼示例
App在與服務器進行網絡交互的時候,需要有一個提示的加載框,如圖:此時我們可以自定義一個加載中的對話框,代碼如下:public class LoadingDialog e
 Android模擬器安裝APP出現INSTALL_FAILED_NO_MATCHING_ABIS錯誤解決方案
Android模擬器安裝APP出現INSTALL_FAILED_NO_MATCHING_ABIS錯誤解決方案當我們想在電腦的Android模擬器中安裝APP的