編輯:關於Android編程
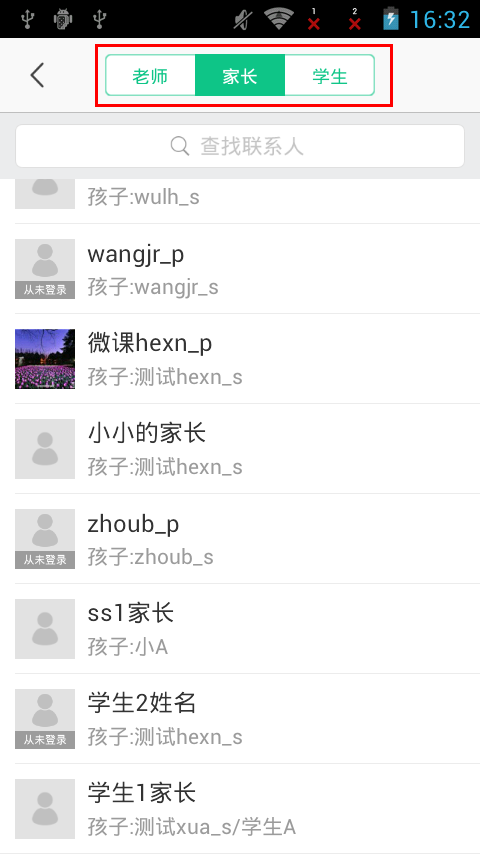
上篇介紹了導航欄下的滑動切換實現,這次要介紹的是導航欄上的切換,在很多應用中經常見到,先看效果圖。

當點擊導航條上的分類的時候,會根據選中的分類顯示下面的數據。
先看布局文件。
frameHead是自定義的導航條,需要注意的是RadioGroup控件contentLayout,這正是這篇文章介紹的切換的區域。關於RadioGroup控件這裡不詳細介紹。導航條下面是一個搜索框和Listview顯示數據。
下面看代碼。
    /**
     * 適配器顯示
     */
    private void setAdapter() {
        if (!Validators.isEmpty(typeList)) {
            getBaseMenuDtoList(typeList.get(0).getUserList());
        } else {
            getBaseMenuDtoList(new ArrayList());
        }
        getTab(typeList);
        setSelector(0);
                   addressAdapter = new AddressClassAdapter(AddressBookClassActivity.this, baseMenuDtoList, getLoginedUser()
                    .getUserId());
        }
        addressListView.setAdapter(addressAdapter);
    }
getBaseMenuDtoList( )方法用來轉換成其他對象,typeList不為空的時候,默認取第一個,給adapter裝載數據。
和上篇一樣,效果實現也是放在
getTab(typeList);
setSelector(0);
裡面。
getTab()代碼。
/**
     * 獲得切換頁
     */
    private void getTab(final List typeList) {
        roleChangeArea.removeAllViews();
        for (int i = 0; i < typeList.size(); i++) {
            RadioButton radioButton = (RadioButton) LayoutInflater.from(this).inflate(R.layout.address_class_tab_item, null);
            radioButton.setText(typeList.get(i).getOwnerName());
            if (i == 0) {
                radioButton.setBackgroundDrawable(DrawableUtils.getLeftTabDrawable(this));
            } else if (i == typeList.size() - 1) {
                radioButton.setBackgroundDrawable(DrawableUtils.getRightTabDrawable(this));
            } else {
                radioButton.setBackgroundDrawable(DrawableUtils.getCenterTabDrawable(this));
            }
            roleChangeArea.addView(radioButton);
            final int id = i;
            radioButton.setOnClickListener(new OnClickListener() {
                @Override
                public void onClick(View v) {
                    setSelector(id);
                    String word = keySearch.getEditableText().toString().trim();
                    if (TextUtils.isEmpty(word)) {
                        addressAdapter.notifyDataSetChanged(baseMenuDtoList);
                    } else {
                        doSearch(word);
                    }
                }
            });
        }
    }
其中roleChangeArea就是上面布局文件中的RadioGroup,這裡也實現了根據類型數量動態添加切換按鈕,R.layout.address_class_tab_item是一個RadioButton.
這裡介紹下,一般是在XML裡寫selector實現選中非選中的時候布局改變的,這裡換成的代碼的方式,具體可以查找StateListDrawable,這裡不加詳細介紹。這是其中的一個方法-DrawableUtils.getLeftTabDrawable(this),其他兩個類似。
public static Drawable getLeftTabDrawable(Context context){
        StateListDrawable drawable = new StateListDrawable();
        drawable.addState(new int[]{-android.R.attr.state_checked}, context.getResources().getDrawable(R.color.color_transparent));
        drawable.addState(new int[]{android.R.attr.state_checked}, context.getResources().getDrawable(R.drawable.address_class_tab_bg_left_checked));
        return drawable;
    }
String word = keySearch.getEditableText().toString().trim();
                    if (TextUtils.isEmpty(word)) {
                        addressAdapter.notifyDataSetChanged(baseMenuDtoList);
                    } else {
                        doSearch(word);
                    }
是實現搜索的這裡也不詳細介紹。
下面看下setSelector(int id)方法。
    /**
     * 選中效果
     */
    public void setSelector(int id) {
        position = id;
        RadioButton radioButton = (RadioButton) roleChangeArea.getChildAt(position);
        radioButton.setChecked(true);
        getBaseMenuDtoList(typeList.get(id).getUserList());
    }
其實就是改變狀態,不要忘記上面我們已經在代碼裡添加了相當於selector的StateListDrawable。即:
radioButton.setBackgroundDrawable(DrawableUtils.getLeftTabDrawable(this));
所以這裡
RadioButton radioButton = (RadioButton) roleChangeArea.getChildAt(position);
        radioButton.setChecked(true);
獲取到點擊的RadioButton,設置選中狀態背景就會相應改變。
getBaseMenuDtoList(typeList.get(id).getUserList());
用來加載對應的分類數據。
回到getTab()代碼。
if (TextUtils.isEmpty(word)) {
                        addressAdapter.notifyDataSetChanged(baseMenuDtoList);
                    } else {
                        doSearch(word);
                    }
可以看到當word空的時候,會刷新數據,這個數據就是上面 getBaseMenuDtoList(typeList.get(id).getUserList());裡更新的。
 Android中在GridView網格視圖上實現item拖拽交換的方法
GridView基礎新建一個HelloGridView的工程修改main.xml代碼如下:<?xml version=1.0 encoding=utf-8&
 用android的GCM 網絡管理來優化電池使用時間
?GCM網絡管理器能讓app注冊能執行面向網絡的服務,每個任務只是完成一個工作。它的API能處理這些任務,允許Google Play Services通過系統集中處理這些
 Android實現Activity、Service與Broadcaster三大組件之間互相調用的方法詳解
本文實例講述了Android實現Activity、Service與Broadcaster三大組件之間互相調用的方法。分享給大家供大家參考,具體如下:我們研究兩個問題,1、
 魅藍Max和小米Max哪個好?魅藍Max和小米Max買哪個?
魅藍Max和小米Max哪個好?在小米Max發布了四個月了,魅族旗下的子系列魅藍Max也跟隨腳步發布了,那麼對於兩款都是“MAX”的手