編輯:關於Android編程
打開/dev/graphics/fb0這個設備的調用過程如下:
1.在HWComposer中,加載module
HWComposer::HWComposer(
        const sp& flinger,
        EventHandler& handler)
{
    ...
    // Note: some devices may insist that the FB HAL be opened before HWC.
    int fberr = loadFbHalModule();
    loadHwcModule();
    ...
}
1)loadFbHalModule()直接從下面的路徑打開fb,初始化並保存framebuffer_device_t類型成員變量mFbDev。
gralloc_device_open()->fb_device_open()->mapFrameBuffer() -> mapFrameBufferLocked()
這裡gralloc_device_open定義在HAL層定義的:
 //gralloc.cpp文件中
 static struct hw_module_methods_t gralloc_module_methods = {
        .open = gralloc_device_open
};
struct private_module_t HAL_MODULE_INFO_SYM = {
    .base = {
        .common = {
            .tag = HARDWARE_MODULE_TAG,
            .version_major = 1,
            .version_minor = 0,
            .id = GRALLOC_HARDWARE_MODULE_ID,
            .name = "Graphics Memory Allocator Module",
            .author = "The Android Open Source Project",
            .methods = &gralloc_module_methods
        },
        .registerBuffer = gralloc_register_buffer,
        .unregisterBuffer = gralloc_unregister_buffer,
        .lock = gralloc_lock,
        .unlock = gralloc_unlock,
    },
    .framebuffer = 0,
    .flags = 0,
    .numBuffers = 0,
    .bufferMask = 0,
    .lock = PTHREAD_MUTEX_INITIALIZER,
    .currentBuffer = 0,
};
這個Module會在HWComposer::loadFbHalModule()中被加載,調用對應的open函數。
看以下代碼注釋
int HWComposer::loadFbHalModule()
{
    hw_module_t const* module;
    //根據GRALLOC_HARDWARE_MODULE_ID這個值,加載對應的module代碼,也就是上面說的內容
    int err = hw_get_module(GRALLOC_HARDWARE_MODULE_ID, &module);
    if (err != 0) {
        ALOGE("%s module not found", GRALLOC_HARDWARE_MODULE_ID);
        return err;
    }
    return framebuffer_open(module, &mFbDev);
}

//這裡methods->open當然就是調用上面module的open函數,也就是gralloc_device_open()
static inline int framebuffer_open(const struct hw_module_t* module,
        struct framebuffer_device_t** device) {
    return module->methods->open(module,
            GRALLOC_HARDWARE_FB0, (struct hw_device_t**)device);
}

//由於第二個參數是GRALLOC_HARDWARE_FB0,所以會跑到fb_device_open中
int gralloc_device_open(const hw_module_t* module, const char* name,
                        hw_device_t** device)
{
    int status = -EINVAL;
    if (!strcmp(name, GRALLOC_HARDWARE_GPU0)) {
        const private_module_t* m = reinterpret_cast(
            module);
        gpu_context_t *dev;
        IAllocController* alloc_ctrl = IAllocController::getInstance();
        dev = new gpu_context_t(m, alloc_ctrl);
        if(!dev)
            return status;

        *device = &dev->common;
        status = 0;
    } else {
        status = fb_device_open(module, name, device);
    }
    return status;
}

//由於name是GRALLOC_HARDWARE_FB0,會跑到if語句裡進行初始化工作,包括打開/dev/graphics/fb0等
int fb_device_open(hw_module_t const* module, const char* name,
                   hw_device_t** device)
{
    int status = -EINVAL;
    if (!strcmp(name, GRALLOC_HARDWARE_FB0)) {
        alloc_device_t* gralloc_device;
        status = gralloc_open(module, &gralloc_device);
        if (status < 0)
            return status;

        /* initialize our state here */
        fb_context_t *dev = (fb_context_t*)malloc(sizeof(*dev));
        if(dev == NULL) {
            gralloc_close(gralloc_device);
            return status;
        }
        memset(dev, 0, sizeof(*dev));

        /* initialize the procs */
        dev->device.common.tag      = HARDWARE_DEVICE_TAG;
        dev->device.common.version  = 0;
        dev->device.common.module   = const_cast(module);
        dev->device.common.close    = fb_close;
        dev->device.setSwapInterval = fb_setSwapInterval;
        dev->device.post            = fb_post;
        dev->device.setUpdateRect   = 0;
        dev->device.compositionComplete = fb_compositionComplete;

        status = mapFrameBuffer((framebuffer_device_t*)dev);
        private_module_t* m = (private_module_t*)dev->device.common.module;
        if (status >= 0) {
            int stride = m->finfo.line_length / (m->info.bits_per_pixel >> 3);
            const_cast(dev->device.flags) = 0;
            const_cast(dev->device.width) = m->info.xres;
            const_cast(dev->device.height) = m->info.yres;
            const_cast(dev->device.stride) = stride;
            const_cast(dev->device.format) = m->fbFormat;
            const_cast(dev->device.xdpi) = m->xdpi;
            const_cast(dev->device.ydpi) = m->ydpi;
            const_cast(dev->device.fps) = m->fps;
            const_cast(dev->device.minSwapInterval) =
                                                        PRIV_MIN_SWAP_INTERVAL;
            const_cast(dev->device.maxSwapInterval) =
                                                        PRIV_MAX_SWAP_INTERVAL;
            const_cast(dev->device.numFramebuffers) = m->numBuffers;
            dev->device.setUpdateRect = 0;

            *device = &dev->device.common;
        }

        // Close the gralloc module
        gralloc_close(gralloc_device);
    }
    return status;
}
2)loadHwcModule()函數通過以下路徑打開fb,初始化並保存hwc_composer_device_1_t類型的成員變量mHwc。
HWComposer::loadHwcModule()->hw_get_module(HWC_HARDWARE_MODULE_ID, &module)
然後在調用hwc_open_1(module, &mHwc)->hwc_device_open()->initContext()->
CopyBit::CopyBit()[hwc_copybit.cpp]->hw_get_module(COPYBIT_HARDWARE_MODULE_ID, &module)
->open_copybit()->open("/dev/graphics/fb0", O_RDWR, 0);
這裡的module加載以及調用open函數的過程基本和上面的一樣,不多說了。
到此可以知道framework層是怎麼打開的/dev/graphics/fb0節點,以待後續進行處理的!!
在SurfaceFlinger中最後進行數據刷新的函數,我們知道是postFrameBuffer()函數。定義如下:
void SurfaceFlinger::postFramebuffer()
{
    ATRACE_CALL();

#ifdef PRODUCT_DEV
    if (CC_UNLIKELY(mDebugFps)) {
        debugShowFPS();
    }
    /*
    if(CC_UNLIKELY(ATRACE_ENABLED())){
        debugShowGPUInfoToSysTrace();
    }*/
#endif

    const nsecs_t now = systemTime();
    mDebugInSwapBuffers = now;

    HWComposer& hwc(getHwComposer());
    if (hwc.initCheck() == NO_ERROR) {
        if (!hwc.supportsFramebufferTarget()) {
            getDefaultDisplayDevice()->makeCurrent(mEGLDisplay, mEGLContext);
        }
        //這個函數當然就是調用HWComposer::commit()函數,,不言而喻~
        hwc.commit();
    }
    ...
}

status_t HWComposer::commit() {
    int err = NO_ERROR;
    if (mHwc) {
        ...
        //這裡的mHwc是加載了/hardware/qcom/display/libhwcomposer/Hwc.cpp的內容的
        //理由嗎,,和上面說的一樣,根據id來選擇module加載~
        //所以set函數就是需要在Hwc.cpp文件中尋找了~
        err = mHwc->set(mHwc, mNumDisplays, mLists);
        ....
    }
    return (status_t)err;
}

static int hwc_set(hwc_composer_device_1 *dev,
                   size_t numDisplays,
                   hwc_display_contents_1_t** displays)
{
    int ret = 0;
    hwc_context_t* ctx = (hwc_context_t*)(dev);
    for (int dpy = 0; dpy < (int)numDisplays; dpy++) {
        hwc_display_contents_1_t* list = displays[dpy];
        switch(dpy) {
            case HWC_DISPLAY_PRIMARY:
                //這個就是主屏!!!看hwc_set_primary()函數
                ret = hwc_set_primary(ctx, list);
                break;
            case HWC_DISPLAY_EXTERNAL:
                ret = hwc_set_external(ctx, list);
                break;
            case HWC_DISPLAY_VIRTUAL:
                if(ctx->mHWCVirtual)
                    ret = ctx->mHWCVirtual->set(ctx, list);
                break;
            default:
                ret = -EINVAL;
        }
    }

    return ret;
}

static int hwc_set_primary(hwc_context_t *ctx, hwc_display_contents_1_t* list) {
    ATRACE_CALL();
    int ret = 0;
    const int dpy = HWC_DISPLAY_PRIMARY;
    if (LIKELY(list) && ctx->dpyAttr[dpy].isActive
            && !ctx->dpyAttr[dpy].isPause) {
        ...
        //利用copybit或者mdp,每個layer都有幾個flags來標記用哪個去畫
        //以做過的一個平台為例,有以下兩種方式
        //// LayerProp::flag values
        /*  enum {
                HWC_MDPCOMP = 0x00000001,
                HWC_COPYBIT = 0x00000002,
            };
        */
        if (ctx->mCopyBit[dpy]) {
            if (ctx->mMDP.version < qdutils::MDP_V4_0)
                copybitDone = ctx->mCopyBit[dpy]->draw(ctx, list, dpy, &fd);
            else
                fd = ctx->mMDPComp[dpy]->drawOverlap(ctx, list);
        }
        ...
        if (!ctx->mMDPComp[dpy]->draw(ctx, list)) {
            ALOGE("%s: MDPComp draw failed", __FUNCTION__);
            ret = -1;
        }
        ...
        if(!Overlay::displayCommit(ctx->dpyAttr[dpy].fd, lRoi, rRoi)) {
            ALOGE("%s: display commit fail for %d dpy!", __FUNCTION__, dpy);
            ret = -1;
        }
        ...
    }
}

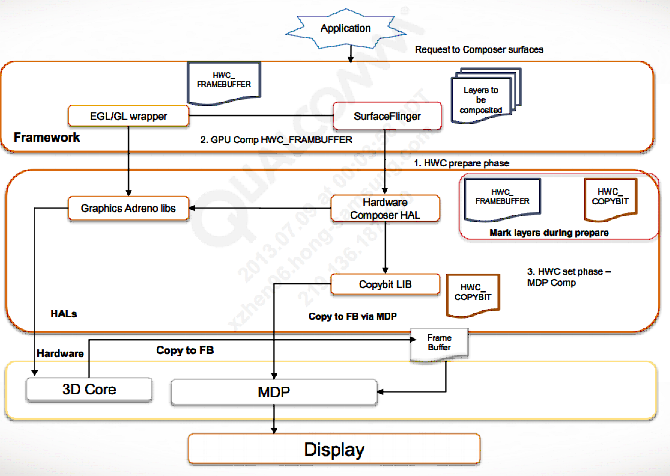
在加載完fb相關的module之後,SurfaceFlinger就可以通過HWC把Layer畫上去。流程如下:
SurfaceFlinger creates a list of layers and sends them to the HWC in the到這裡就可以知道怎麼加載的模塊,也看了SurfaceFlinger通過HWComposer和HWC.cpp模塊的內容進行顯示數據的刷寫的過程。接下來看一下SurfaceFlinger,,
 用android的GCM 網絡管理來優化電池使用時間
?GCM網絡管理器能讓app注冊能執行面向網絡的服務,每個任務只是完成一個工作。它的API能處理這些任務,允許Google Play Services通過系統集中處理這些
 10個你可能不知道的 Android Studio技巧
寫代碼的時候過度依賴鼠標可能會遇到比低效率更嚴重的問題。這裡的技巧幫助你寫更少的代碼,充分發揮鍵盤的功能,因此你可以避免發生這樣的情況:hanks Obama.這裡的絕大
 Android控件之使用ListView實現時間軸效果
實現思路:該View是通過ListView實現的,通過實體兩個字段內容content和時間time來展示每個ListItem時間軸是使用上面一條線(20dp)
 Android開發實例之登錄界面的實現
本文要演示的Android開發實例是如何完成一個Android中的miniTwitter登錄界面,下面將分步驟講解怎樣實現圖中的界面效果,讓大家都能輕松的做出美觀的登錄界