編輯:關於Android編程
體驗了一下weex,發現weex語法還挺簡單,上手容易,發現自己沒什麼前端知識,也能極易上手,出於強烈好奇和業務預研的需要,分析了其Android端的Weex Sdk一些源碼.
先從WXSDKManager入手後,畫出其結構圖如圖:
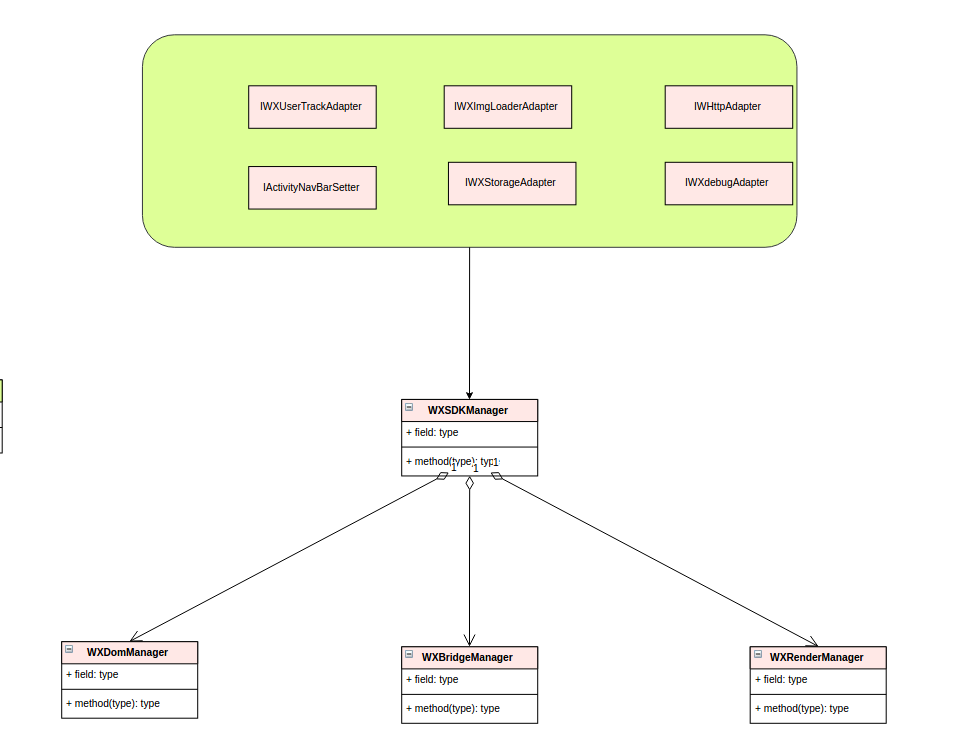
IWXUserTrackAdapter:用來處理日志信息接口,常常拿來做一些用戶埋點統計.
IWXImgLoaderAdapter:用來處理View加載圖片接口,可以實現其控制如何加載遠程和本地圖片.
IWXHttpAdapter:用來處理網絡請求的接口,常常處理請求一系列過程,默認實現DefaultWXHttpAdapter.
IActivityNavBarSetter:用來處理頁面跳轉接口,可以實現其接口來控制頁面的跳轉.
IWXStorageAdapter:用來處理存儲接口,例如SQLite存儲,默認實現DefaultWXStorage.
IWXDebugAdapter:用來處理調試接口,通常實現其接口來在Chrom上做一些頁面的調試.
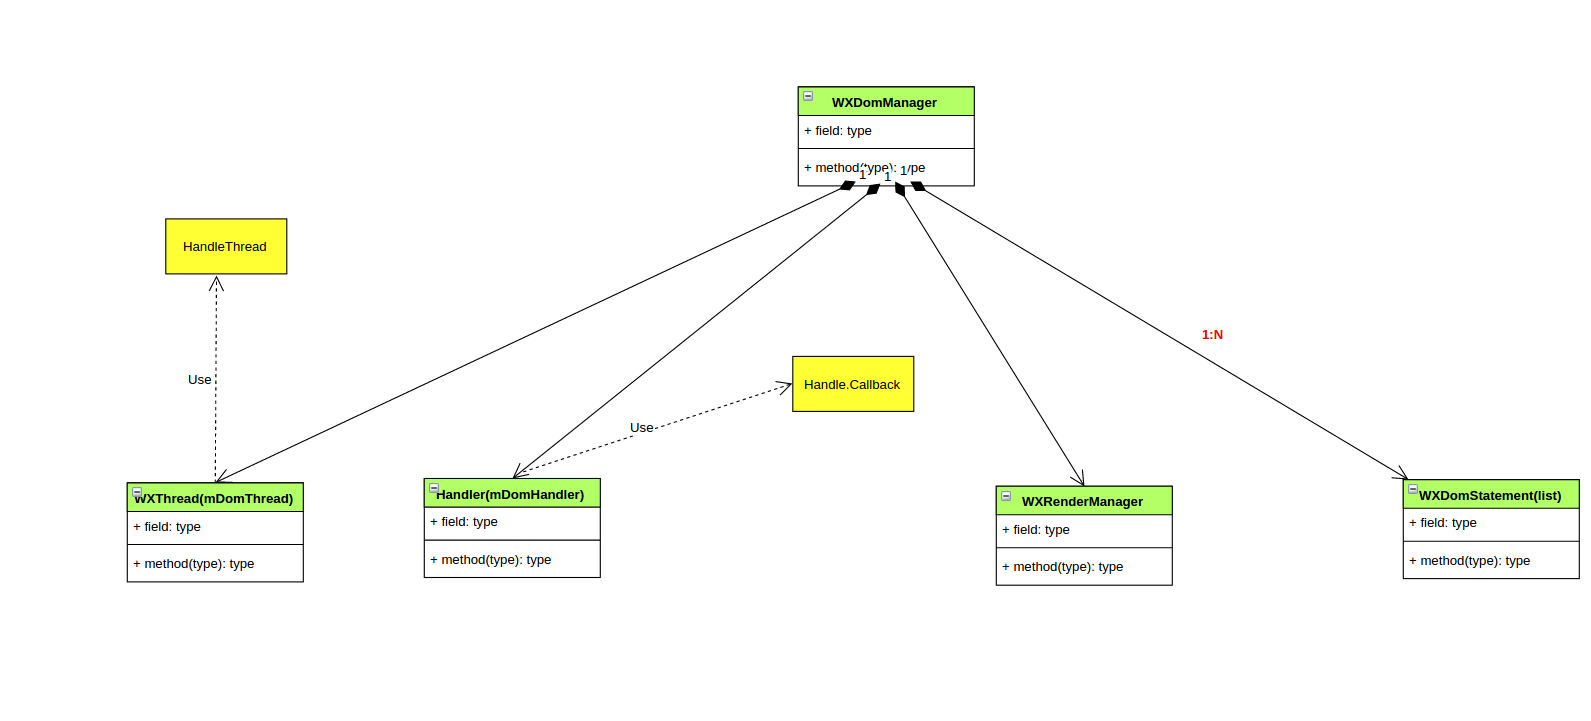
WXDomManager:專門用來管理Dom節點一些操作,如創建節點對應對象,但真正操作是委托給其他的對象,其關聯如圖:
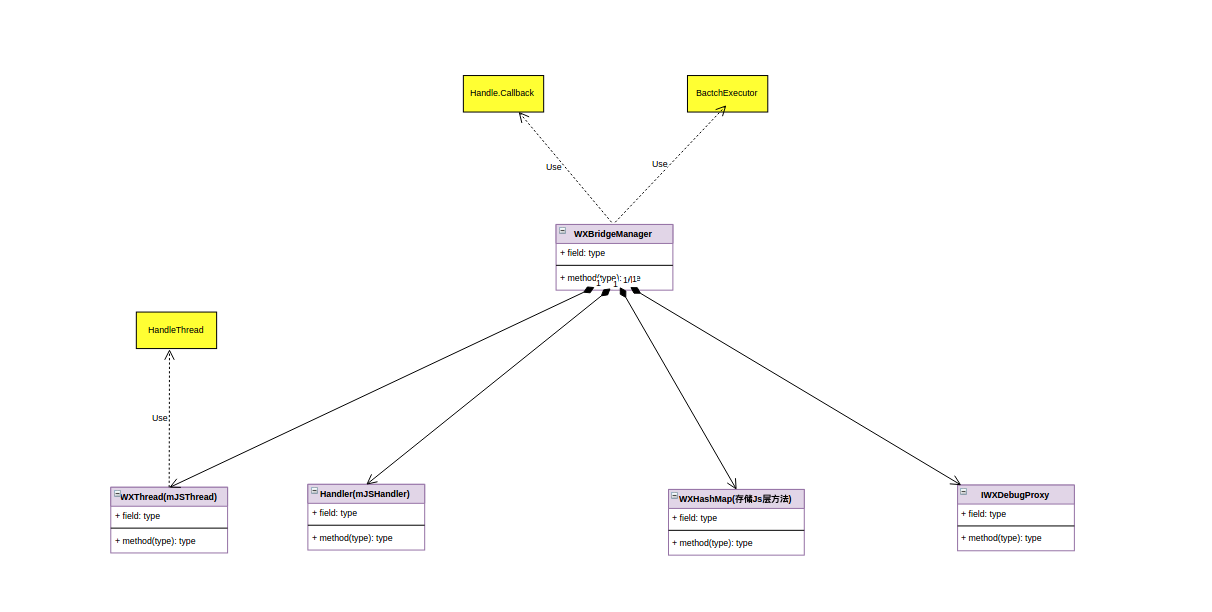
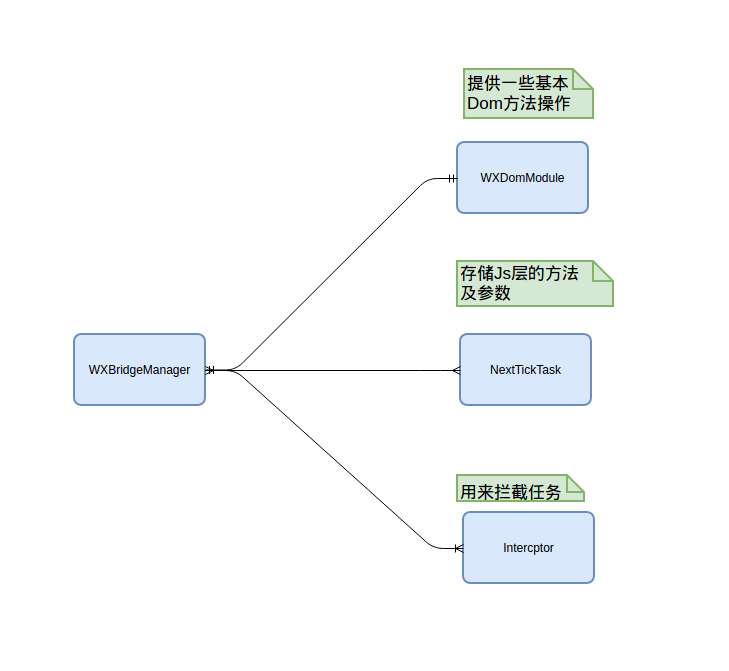
WXBridgeManager:用來處理Js和Android端的通信,例如Js端調用Android端Native層的方法.其關聯如圖:
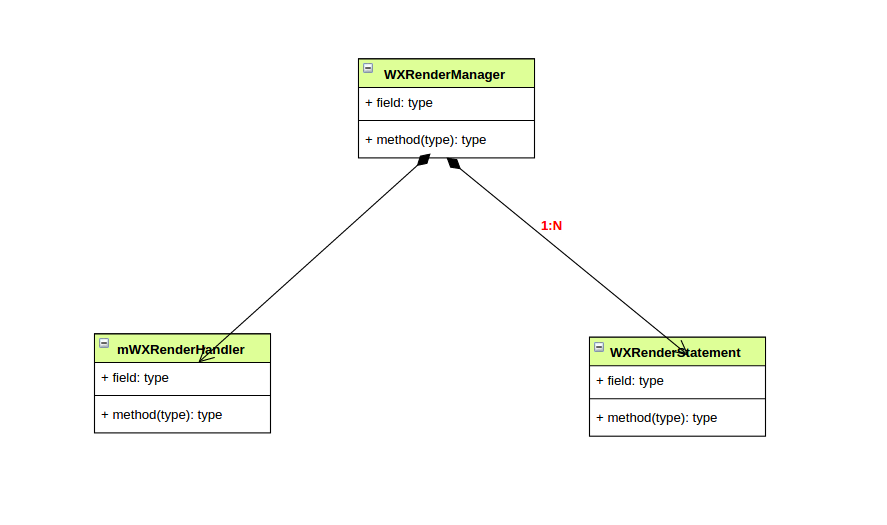
WXRenderManager:用來處理一些渲染操作,例如通過WXRenderStatement將Js層標簽轉到native層的View組件,其關聯如圖:
從上面看知道,一個weex頁面在Android端渲染,分了三大模塊,Dom節點操作管理模塊,跨端通信模塊,渲染模塊,其三個端具體關聯分別如下.
節點操作模塊:

跨端通信模塊:
渲染模塊:

在分析weex如何在android端繪制流程之前,首先先弄清楚一個weex頁面在native層的生命周期是如何?

那麼在沒有WebView的情況下,Native層又如何去解析Js代碼呢?梳理了一下其源碼,發現weex主要通過下圖方式,建起js和java之間的通信橋梁:

從圖可知,Js如果要與java通信,那麼可以通過google v8引擎先與c++通信,然後在通過jni機制來實現與java的通信,從解決了Js頁面與Native的通信了.同理,java與Js通信也一樣.
接下來就分析了其weex之android端的繪制流程了,但限於前端和v8引擎知識有限,所以還不能很好的深入到裡面,只能膚淺概況其繪制流程:

weex能很靈活的支持組件擴展,在weex android sdk裡,定義一系列weex組件,並且映射到native對應View組件.這裡大概概況一下組件注冊流程:

那weex組件設置屬性又如何映射到native層,weex組件轉換native組件步驟如圖(非根節點,js調用過程類似上面時序圖):

在這裡weex的module自擴展注冊和weex的組件注冊流程差不多,也是通過@WXModuleAnno注解標記native層方法供js調用,其調用流程如下:

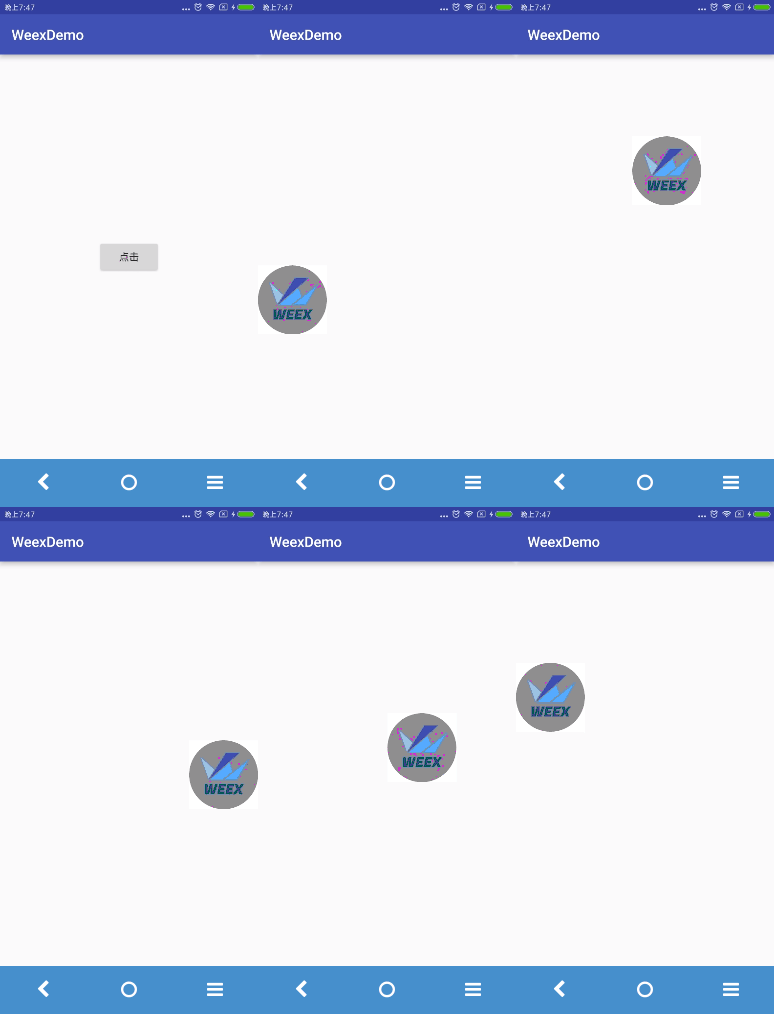
說了那麼多,還是來實踐一個浮窗的weex控件吧,(浮窗控件還有很多沒完成,完成會嘗試同步到weex開源項目上)這裡我直接貼核心代碼了.
原生部分代碼:
//浮窗接口
public interface FloatWindowInterface {
  void init(WindowManager windowManager,View windowView);
  void show();
  void hide();
}


//浮窗native的View容器
public class WXFloatFrameLayout extends WXFrameLayout {
  private FloatWindowInterface mFloatWindow;

  public WXFloatFrameLayout(Context context, FloatWindowInterface floatWindow) {
    super(context);
    this.mFloatWindow = floatWindow;
  }

  public FloatWindowInterface getFloatWindow() {
    return mFloatWindow;
  }

  public void setFloatWindow(FloatWindowInterface floatWindow) {
    mFloatWindow = floatWindow;
  }

  public boolean isIntercept() {
    return isIntercept;
  }

  public void setIntercept(boolean intercept) {
    isIntercept = intercept;
  }

  private boolean isIntercept=true;

  public WXFloatFrameLayout(Context context) {
    super(context);
  }

  @Override
  public boolean onInterceptTouchEvent(MotionEvent ev) {
    if(isIntercept){
      return true;
    }
    return super.onInterceptTouchEvent(ev);
  }

}


//浮窗的weex組件
@Component(lazyload = false)
public class WXWindowComponent extends WXDiv implements WXSDKInstance.OnInstanceVisibleListener,View.OnTouchListener,FloatWindowInterface {
  private WXSDKInstance mViewInstance;
  private String src;
  private boolean mIsVisible=true;
  private String originUrl;
  private FloatViewRenderListener mListener;
  private WindowManager mWm;
  private View mWindowView;
  private WindowManager.LayoutParams mLayoutParams;
  private int mGravity=Gravity.CENTER;
  private int mFlag=WindowManager.LayoutParams.FLAG_NOT_TOUCH_MODAL
          | WindowManager.LayoutParams.FLAG_NOT_FOCUSABLE;
  private float mTouchX;
  private float mTouchY;
  private int mLeft=0;
  private int mTop=0;
  private int mDeviceWidth;
  private boolean mDisableFloat=false;
  public WXWindowComponent(WXSDKInstance instance, WXDomObject node, WXVContainer parent, boolean lazy) {
    super(instance, node, parent, lazy);
    mListener=new FloatViewRenderListener(this);
  }


  private void updateViewPosition(){
    this.mLayoutParams.x=(int) (mTouchX-mLeft);
    this.mLayoutParams.y=(int) (mTouchY-mTop);
    mWm.updateViewLayout(mWindowView,this.mLayoutParams);
  }


  @Override
  public boolean onTouch(View v, MotionEvent event) {
    if(mDisableFloat){
      return false;
    }
    mTouchX = event.getRawX();
    mTouchY = event.getRawY();
    switch (event.getAction()) {
      case MotionEvent.ACTION_MOVE:
        updateViewPosition();
        break;
      case MotionEvent.ACTION_UP:
      case MotionEvent.ACTION_CANCEL:
        if(mTouchX>=this.mDeviceWidth>>1){
          mTouchX=this.mDeviceWidth;
        }else {
          mTouchX=0;
        }
        updateViewPosition();
        break;
    }
    return true;
  }

  public void init(WindowManager windowManager,View windowView) {
    this.mDeviceWidth= WXViewUtils.getScreenWidth(getContext());
    this.mLayoutParams=new WindowManager.LayoutParams();
    this.mLayoutParams.height=WindowManager.LayoutParams.WRAP_CONTENT;
    this.mLayoutParams.width=WindowManager.LayoutParams.WRAP_CONTENT;
    this.mLayoutParams.format= PixelFormat.TRANSLUCENT;
    this.mLayoutParams.type=WindowManager.LayoutParams.TYPE_APPLICATION;
    this.mLayoutParams.gravity=this.mGravity;
    this.mLayoutParams.flags =this.mFlag;
    this.mWm= windowManager;
    this.mWindowView=windowView;
    ((WXFloatFrameLayout)getHostView()).setIntercept(true);
    this.mWindowView.setOnTouchListener(this);
  }

  void loadInstance(){
    mViewInstance=createInstance();
  }
  @Override
  public void onAppear() {
    if(mIsVisible&&mViewInstance!=null){
      WXComponent comp=mViewInstance.getRootCom();
      show();
      if(comp!=null){
        mViewInstance.fireEvent(comp.getRef(), Constants.Event.VIEWAPPEAR,null, null);
      }
    }
  }

  @Override
  public void onDisappear() {
    if(mIsVisible && mViewInstance != null){
      WXComponent comp = mViewInstance.getRootCom();
      hide();
      if(comp != null)
        mViewInstance.fireEvent(comp.getRef(), Constants.Event.VIEWDISAPPEAR,null, null);
    }
  }
  public void renderNewURL(String url){
    this.src=url;
    loadInstance();
  }

  public ViewGroup getViewContainer(){
    return getHostView();
  }
  private WXSDKInstance createInstance() {
    WXSDKInstance sdkInstance =new WXSDKInstance(getContext());
    getInstance().addOnInstanceVisibleListener(this);
    sdkInstance.registerRenderListener(mListener);
    final String url=src;
    if(TextUtils.isEmpty(url)){
      return sdkInstance;
    }
    ViewGroup.LayoutParams layoutParams = getHostView().getLayoutParams();
    sdkInstance.renderByUrl(WXPerformance.DEFAULT,
            url,
            null, null, layoutParams.width,
            layoutParams.height,
            WXRenderStrategy.APPEND_ASYNC);
    return sdkInstance;
  }

  static class FloatViewRenderListener implements IWXRenderListener{
    WXWindowComponent mComponent;

    public FloatViewRenderListener(WXWindowComponent wxWindowComponent){
      this.mComponent=wxWindowComponent;
    }
    @Override
    public void onViewCreated(WXSDKInstance instance, View view) {
      FrameLayout hostView=this.mComponent.getHostView();
      view.invalidate();
      hostView.removeAllViews();
      hostView.addView(view);
    }

    @Override
    public void onRenderSuccess(WXSDKInstance instance, int width, int height) {

    }

    @Override
    public void onRefreshSuccess(WXSDKInstance instance, int width, int height) {

    }

    @Override
    public void onException(WXSDKInstance instance, String errCode, String msg) {

    }
  }
  @Override
  protected boolean setProperty(String key, Object param) {
    switch (key) {
      case Constants.Name.SRC:
        String src = WXUtils.getString(param,null);
        if (src != null)
          setSrc(src);
        return true;
    }
    return super.setProperty(key, param);
  }

  @WXComponentProp(name = Constants.Name.SRC)
  public void setSrc(String src) {
    originUrl=this.src;
    this.src = src;
    if (mViewInstance != null) {
      mViewInstance.destroy();
      mViewInstance = null;
    }
      loadInstance();
  }

  @WXComponentProp(name = com.scau.beyondboy.weexdemo.weex.common.Constants.Name.GRAVITY)
  public void setGravity(int gravity){
    this.mGravity=gravity;
    this.mLayoutParams.gravity=this.mGravity;
    show();
  }

  @WXComponentProp(name = com.scau.beyondboy.weexdemo.weex.common.Constants.Name.DISPlAY_WINDOW)
  public void displayWindow(boolean displayWindow){
    if(displayWindow){
      show();
    }else {
      hide();
    }
  }

  @WXComponentProp(name = com.scau.beyondboy.weexdemo.weex.common.Constants.Name.DISABLE_FLOAT)
  public void disableFloat(boolean disableFloat){
    this.mDisableFloat=disableFloat;
    if(this.mDisableFloat){
      ((WXFloatFrameLayout)getHostView()).setIntercept(false);
    }else{
      ((WXFloatFrameLayout)getHostView()).setIntercept(true);
    }
  }

  @WXComponentProp(name = com.scau.beyondboy.weexdemo.weex.common.Constants.Name.FLAG)
  public void setFlag(int flag){
    this.mFlag=flag;
  }
  public void show(){
    if(this.mWm==null){
      return;
    }
    if(this.mWindowView.getParent()!=null){
      if(this.mWindowView.getParent()!=null){
        this.mWm.removeView(mWindowView);
      }
    }
    this.mWm.addView(this.mWindowView,this.mLayoutParams);
    this.mWindowView.post(new Runnable() {
      @Override
      public void run() {
        int[] location =new int[2];
        mWindowView.getLocationOnScreen(location);
        mLeft=location[0]+(mWindowView.getWidth()>>1);
        mTop=location[1]+(mWindowView.getHeight()>>1);
      }
    });
  }

  public void hide(){
    if(this.mWm==null){
      return;
    }
    if(this.mWindowView!=null&&this.mWindowView.getParent()!=null){
      this.mWm.removeView(this.mWindowView);
      this.mLayoutParams.x=0;
      this.mLayoutParams.y=0;
    }
  }

  public String getSrc() {
    return src;
  }

  public String getOriginUrl() {
    return originUrl;
  }

  public void setOriginUrl(String originUrl) {
    this.originUrl = originUrl;
  }

  @Override
  public void destroy() {
    super.destroy();
    hide();
    if(mViewInstance!=null){
      mViewInstance.destroy();
      mViewInstance=null;
    }
    src=null;
  }

  @Override
  protected WXFloatFrameLayout initComponentHostView(@NonNull Context context) {
    return new WXFloatFrameLayout(context,this);
  }

}
這裡別忘了注冊一下組件,這裡我用這行代碼注冊WXSDKEngine.registerComponent("float", WXWindowComponent.class,true);.
we文件代碼:

通過寫bash腳本去編譯一下,這些we文件會通過weex工具去轉換js文件存到我的android項目assets目錄下,運行的結果如圖(紅點是受錄制影響):
weex渲染一個頁面有幾個性能指標要測試一下,這部分網上也有一些數據,我這裡也將測試幾個性能指標:內存消耗,時間消耗,GPU渲染性能測試,文件大小尺寸.
為了避免因GC帶來影響,這裡測試條件是為多次觸發GC後,內存恢復沒還加載we或原生布局頁面時的水平,同時等穩定後時候再點擊按鈕重新打開頁面,統計一次相關數據,測試是跟加載原生布局頁面做對比,加載布局為hello.we頁面,其代碼:
Hello World.
為了盡量接近,View視圖樹也盡量一樣,先看看hello.we界面視圖樹:
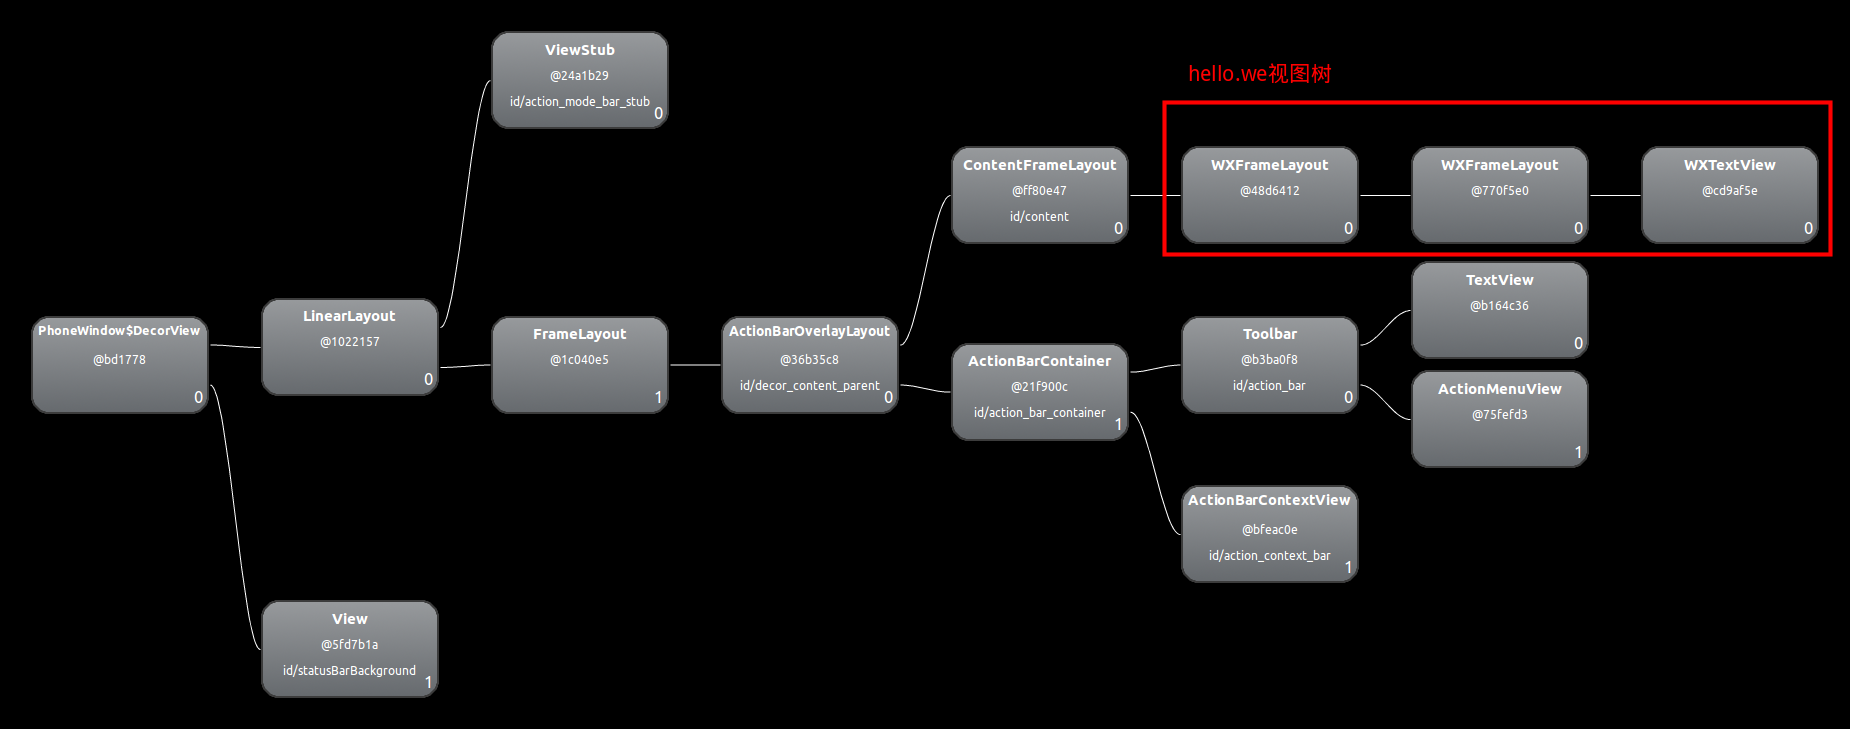
這裡原生布局代碼沒有引用weex的組件,因此會形成一點不同,原生布局代碼:
<framelayout android:layout_height="match_parent" android:layout_width="match_parent" android:orientation="vertical" xmlns:android="http://schemas.android.com/apk/res/android">
    <framelayout android:layout_height="wrap_content" android:layout_width="wrap_content">

    </framelayout>
</framelayout>
測試代碼核心:
//AbstractWeexActvity onCreate createWeexInstance方法已注釋掉
public class WXPageActivity extends SimpleWeexActivity {
    private static final String DEFAULT_IP = "localhost";
    private static String CURRENT_IP= DEFAULT_IP; // your_current_IP
    private static final String WEEX_INDEX_URL = "http://"+CURRENT_IP+":12580/examples/build/index.js";
    private boolean isloadJs=true;
    private Button mButton;
    @Override
    protected void onCreate(@Nullable Bundle savedInstanceState) {
        super.onCreate(savedInstanceState);
      mButton=new Button(this);
      FrameLayout.LayoutParams layoutParams=new FrameLayout.LayoutParams(FrameLayout.LayoutParams.WRAP_CONTENT,FrameLayout.LayoutParams.WRAP_CONTENT);
      layoutParams.gravity= Gravity.CENTER;
      mButton.setLayoutParams(layoutParams);
      mButton.setText("測試內存JS");
      mButton.setTextColor(Color.BLACK);
      mButton.setOnClickListener(new View.OnClickListener() {
        @Override
        public void onClick(View v) {
          getContainer().removeAllViews();
          if(isloadJs){
//每次都會創建we instance實例            renderPage(WXFileUtils.loadAsset("hello.js",WXPageActivity.this),"file://assets/hello.js");
            mButton.setText("測試內存xml");
          }else{
            View view= LayoutInflater.from(WXPageActivity.this).inflate(R.layout.weex_hello,null);
            getContainer().addView(view);
            mButton.setText("測試內存JS");
          }
          isloadJs=!isloadJs;
        }
      });
      ((FrameLayout)findViewById(android.R.id.content)).addView(mButton);
    }
    //恢復原來頁面
  @Override
  public void onBackPressed() {
    //如果是加載we頁面會銷毀we文件Instance實例,否則什麼都不做
    super.onBackPressed();
    getContainer().removeAllViews();
    getContainer().addView(mButton);
  }

  @Override
    public void onDestroy() {
        super.onDestroy();
        finish();
    }

  @Override
  public void onResume() {
    super.onResume();
  }
}
其測試結果如下:

雖然官方對we在native層渲染有時間統計,但為了一致,我是通過統計addOnGlobalLayoutListener()其結束時間(統計的結束時間會比onRenderSuccess時間長一一些),布局還是hello.we和weex_hellow.xml兩個文件做對比.基於上面代碼填加如下時間測試核心代碼:
//來自AbstarctWeexActivity的方法,並在createInstance方法獲取時間起始start
@Override
  public void onViewCreated(WXSDKInstance wxsdkInstance, View view) {
    if(view==null&&!(view instanceof ViewGroup)){
      return;
    }
    ViewGroup viewGroup=(ViewGroup)view;
    if(viewGroup.getChildCount()<=0){
      return;
    }
    final View rootView=viewGroup.getChildAt(0);
    if(rootView instanceof WXFloatFrameLayout){
      viewGroup.removeAllViews();
      viewGroup.removeView(rootView);
      viewGroup=null;
      final FloatWindowInterface floatWindowInterface=((WXFloatFrameLayout)rootView).getFloatWindow();
      floatWindowInterface.init(this.getWindowManager(),rootView);
      floatWindowInterface.show();
    }else if(mContainer != null){
      mContainer.removeAllViews();
      mContainer.addView(view);
    }
    //添加時鍵測試代碼
    getContainer().getViewTreeObserver().addOnGlobalLayoutListener(new ViewTreeObserver.OnGlobalLayoutListener() {
      @TargetApi(Build.VERSION_CODES.JELLY_BEAN)
      @Override
      public void onGlobalLayout() {
        getContainer().getViewTreeObserver().removeOnGlobalLayoutListener(this);
        runOnUiThread(new Runnable() {
          @Override
          public void run() {
            if(isRender){
              isRender=false;
              end=System.currentTimeMillis();
              Log.i("Time","WEEXTime:"+(end-start));
            }
          }
        });
      }
    });
  }

//來自WXPageActivity的方法
@Override
    protected void onCreate(@Nullable Bundle savedInstanceState) {
        super.onCreate(savedInstanceState);
      mButton=new Button(this);
      FrameLayout.LayoutParams layoutParams=new FrameLayout.LayoutParams(FrameLayout.LayoutParams.WRAP_CONTENT,FrameLayout.LayoutParams.WRAP_CONTENT);
      layoutParams.gravity= Gravity.CENTER;
      mButton.setLayoutParams(layoutParams);
      mButton.setText("測試內存JS");
      mButton.setTextColor(Color.BLACK);
      mButton.setOnClickListener(new View.OnClickListener() {
        @Override
        public void onClick(View v) {
          getContainer().removeAllViews();
          isRender=true;
          if(isloadJs){
            renderPage(WXFileUtils.loadAsset("hello.js",WXPageActivity.this),"file://assets/hello.js");
            mButton.setText("測試內存xml");
          }else{
            start=System.currentTimeMillis();
            View view= LayoutInflater.from(WXPageActivity.this).inflate(R.layout.weex_hello,null);
            getContainer().addView(view);
            getContainer().getViewTreeObserver().addOnGlobalLayoutListener(new ViewTreeObserver.OnGlobalLayoutListener() {
              @TargetApi(Build.VERSION_CODES.JELLY_BEAN)
              @Override
              public void onGlobalLayout() {
                getContainer().getViewTreeObserver().removeOnGlobalLayoutListener(this);
                runOnUiThread(new Runnable() {
                  @Override
                  public void run() {
                    if(isRender){
                      isRender=false;
                      end=System.currentTimeMillis();
                      Log.i("Time","XMLTime:"+(end-start));
                    }
                  }
                });
              }
            });
            mButton.setText("測試內存JS");
          }
          isloadJs=!isloadJs;
        }
      });
      ((FrameLayout)findViewById(android.R.id.content)).addView(mButton);
    }
其時間對比如圖所示:

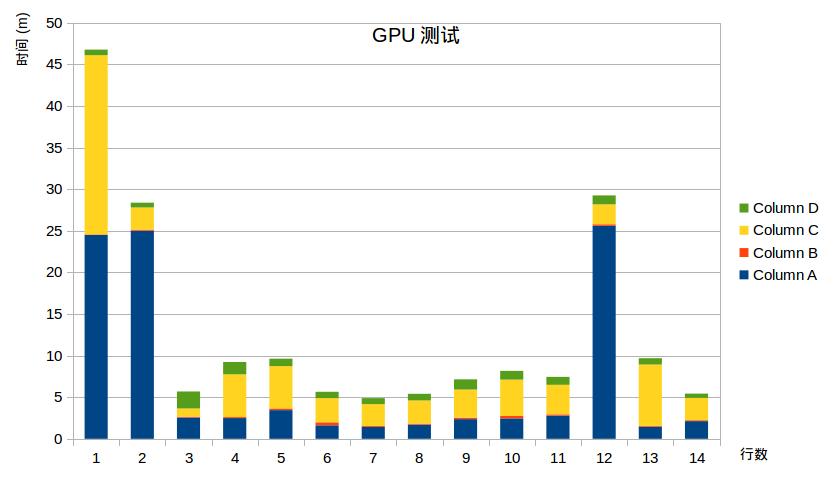
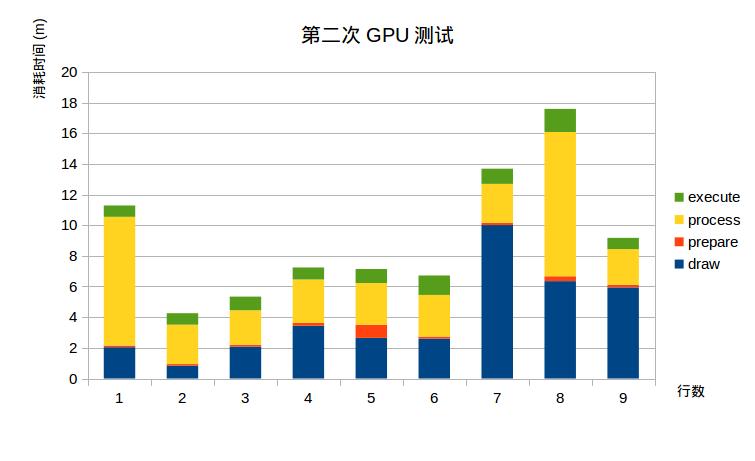
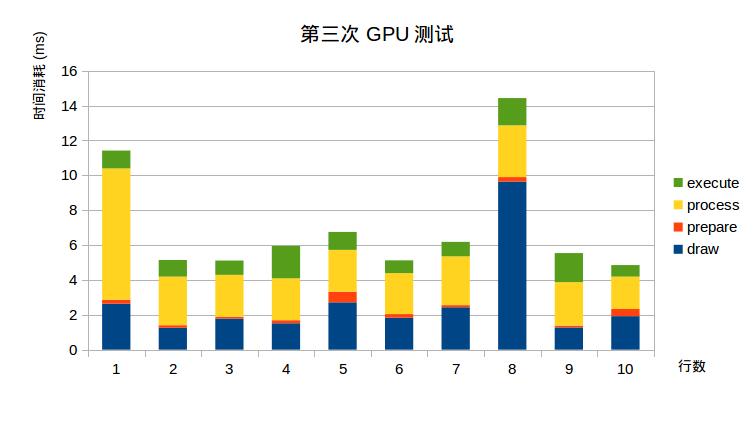
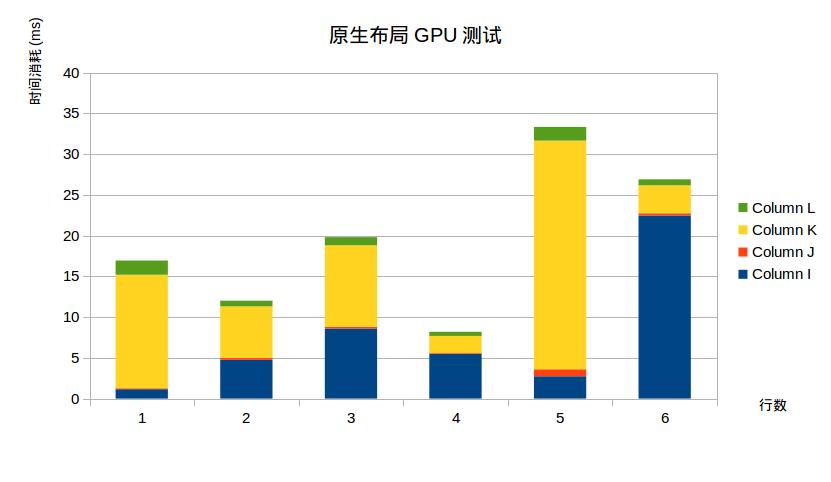
GPU渲染性能測試主要是通過adb shell dumpsys gfxinfo命令獲取數據,然後導入excel表格來生成圖表,GPU渲染we文件如圖(時間為ms):
第二次測試:
第三次測試:
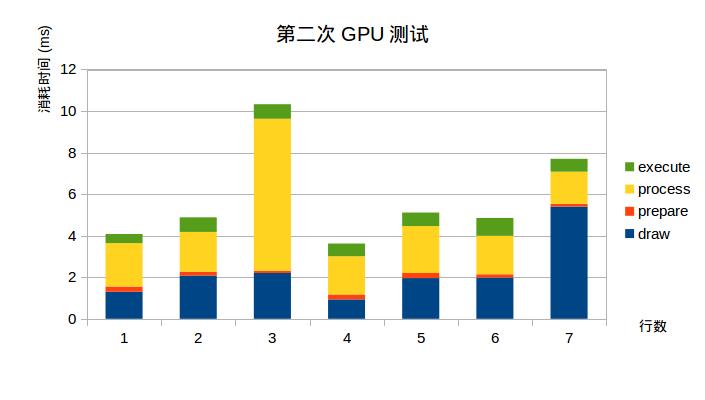
GPU渲染原生布局文件如圖:
第二次測試:
第三次測試:
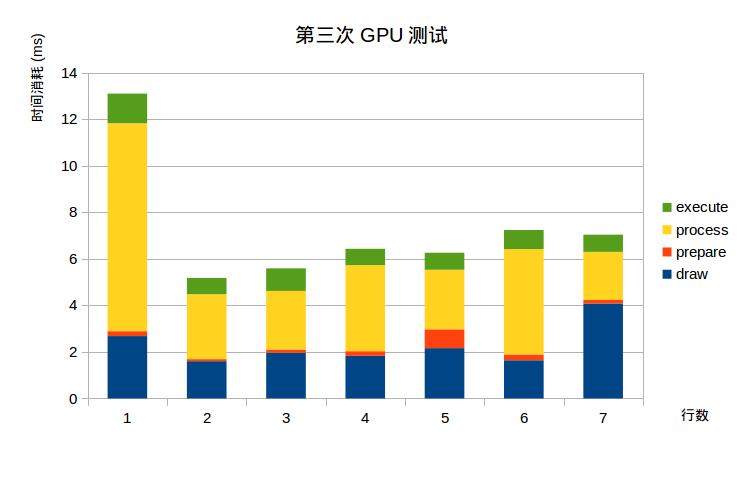
最後一個指標就是文件大小,對比一下weex_hello.xml和hello.js文件尺寸:
以上測試還存在一些局限,如布局文件單一,機型單一等情況,但從上面測試情況來看,weex相對於native的原生加載頁面還是存一些性能瓶頸,如內存消耗,時間消耗,通常內存消耗和時間消耗是互相關聯,同時也關聯了CPU的性能.文件尺寸.對於優化內存消耗部分,可以采用一些復用對象方式或對象池方式等手段來減少內存開銷,如觸屏事件的Target.對於時間消耗,可以采用緩存策略來去管理一些weex實例,如緩存常用對象等手段,對於文件尺寸來說,可以采用js代碼壓縮,甚至通過技巧去共享依賴模塊,而不是每次轉換js文件,就要導入依賴模塊等方式來減少文件尺寸.
由於對於前端知識缺少了解,有不足之處望多多指正.不過後面時間還是會繼續寫一些Weex之Android端的細節地方.
 Android:通過SpannableString為TextView設置豐富的顯示效果
在使用TextView的過程中,有時候會需要將一串文本中的部分文字做特別的顯示效果處理,比如加粗、改變顏色、加著重標識、超鏈接等等,我們可以通過多個TextView拼湊來
 android基礎總結篇之一:Activity生命周期
近來回顧了一下關於Activity的生命周期,參看了相關書籍和官方文檔,也有了不小的收獲,對於以前的認知有了很大程度上的改善,在這裡和大家分享一下。熟悉javaEE的朋友
 Android Studio下自動生成UML圖
畫類圖是一件挺麻煩的事情。如果有工具能自動生成類圖,那有多好!簡單搜索了一下,還真有。AS (2.1)下面搞一個插件code iris就可以自動生成。1 插件安裝安裝很簡
 跟我學Android之十 對話框
本章內容 第1節 Toast提示框 第2節 AlertDialog對話框 第3節 特色對話框 第4節 自定義對話框本章目標 熟練掌握Toast的用法。 熟練掌握Dialo