編輯:關於Android編程
前言:經過昨天的學習,感覺對socket越來越熟悉了,但還是得多寫寫。業精於勤荒於嬉,行成於思毀於隨!今天我寫了一個與項目稍微接近的一個小程序。對socket越來越深入了。我模擬了兩個接口,發送到服務器,服務器進行數據操作後,將數據返回給客戶端。
一、服務器端代碼 :
import org.json.JSONException;
import org.json.JSONObject;

import java.io.DataInputStream;
import java.io.DataOutputStream;
import java.io.IOException;
import java.net.ServerSocket;
import java.net.Socket;


/**
 * Created by demi on 16/10/12.
 */

public class JsonServer {

    public static void main(String args[]) {
        ServerSocket ss = null;
        Socket s = null;
        DataInputStream dis = null;
        DataOutputStream dos = null;

        try {
            ss = new ServerSocket(3320);
            s = ss.accept();
            System.out.println("Client :" + s.getInetAddress() + " : " + s.getPort() + " 已連接》》》》》》");
            dos = new DataOutputStream(s.getOutputStream());
            dis = new DataInputStream(s.getInputStream());
            while (true) {
                String data = dis.readUTF();
                System.out.println(data);
                if (null != data) {
                    if (!data.contains("data")) {
                        JSONObject jo = new JSONObject(data);
                        int a =jo.getInt("numA");
                        int b =jo.getInt("numB");
                        dos.writeUTF(creatSumJson(a,b));//寫入數據到客戶端

                    } else {
                        JSONObject jo = new JSONObject(data);
                        int a =jo.getInt("data");
                        for (int i = 0; i < 100; i++) {
                            a++;
                            dos.writeUTF(createRandomJson(a));//寫入數據到客戶端
                        }
                    }
                }
            }
        } catch (Exception e) {
            e.printStackTrace();
            try {
                dis.close();
                dos.close();
                s.close();
                ss.close();
                System.out.print("鏈接已斷開");
            } catch (IOException e1) {
                e1.printStackTrace();
            }
        }
    }
    /**
     * 模擬現實項目中的接口,在做了自加運算後創建一個json。
     */

    public static String createRandomJson(int a){
        JSONObject s = new JSONObject();
        try {
            s.put("data", a);
        } catch (JSONException e) {
            e.printStackTrace();
        }
        return s.toString() ;
    }

    /**
     * 模擬現實項目中的接口,獲取客戶端的兩個加數,做完加法後返回給客戶端。
     */
    //
    public static String creatSumJson(int a, int b){
        JSONObject s =new JSONObject();
        try {
            s.put("sum", a+b);
        } catch (JSONException e) {
            e.printStackTrace();
        }
        return s.toString() ;
    }
}
二、客戶端代碼:
JsonClient.java
package mysocket.jsonway; import org.json.JSONException; import org.json.JSONObject; import java.io.DataInputStream; import java.io.DataOutputStream; import java.io.IOException; import java.net.Socket; import java.util.Random; /** * Created by demi on 16/10/12. */ public class JsonClient { public static void main(String args[]){ DataOutputStream dos =null; Thread chat = null; Socket socket = null; DataInputStream dis =null; try { socket =new Socket("127.0.0.1",3320); dos =new DataOutputStream(socket.getOutputStream()); dos.writeUTF(createRandomJson());//寫入數據到服務器端 chat = new Thread(new ChatThread(socket)); chat.start(); socket.setKeepAlive(true); int i = 0; while(i<=100){ Thread.sleep(1000); dos.writeUTF(creatSumJson());//寫入數據到服務器端 i++; } } catch (IOException e) { e.printStackTrace(); try { dos.close(); socket.close(); chat.stop(); System.out.print("鏈接已斷開"); } catch (IOException e1) { e1.printStackTrace(); } } catch (InterruptedException e) { e.printStackTrace(); } } /** * 模擬現實項目中的接口,創建一個20以內的隨機數的json,發送到服務器,讓服務器做++運算,加一次向客戶端推送一次結果。 */ public static String createRandomJson(){ JSONObject s = new JSONObject(); try { s.put("data", new Random().nextInt(20)); } catch (JSONException e) { e.printStackTrace(); } return s.toString() ; } /** * 模擬現實項目中的接口,創建兩個100以內的隨機數的json,發送到服務器,讓服務器做完加法後返回給客戶端。 */ // public static String creatSumJson(){ JSONObject s =new JSONObject(); try { s.put("numA", new Random().nextInt(100)); s.put("numB", new Random().nextInt(100)); } catch (JSONException e) { e.printStackTrace(); } return s.toString() ; } }
ChatThread.java
package mysocket.jsonway; import java.io.DataInputStream; import java.io.IOException; import java.net.Socket; /** * Created by demi on 16/10/13. */ public class ChatThread implements Runnable { private Socket s = null; DataInputStream dis =null; public ChatThread(Socket s){ this.s = s; } @Override public void run() { try { dis =new DataInputStream(s.getInputStream()); while(true){ System.out.println(dis.readUTF()); //打印來自服務器的數據 } } catch (IOException e) { e.printStackTrace(); } } }
先啟動服務器,再啟動客戶端,運行結果: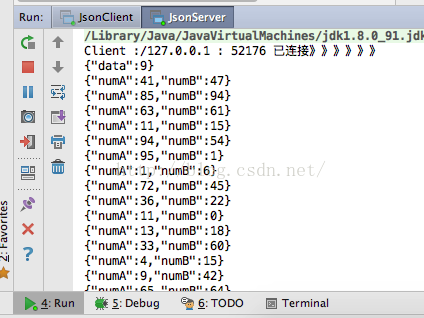
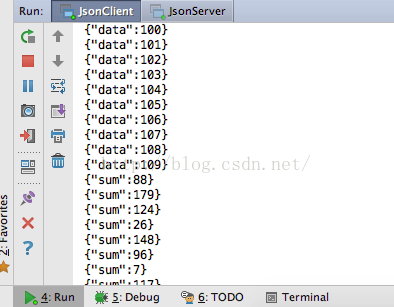 寫到這,我就想到一個問題,目前只能一個客戶端連接一個服務器,而現實項目中,很多客戶端連接一個服務器的。所以需要將服務器改造改造。
JsonServer.java
public static void main(String args[]) { ServerSocket ss = null; Socket s = null; Thread thread = null; try { ss = new ServerSocket(3320); while (true) { s = ss.accept(); System.out.println("Client :" + s.getInetAddress() + " : " + s.getPort() + " 已連接》》》》》》"); thread = new Thread(new ServerThread(s)); thread.start(); } } catch (IOException e) { e.printStackTrace(); } }
可以看到,我寫了一個while死循環,一直在accept(),少了好多代碼,多了一個線程,只要一個客戶端鏈接上來,我就新建一個線程,在線程中去操作數據,返回給客戶端數據:
ServerThread.java
package mysocket.versionone; import org.json.JSONException; import org.json.JSONObject; import java.io.DataInputStream; import java.io.DataOutputStream; import java.io.IOException; import java.net.Socket; /** * Created by demi on 16/10/14. */ public class ServerThread implements Runnable { private Socket s = null; DataInputStream dis = null; DataOutputStream dos = null; public ServerThread(Socket s) { this.s = s; } @Override public void run() { try { while (true) { dos = new DataOutputStream(s.getOutputStream()); dis = new DataInputStream(s.getInputStream()); String data = dis.readUTF(); System.out.println(data); if (null != data) { if (!data.contains("data")) { JSONObject jo = new JSONObject(data); int a = jo.getInt("numA"); int b = jo.getInt("numB"); dos.writeUTF(creatSumJson(a, b));//寫入數據到客戶端 } else { JSONObject jo = new JSONObject(data); int a = jo.getInt("data"); for (int i = 0; i < 100; i++) { a++; dos.writeUTF(createRandomJson(a));//寫入數據到客戶端 } } } } } catch (Exception e) { e.printStackTrace(); try { dis.close(); dos.close(); s.close(); System.out.print("鏈接已斷開"); } catch (IOException e1) { e1.printStackTrace(); } } } /** * 模擬現實項目中的接口,在做了自加運算後創建一個json。 */ public static String createRandomJson(int a) { JSONObject s = new JSONObject(); try { s.put("data", a); } catch (JSONException e) { e.printStackTrace(); } return s.toString(); } /** * 模擬現實項目中的接口,獲取客戶端的兩個加數,做完加法後返回給客戶端。 */ // public static String creatSumJson(int a, int b) { JSONObject s = new JSONObject(); try { s.put("sum", a + b); } catch (JSONException e) { e.printStackTrace(); } return s.toString(); } }
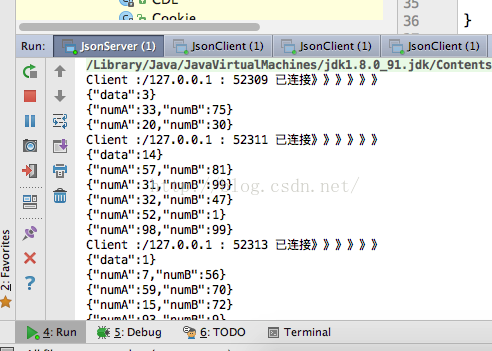
總結:在寫這個程序的時候,遇到了一個坑--Android環境下是自帶jsonjar包的,可jdk中沒有。還得自己導入。我最開始是在AS中寫的,一運行就出現異常。LOG中的關鍵字 “stub”.導入了json包後還報錯。沒辦法,換了個編譯環境 ---> IDEA,導入json包,就搞定了。
 Android Selector和Shape的使用方法
1.背景選擇器(位於res/drawable/,使用方法:android:background=”@drawable/XXX”) 復制代碼 代碼如下: <?xml
 Android App中使用ListFragment的實例教程
ListFragment繼承於Fragment。因此它具有Fragment的特性,能夠作為activity中的一部分,目的也是為了使頁面設計更加靈活。相比Fragment
 Drawable資源的初步使用
剛開始接觸到Android的時候,看到類似下面的一個Button:當時感覺這樣的button有點像Material Design風格,真的以為是裁剪好的圖片,好奇心驅使我
 Android 斷點續傳原理以及實現
Android 斷點續傳原理以及實現0. 前言在Android開發中,斷點續傳聽起來挺容易,在下載一個文件時點擊暫停任務暫停,點擊開始會繼續下載文件。但是真正