編輯:關於Android編程
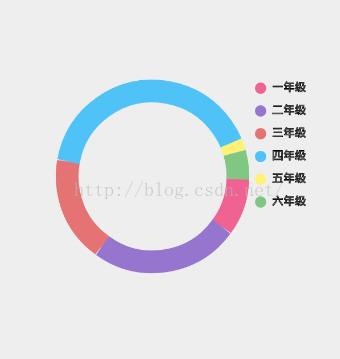
效果圖:

步驟一:分析變量信息
    //-------------必須給的數據相關-------------
    private String[] str = new String[]{"一年級", "二年級", "三年級", "四年級", "五年級", "六年級"};
    //分配比例大小,總比例大小為100
    private int[] strPercent = new int[]{10, 25, 18, 41, 2, 5};
    //圓的直徑
    private float mRadius = 300;
    //圓的粗細
    private float mStrokeWidth = 40;
    //文字大小
    private int textSize = 20;
    //-------------畫筆相關-------------
    //圓環的畫筆
    private Paint cyclePaint;
    //文字的畫筆
    private Paint textPaint;
    //標注的畫筆
    private Paint labelPaint;
    //-------------顏色相關-------------
    //邊框顏色和標注顏色
    private int[] mColor = new int[]{0xFFF06292, 0xFF9575CD, 0xFFE57373, 0xFF4FC3F7, 0xFFFFF176, 0xFF81C784};
    //文字顏色
    private int textColor = 0xFF000000;
    //-------------View相關-------------
    //View自身的寬和高
    private int mHeight;
    private int mWidth;
圓的粗細:圓環的大小。
標注:文字前面的圓點。
分配比例大小:由於需要計算圓環掃過的角度,計算方法使用:(比例/100)*360度,用百分比算出360度占用了多少,由於比例/100的結果一直是0,所以換一種方法:(比例*360度)/100,先乘後除,但是這樣會導致沒辦法獲得100/100的值,所以我們分配比例大小的總和為101.
步驟二:獲取View的寬和高
    public MyChatView(Context context) {
        super(context);
    }

    public MyChatView(Context context, AttributeSet attrs) {
        super(context, attrs);
    }

    public MyChatView(Context context, AttributeSet attrs, int defStyleAttr) {
        super(context, attrs, defStyleAttr);
    }

    @Override
    protected void onSizeChanged(int w, int h, int oldw, int oldh) {
        super.onSizeChanged(w, h, oldw, oldh);
        mWidth = w;
        mHeight = h;
    }
步驟三:實現onDraw方法,進行我們的繪制
@Override
    protected void onDraw(Canvas canvas) {
        super.onDraw(canvas);
        //移動畫布到圓環的左上角
        canvas.translate(mWidth / 2 - mRadius / 2, mHeight / 2 - mRadius / 2);
        //初始化畫筆
        initPaint();
        //畫圓環
        drawCycle(canvas);
        //畫文字和標注
        drawTextAndLabel(canvas);
    }

    /**
     * 初始化畫筆
     */
    private void initPaint() {
        //邊框畫筆
        cyclePaint = new Paint();
        cyclePaint.setAntiAlias(true);
        cyclePaint.setStyle(Paint.Style.STROKE);
        cyclePaint.setStrokeWidth(mStrokeWidth);
        //文字畫筆
        textPaint = new Paint();
        textPaint.setAntiAlias(true);
        textPaint.setColor(textColor);
        textPaint.setStyle(Paint.Style.STROKE);
        textPaint.setStrokeWidth(1);
        textPaint.setTextSize(textSize);
        //標注畫筆
        labelPaint = new Paint();
        labelPaint.setAntiAlias(true);
        labelPaint.setStyle(Paint.Style.FILL);
        labelPaint.setStrokeWidth(2);
    }

    /**
     * 畫圓環
     *
     * @param canvas
     */
    private void drawCycle(Canvas canvas) {
        float startPercent = 0;
        float sweepPercent = 0;
        for (int i = 0; i < strPercent.length; i++) {
            cyclePaint.setColor(mColor[i]);
            startPercent = sweepPercent + startPercent;
            //這裡采用比例占100的百分比乘於360的來計算出占用的角度,使用先乘再除可以算出值
            sweepPercent = strPercent[i] * 360 / 100;
            canvas.drawArc(new RectF(0, 0, mRadius, mRadius), startPercent, sweepPercent, false, cyclePaint);
        }
    }

    /**
     * 畫文字和標注
     *
     * @param canvas
     */
    private void drawTextAndLabel(Canvas canvas) {
        for (int i = 0; i < strPercent.length; i++) {
            //文字離右邊環邊距為60,文字與文字之間的距離為40
            canvas.drawText(str[i], mRadius + 60, i * 40, textPaint);
            //畫標注,標注離右邊環邊距為40,y軸則要減去半徑(10)的一半才能對齊文字
            labelPaint.setColor(mColor[i]);
            canvas.drawCircle(mRadius + 40, i * 40 - 5, 10, labelPaint);
        }
    }
步驟四:分析上面代碼的繪制過程
思路分析:
1、畫布移到圓環的左上角,為(0,0)。
2、畫圓環:使用drawArc方法畫出一個直徑為mRadius的圓環,從初始角度開始,掃過多少角度。這裡使用初始角度的遞增方法使圓環一段接上一段的畫出來。如果想讓圓環旋轉起來,就修改startPercent的值即可。
3、畫文字和標注:將文字和標注畫於圓環的右上角,也即圓的直徑加上一段間距即可,同理,標注也是。
最後獻上這個類的源碼:源碼下載
public class MyChatView extends View {

    //-------------必須給的數據相關-------------
    private String[] str = new String[]{"一年級", "二年級", "三年級", "四年級", "五年級", "六年級"};
    //分配比例大小,總比例大小為100,由於經過運算後最後會是99.55左右的數值,導致圓不能夠重合,會留出點空白,所以這裡的總比例大小我們用101
    private int[] strPercent = new int[]{10, 25, 18, 41, 2, 5};
    //圓的直徑
    private float mRadius = 300;
    //圓的粗細
    private float mStrokeWidth = 40;
    //文字大小
    private int textSize = 20;
    //-------------畫筆相關-------------
    //圓環的畫筆
    private Paint cyclePaint;
    //文字的畫筆
    private Paint textPaint;
    //標注的畫筆
    private Paint labelPaint;
    //-------------顏色相關-------------
    //邊框顏色和標注顏色
    private int[] mColor = new int[]{0xFFF06292, 0xFF9575CD, 0xFFE57373, 0xFF4FC3F7, 0xFFFFF176, 0xFF81C784};
    //文字顏色
    private int textColor = 0xFF000000;
    //-------------View相關-------------
    //View自身的寬和高
    private int mHeight;
    private int mWidth;


    public MyChatView(Context context) {
        super(context);
    }

    public MyChatView(Context context, AttributeSet attrs) {
        super(context, attrs);
    }

    public MyChatView(Context context, AttributeSet attrs, int defStyleAttr) {
        super(context, attrs, defStyleAttr);
    }

    @Override
    protected void onSizeChanged(int w, int h, int oldw, int oldh) {
        super.onSizeChanged(w, h, oldw, oldh);
        mWidth = w;
        mHeight = h;
    }

    @Override
    protected void onDraw(Canvas canvas) {
        super.onDraw(canvas);
        //移動畫布到圓環的左上角
        canvas.translate(mWidth / 2 - mRadius / 2, mHeight / 2 - mRadius / 2);
        //初始化畫筆
        initPaint();
        //畫圓環
        drawCycle(canvas);
        //畫文字和標注
        drawTextAndLabel(canvas);
    }

    /**
     * 初始化畫筆
     */
    private void initPaint() {
        //邊框畫筆
        cyclePaint = new Paint();
        cyclePaint.setAntiAlias(true);
        cyclePaint.setStyle(Paint.Style.STROKE);
        cyclePaint.setStrokeWidth(mStrokeWidth);
        //文字畫筆
        textPaint = new Paint();
        textPaint.setAntiAlias(true);
        textPaint.setColor(textColor);
        textPaint.setStyle(Paint.Style.STROKE);
        textPaint.setStrokeWidth(1);
        textPaint.setTextSize(textSize);
        //標注畫筆
        labelPaint = new Paint();
        labelPaint.setAntiAlias(true);
        labelPaint.setStyle(Paint.Style.FILL);
        labelPaint.setStrokeWidth(2);
    }

    /**
     * 畫圓環
     *
     * @param canvas
     */
    private void drawCycle(Canvas canvas) {
        float startPercent = 0;
        float sweepPercent = 0;
        for (int i = 0; i < strPercent.length; i++) {
            cyclePaint.setColor(mColor[i]);
            startPercent = sweepPercent + startPercent;
            //這裡采用比例占100的百分比乘於360的來計算出占用的角度,使用先乘再除可以算出值
            sweepPercent = strPercent[i] * 360 / 100;
            canvas.drawArc(new RectF(0, 0, mRadius, mRadius), startPercent, sweepPercent, false, cyclePaint);
        }
    }

    /**
     * 畫文字和標注
     *
     * @param canvas
     */
    private void drawTextAndLabel(Canvas canvas) {
        for (int i = 0; i < strPercent.length; i++) {
            //文字離右邊環邊距為60,文字與文字之間的距離為40
            canvas.drawText(str[i], mRadius + 60, i * 40, textPaint);
            //畫標注,標注離右邊環邊距為40,y軸則要減去半徑(10)的一半才能對齊文字
            labelPaint.setColor(mColor[i]);
            canvas.drawCircle(mRadius + 40, i * 40 - 5, 10, labelPaint);
        }
    }

}
 Android 信息中URL地址識別問題
ATCID主要用來處理PC端傳輸過來的AT命令,從AT命令實際處理的地方來說,主要分為3類: 1. 需要Modem來處理的AT命令; 2. 需要在nativ
 viewpager+fragment的懶加載
正文 進入正題,主要講解viewpager+fragment實現微信滑動切換頁面的功能,並且附帶切換效果,功能其實並不難,只是需要把知識點關聯起來1.分析用到的知識點(1
 java/android 設計模式學習筆記(15)---責任鏈模式
這篇博客我們來介紹一下責任鏈模式(Chain-of-responsibility Pattern),責任聯模式又稱為職責鏈模式,是行為型設計模式之一。顧名思義,責任鏈模式
 Handler消息機制完全解析(一)Message中obtain()與recycle()
提供obtain()在obtain的所有重載方法中,第一行都是Message m = obtain();,即調用空參的方法。先來看一下這個空參方法public stati