編輯:關於Android編程
一直都想親自做一次使用android應用程序訪問Linux內核驅動的嘗試,但總是沒能做到。最近抽出時間,下決心重新嘗試一次。嘗試的開始當然是先寫一個Linux內核驅動了。
我希望寫一個簡單測驅動程序,實現寫一個字符串進去,然後再把它讀出來的功能。驅動中會創建dev/hello設備節點和/sys/class/hello/hello/val 設備節點,沒有實現proc/下的對應的設備節點。/sys/class/hello/hello/val 主要用於快速測試,而dev/hello則主要用於供上層應用調用。
代碼我已經在android6.0的linux kernel上測試過了,代碼中有響應的注釋,所以這裡直接貼出代碼:
文件如下:
#include#include #include #include #include #include #include #include #include #include #include #include #include #include #include #include "hello.h" /*定義主設備和從設備號變量*/ static int hello_major = 0; static int hello_minor = 0; /*設備類別和設備變量*/ static struct class* hello_class = NULL; static struct hello_test_dev* hello_dev = NULL; /*傳統的設備文件操作方法*/ static int hello_open(struct inode* inode, struct file* filp); static int hello_release(struct inode* inode, struct file* filp); static ssize_t hello_read(struct file* filp, char __user *buf, size_t count, loff_t* f_pos); static ssize_t hello_write(struct file* filp, const char __user *buf, size_t count, loff_t* f_pos); /*設備文件操作方法表*/ static struct file_operations hello_fops = { .owner = THIS_MODULE, .open = hello_open, .release = hello_release, .read = hello_read, .write = hello_write, }; /*訪問設置屬性方法*/ static ssize_t hello_val_show(struct device* dev, struct device_attribute* attr, char* buf); static ssize_t hello_val_store(struct device* dev, struct device_attribute* attr, const char* buf, size_t count); /*定義設備屬性*/ static DEVICE_ATTR(val, S_IRUGO | S_IWUSR, hello_val_show, hello_val_store); /*打開設備方法*/ static int hello_open(struct inode* inode, struct file* filp) { struct hello_test_dev* dev; /*將自定義設備結構體保存在文件指針的私有數據域中,以便訪問設備時拿來用*/ dev = container_of(inode->i_cdev, struct hello_test_dev, dev); filp->private_data = dev; return 0; } /*設備文件釋放時調用,空實現*/ static int hello_release(struct inode* inode, struct file* filp) { return 0; } /*讀內存*/ static ssize_t hello_read(struct file* filp, char __user *buf, size_t count, loff_t* f_pos) { ssize_t err = 0; struct hello_test_dev* dev = filp->private_data; /*同步訪問*/ if(down_interruptible(&(dev->sem))) { return -ERESTARTSYS; } if(count < sizeof(dev->val)) { goto out; } /*讀字符串*/ if(copy_to_user(buf, dev->val, sizeof(dev->val))) { err = -EFAULT; goto out; } err = sizeof(dev->val); out: up(&(dev->sem)); return err; } /*寫字符串*/ static ssize_t hello_write(struct file* filp, const char __user *buf, size_t count, loff_t* f_pos) { struct hello_test_dev* dev = filp->private_data; ssize_t err = 0; /*同步訪問*/ if(down_interruptible(&(dev->sem))) { return -ERESTARTSYS; } if(count != sizeof(dev->val)) { goto out; } /*將用戶寫進來的字符串保存到驅動的內存中*/ if(copy_from_user(dev->val, buf, count)) { err = -EFAULT; goto out; } err = sizeof(dev->val); out: up(&(dev->sem)); return err; } /*寫字符串到內存*/ static ssize_t __hello_set_val(struct hello_test_dev* dev, const char* buf, size_t count) { /*同步訪問*/ if(down_interruptible(&(dev->sem))) { return -ERESTARTSYS; } printk(KERN_ALERT"__hello_set_val.buf: %s count:%d\n",buf,count); printk(KERN_ALERT"__hello_set_val.dev->val: %s count:%d\n",dev->val,count); strncpy(dev->val,buf, count); printk(KERN_ALERT"__hello_set_val.dev->val: %s count:%d\n",dev->val,count); up(&(dev->sem)); return count; } /*讀取設備屬性val*/ static ssize_t hello_val_show(struct device* dev, struct device_attribute* attr, char* buf) { struct hello_test_dev* hdev = (struct hello_test_dev*)dev_get_drvdata(dev); printk(KERN_ALERT"hello_val_show.\n"); printk(KERN_ALERT"%s\n",hdev->val); return 0; } /*寫設備屬性val*/ static ssize_t hello_val_store(struct device* dev, struct device_attribute* attr, const char* buf, size_t count) { struct hello_test_dev* hdev = (struct hello_test_dev*)dev_get_drvdata(dev); printk(KERN_ALERT"hello_val_store.buf: %s count:%d\n",buf,count); return __hello_set_val(hdev, buf, count); } /*初始化設備*/ static int __hello_setup_dev(struct hello_test_dev* dev) { int err; dev_t devno = MKDEV(hello_major, hello_minor); memset(dev, 0, sizeof(struct hello_test_dev)); cdev_init(&(dev->dev), &hello_fops); dev->dev.owner = THIS_MODULE; dev->dev.ops = &hello_fops; /*注冊字符設備*/ err = cdev_add(&(dev->dev),devno, 1); if(err) { return err; } /*初始化信號量和寄存器val的值*/ init_MUTEX(&(dev->sem)); dev->val = kmalloc(10,GFP_KERNEL); strncpy(dev->val,"hello",sizeof("hello")); return 0; } /*模塊加載方法*/ static int __init hello_init(void){ int err = -1; dev_t dev = 0; struct device* temp = NULL; printk(KERN_ALERT"hello_init.\n"); /*動態分配主設備和從設備號*/ err = alloc_chrdev_region(&dev, 0, 1, HELLO_DEVICE_NODE_NAME); if(err < 0) { printk(KERN_ALERT"Failed to alloc char dev region.\n"); goto fail; } hello_major = MAJOR(dev); hello_minor = MINOR(dev); /*分配helo設備結構體變量*/ hello_dev = kmalloc(sizeof(struct hello_test_dev), GFP_KERNEL); if(!hello_dev) { err = -ENOMEM; printk(KERN_ALERT"Failed to alloc hello_dev.\n"); goto unregister; } /*初始化設備*/ err = __hello_setup_dev(hello_dev); if(err) { printk(KERN_ALERT"Failed to setup dev: %d.\n", err); goto cleanup; } /*在/sys/class/目錄下創建設備類別目錄hello*/ hello_class = class_create(THIS_MODULE, HELLO_DEVICE_CLASS_NAME); if(IS_ERR(hello_class)) { err = PTR_ERR(hello_class); printk(KERN_ALERT"Failed to create hello class.\n"); goto destroy_cdev; } /*在/dev/目錄和/sys/class/hello目錄下分別創建設備文件hello*/ temp = device_create(hello_class, NULL, dev, "%s", HELLO_DEVICE_FILE_NAME); if(IS_ERR(temp)) { err = PTR_ERR(temp); printk(KERN_ALERT"Failed to create hello device."); goto destroy_class; } /*在/sys/class/hello/hello目錄下創建屬性文件val*/ err = device_create_file(temp, &dev_attr_val); if(err < 0) { printk(KERN_ALERT"Failed to create attribute val."); goto destroy_device; } dev_set_drvdata(temp, hello_dev); printk(KERN_ALERT"Succedded to initialize hello device.\n"); return 0; destroy_device: device_destroy(hello_class, dev); destroy_class: class_destroy(hello_class); destroy_cdev: cdev_del(&(hello_dev->dev)); cleanup: kfree(hello_dev); unregister: unregister_chrdev_region(MKDEV(hello_major, hello_minor), 1); fail: return err; } /*模塊卸載方法*/ static void __exit hello_exit(void) { dev_t devno = MKDEV(hello_major, hello_minor); printk(KERN_ALERT"hello_exit\n"); /*銷毀設備類別和設備*/ if(hello_class) { device_destroy(hello_class, MKDEV(hello_major, hello_minor)); class_destroy(hello_class); } /*刪除字符設備和釋放設備內存*/ if(hello_dev) { cdev_del(&(hello_dev->dev)); kfree(hello_dev); } if(hello_dev->val != NULL){ kfree(hello_dev->val); } /*釋放設備號*/ unregister_chrdev_region(devno, 1); } MODULE_LICENSE("GPL"); MODULE_DESCRIPTION("Test Driver"); module_init(hello_init); module_exit(hello_exit);
文件如下:
#ifndef _HELLO_TEST_H_ #define _HELLO_ANDROID_H_ #include#include #define HELLO_DEVICE_NODE_NAME "hello" #define HELLO_DEVICE_FILE_NAME "hello" #define HELLO_DEVICE_CLASS_NAME "hello" struct hello_test_dev { char * val; struct semaphore sem; struct cdev dev; }; #endif
在linux源碼目錄的driver下新建hello目錄,把hello.c和hello.h文件放入其中。新增Makefile和Kconfig文件:
obj-$(CONFIG_HELLO) += hello.o
       config HELLO
           tristate "Test Driver"
           default n
           help
           This is the test driver.
添加如下一項:
obj-$(CONFIG_HELLO) += hello/
添加如下一項:
source "drivers/hello/Kconfig"
如果對編譯linux kernel不熟悉請自行百度。
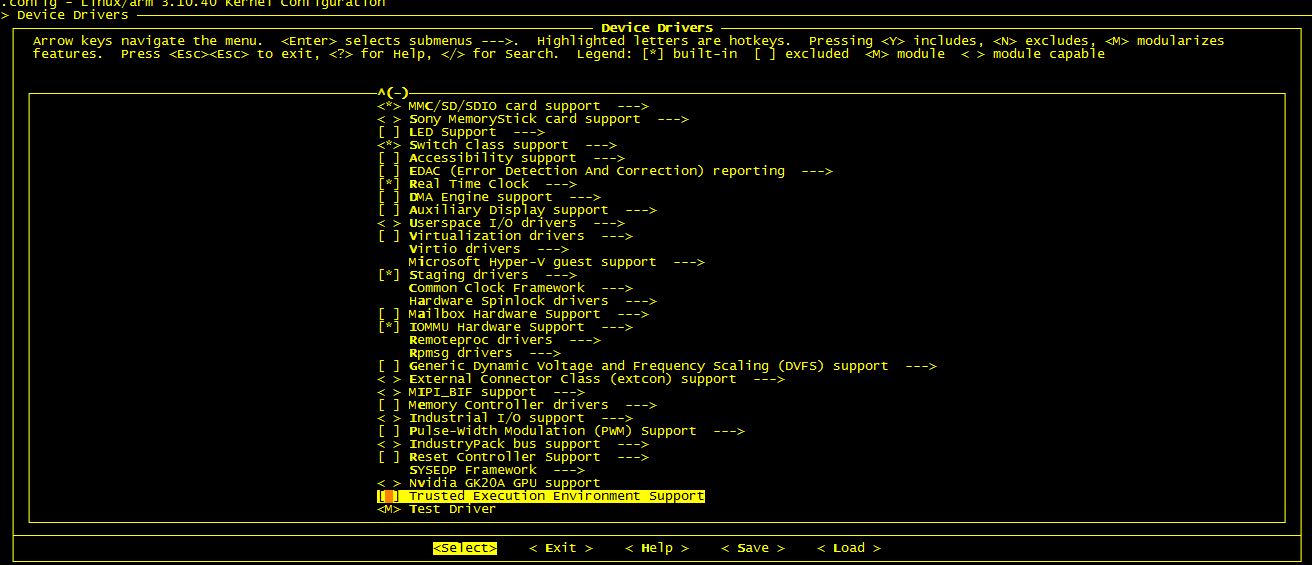
配置界面如下:

可以看到這裡出現了我們在Kconfig中添加的Test Driver選項,我們把它選擇成以模塊的形式編譯,這更有利於我們的測試,這樣我們就不需要重新少些linux kernel了。Android的linux kernel一般是打包進boot.img文件的,如果想把模塊編譯進Linux內核,並且重寫燒寫linux kernel ,建議把kernel放到out/target/product/xxx/目錄下,然後使用make bootimage-nodeps能快速生成boot.img文件,具體kernel放置的位置還需要看android編譯系統相關配置,這裡就不深究了。
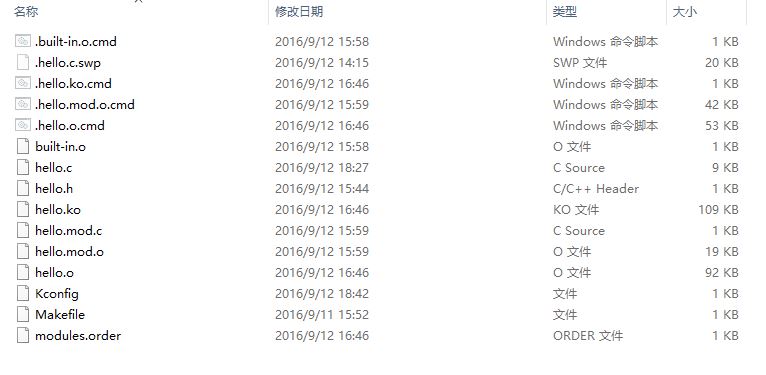
執行make -j16(-j16標示使用16個cpu來編譯,只是個請求),這個過程還是很快的,幾分鐘就可以編譯成功。編譯後的hello目錄如下:

可以看到生成了hello.ko文件。
建議直接使用adb push hello.ko /data 即可,也可以用U盤拷貝。總之,把它放到android設備上。
cd /data
insmod hello.ko
這個時候可以看到/dev/hello /sys/class/hello/hello/val文件已經出現
輸入命令:echo haha > val
打印如下:
[ 9641.053505] hello_val_store.buf: haha
[ 9641.053505] count:5
[ 9641.060167] __hello_set_val.buf: haha
[ 9641.060167] count:5
[ 9641.066841] __hello_set_val.dev->val: hello count:5
[ 9641.073088] __hello_set_val.dev->val: haha
[ 9641.073088] count:5
可以看到數據已經寫入,
使用cat val 讀取:
打印如下:
[ 9644.953496] hello_val_show.
[ 9644.957127] haha
[ 9644.957127]
可以看到haha打印出來了,書名寫入是成功的。
首先在android源碼的packages目錄下新建一個hellotest目錄,該目錄下新建hellotest.c和Android.mk兩個文件。
這個文件用來打開/dev/hello文件並嘗試讀和寫字符串操作,並打印相關信息,源碼如下:
#include#include #include #define HELLO_DEVICE "/dev/hello" int main(int argc, char** argv) { int fd = -1; char * str = malloc(10); //打開/dev/hello fd = open(HELLO_DEVICE, O_RDWR); if(fd == -1) { printf("Failed to open device %s.\n", HELLO_DEVICE); return -1; } printf("Read original value:\n"); //先讀一次數據看看 read(fd, str, 10); printf("read data: %s\n", str); strncpy(str,"nihao",sizeof("nihao")); printf("write nihao\n"); //寫nihao進去 write(fd, str, sizeof(str)); printf("Read the value again:\n"); //讀看看是不是nihao read(fd, str, 10); printf("read data: %s\n", str); close(fd); return 0; }
android下編譯應用程序使用Android.mk還是很方便的:
      LOCAL_PATH := $(call my-dir)

      include $(CLEAR_VARS)

      LOCAL_MODULE_TAGS := optional

      LOCAL_MODULE := hellotest

      LOCAL_SRC_FILES := $(call all-subdir-c-files)

      include $(BUILD_EXECUTABLE)
執行mm命令即可
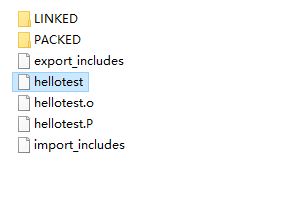
編譯後的文件在out/target/product/xxx/obj/EXECUTABLES/hellotest_intermediates/目錄下,該目錄編譯後如圖:

使用adb push hellotest /data把hellotest 推送到android設備上來,然後chmod +x hellotest添加可執行權限。
最後./hellotest
打印如下:
Read original value:
read data: hell
write nihao
Read the value again:
read data: nihao
可見測試成功。
 android如何寫一個投票或是表達觀點的界面
先上圖: 把這些表示觀點的view放在一個LinearLayout裡: 每個Item可以這樣來實現: &n
 Android應用程序相關的文件目錄詳解
一、方法介紹: 每個Android應用程序都可以通過Context來獲取與應用程序相關的目錄,這些目錄的功能各異,每一個目錄都有自己的特點,
 09_android入門_采用android-async-http開源項目的GET方式或POST方式實現登陸案例
根據08_android入門_android-async-http開源項目介紹及使用方法的介紹,我們通過最常見的登陸案例進行介紹android-async-http開源項
 android自定義popupwindow仿微信右上角彈出菜單效果
微信右上角的操作菜單看起來很好用,就照著仿了一下,不過是舊版微信的,手裡剛好有一些舊版微信的資源圖標,給大家分享一下。不知道微信是用什麼實現的,我使用popupwindo