編輯:關於Android編程
數據庫 SQLite
Oracle SQLServer mySql SQLite 關系型數據
SQLite 數據庫
Android系統中集成了輕量級的數據SQLite
一, 特點:
輕量級 只有一個動態的庫, 是以單個文件的形式進行存取
零配置 無需安裝
跨平台 支持多個操作系統
嵌入式 嵌入手機
在程序的內部,任何位置都能通過數據庫的名稱訪問數據庫, 其他用於程序無法通過數據庫的名稱對其訪問
路徑: data/data/應用程序包名/database/****
二 , 數據存儲的類型
NULL 空值
INTEGER 整型
VARCHAR 可變長度的字符數據
TEXT 文本字符串
BOOLEAN 布爾
三, sql語句
1, 創建表
create table if not exists 表名(字段名稱 字段類型 primary key autoincrement,字段名稱 字段類型,.....)
create table if not exists user(_id integer primary key autoincrement,name varchar(20),age integer)
2, 插入數據
insert into 表名(字段S) values(值S)
insert into user(name,age) values('小明',20)
3, 修改數據
update 表名 set 字段名稱=值 where 字段 = 值
update user set name='小攀' where _id=1
4, 查詢數據
select (字段S) from 表名 where 字段 = 值
select * from user
模糊查詢: select * from 表名 where name like '%o%'
5, 刪除數據
delete from 表名 where 字段 = 值
delete from user where _id=2
四, 操作數據庫的核心類
1, SQLiteDatabase 管理和操作數據庫
特點:
提供了一個管理數據庫的類
提供了增刪改查的方法
數據庫的名稱是唯一的, 創建一次之後就是打開數據
獲取數據庫對象的方法
Context.openOrCreateDatabase(String name, int mode, CursorFactory factory);
SQLiteDatabase 主要提供的方法
void execSQL(String sql) 執行sql語句
Cusor rawQuery(String sql,String[] selectionArgs) 查詢數據庫符合要求的內容
封裝好的方法: 適用於不懂SQL語句的用戶
insert() 插入數據到指定的表中
update() 修改指定表中的數據
query() 查詢表中的指定內容
delete() 刪除表中指定的數據
2, SQLiteOpenHelper 用於數據庫的創建和版本的更新
3, Cursor 游標
默認游標的位置顯示在數據之上
boolean cursor.move(int offset) 游標向上或向下移動指定的行數 , 如果offset為正數,則表示向上移動; 如果為負數 表示向下移動; 並且判斷當前數據是否存在
boolean cursor.moveToNext() 游標移動到下一條數據, 並且判斷下一條數據是否存在
boolean cursor.moveToPrevious() 游標移動到上一條數據, 並且判斷上一條數據是否存在
boolean cursor.moveToFirst()游標移動到第一條數據, 並且判斷第一條數據是否存在
package com.qf.day13_phonebook;

import android.app.Activity;
import android.app.AlertDialog;
import android.app.AlertDialog.Builder;
import android.content.DialogInterface;
import android.content.DialogInterface.OnClickListener;
import android.content.Intent;
import android.database.Cursor;
import android.os.Bundle;
import android.view.Menu;
import android.view.MenuItem;
import android.view.View;
import android.widget.AdapterView;
import android.widget.AdapterView.OnItemClickListener;
import android.widget.ListView;
import android.widget.SimpleCursorAdapter;

import com.qf.day13_phonebook.db.DbService;

public class MainActivity extends Activity {

	//控件
	private ListView lv;
	//數據源
	private Cursor cursor;
	//適配器
	private SimpleCursorAdapter adapter;

	private DbService dbService;


    @Override
    protected void onCreate(Bundle savedInstanceState) {
        super.onCreate(savedInstanceState);
        setContentView(R.layout.activity_main);

        lv = (ListView) findViewById(R.id.lv);

        dbService = new DbService(this);

    }

    @Override
    protected void onResume() {
    	// TODO Auto-generated method stub
    	super.onResume();

    	setListAdapter();

    	lv.setOnItemClickListener(new OnItemClickListener() {

			@Override
			public void onItemClick(AdapterView parent, View view,
					final int position, long id) {

				AlertDialog.Builder builder = new AlertDialog.Builder(MainActivity.this);

				builder.setIcon(R.drawable.ic_launcher);
				builder.setTitle("請選擇你的操作");

				builder.setItems(new String[]{"編輯聯系人","刪除聯系人"}, new OnClickListener() {

					@Override
					public void onClick(DialogInterface dialog, int which) {
						// 點擊的是那個Item
						switch (which) {
						case 0:
							//編輯聯系人

							//1, 游標指向指定的數據
							if(cursor.moveToPosition(position))
							{
								//2, 從游標中獲取當前點擊的Item 對應的  姓名+電話
								int id = cursor.getInt(cursor.getColumnIndex("_id"));
								String name = cursor.getString(cursor.getColumnIndex("name"));
								String phone = cursor.getString(cursor.getColumnIndex("phone"));

								//3, 帶著參數  進入編輯頁面
								Intent intent = new Intent(MainActivity.this, EditActivity.class);
								intent.putExtra("id", id);
								intent.putExtra("name", name);
								intent.putExtra("phone", phone);
								intent.putExtra("isAdd", false);
								startActivity(intent);

							}

							break;

						case 1:
							//刪除聯系人

							AlertDialog.Builder builder2 = new AlertDialog.Builder(MainActivity.this);
							builder2.setIcon(R.drawable.ic_launcher);
							builder2.setTitle("提示");
							builder2.setMessage("是否確認刪除?");

							builder2.setNegativeButton("取消", null);
							builder2.setPositiveButton("確定", new OnClickListener() {

								@Override
								public void onClick(DialogInterface dialog, int which) {
									//1, 游標移動到指定的位置
									if(cursor.moveToPosition(position))
									{
										//2, 獲取當前游標指向的ID
										int id = cursor.getInt(cursor.getColumnIndex("_id"));

										//從數據庫中刪除數據
										dbService.delete(id);

										//把游標創建的方法再次執行一次
										//cursor.requery();
										setListAdapter();
									}


								}
							});

							builder2.show();

							break;
						}

					}
				});

				builder.show();

			}
		});

    }

    /**
     * 獲取數據源  設置適配器
     */
	private void setListAdapter() {
		//數據源
    	cursor = dbService.getUsers();

    	//適配器
    	adapter = new SimpleCursorAdapter(this,
    									  R.layout.item_lv,
    									  cursor,
    									  new String[]{"name","phone"},
    									  new int[]{R.id.name,R.id.phone},
    									  SimpleCursorAdapter.FLAG_REGISTER_CONTENT_OBSERVER);

    	//設置適配器
    	lv.setAdapter(adapter);
	}


    @Override
    public boolean onCreateOptionsMenu(Menu menu) {
    	// 加載菜單布局

    	getMenuInflater().inflate(R.menu.main,menu);

    	return super.onCreateOptionsMenu(menu);
    }

    @Override
    public boolean onOptionsItemSelected(MenuItem item) {
    	switch (item.getItemId()) {

		case R.id.action_adduser:

			Intent intent = new Intent(MainActivity.this, EditActivity.class);

			intent.putExtra("isAdd", true);

			startActivity(intent);

			break;

		}
    	return super.onOptionsItemSelected(item);
    }
}
package com.qf.day13_phonebook;

import com.qf.day13_phonebook.db.DbService;

import android.app.Activity;
import android.content.Intent;
import android.os.Bundle;
import android.view.View;
import android.widget.EditText;

public class EditActivity extends Activity {

	private EditText nameEdit,phoneEdit;

	private boolean isAdd;

	private DbService dbService;

	private int id;

	@Override
	protected void onCreate(Bundle savedInstanceState) {
		super.onCreate(savedInstanceState);
		setContentView(R.layout.activity_edit);

		nameEdit = (EditText) findViewById(R.id.name_edit);
		phoneEdit = (EditText) findViewById(R.id.phone_edit);

		//接收傳入的參數
		Intent intent = getIntent();

		isAdd = intent.getBooleanExtra("isAdd", true);
		if(!isAdd)
		{
			id = intent.getIntExtra("id", 0);
			String name = intent.getStringExtra("name");
			String phone = intent.getStringExtra("phone");

			nameEdit.setText(name);
			phoneEdit.setText(phone);
		}


		//設置Activity標題
		if(isAdd)
		{
			setTitle("添加聯系人");
		}else{
			setTitle("編輯聯系人");
		}

		dbService = new DbService(this);
	}

	public void submit(View v)
	{
		String name = nameEdit.getText().toString().trim();
		String phone = phoneEdit.getText().toString().trim();

		if(isAdd)
		{
			dbService.insertUsers(name,phone);
		}
		else{
			dbService.updateUsers(id,name,phone);
		}

		finish();
	}


}
package com.qf.day13_phonebook.db;

import android.content.Context;
import android.database.sqlite.SQLiteDatabase;
import android.database.sqlite.SQLiteDatabase.CursorFactory;
import android.database.sqlite.SQLiteOpenHelper;

public class DbOperHelper extends SQLiteOpenHelper {


	public DbOperHelper(Context context) {
		super(context, "phone_book", null, 1);
		// TODO Auto-generated constructor stub
	}

	//數據庫創建時執行一次  在後台後連接數據庫
	@Override
	public void onCreate(SQLiteDatabase db) {
		//初始化表

		db.execSQL("create table if not exists users(_id integer primary key autoincrement,name,phone)");

		db.execSQL("insert into users(name,phone) values('張三','153110120')");
		db.execSQL("insert into users(name,phone) values('李四','153120119')");
		db.execSQL("insert into users(name,phone) values('王五','153110911')");
		db.execSQL("insert into users(name,phone) values('趙六','153110114')");

	}

	//版本更新時執行
	@Override
	public void onUpgrade(SQLiteDatabase db, int oldVersion, int newVersion) {
		// TODO Auto-generated method stub

	}

}
package com.qf.day13_phonebook.db;

import android.content.ContentValues;
import android.content.Context;
import android.database.Cursor;
import android.database.sqlite.SQLiteDatabase;

/**
 * 操作數據庫的封裝類
 *
 * @author Administrator
 *
 */
public class DbService {

	private Context context;
	private DbOperHelper dbOperHelper;

	public DbService(Context context) {

		this.context = context;

		dbOperHelper = new DbOperHelper(context);
	}

	//得到聯系表中的所有數據
	public Cursor getUsers()
	{
		//1, 打開連接

		SQLiteDatabase db = dbOperHelper.getReadableDatabase();

		//2, 查詢數據
		return db.rawQuery("select * from users", null);
	}

	//添加聯系人
	public void insertUsers(String name, String phone) {
		//1, 打開連接
		SQLiteDatabase db = dbOperHelper.getWritableDatabase();

		//2, 插入數據
		ContentValues values = new ContentValues();
		values.put("name", name);
		values.put("phone", phone);

		db.insert("users", null, values);
	}

	//編輯聯系人
	public void updateUsers(int id, String name, String phone) {

		//1, 打開連接
		SQLiteDatabase db = dbOperHelper.getWritableDatabase();

		//2, 修改數據
		ContentValues values = new ContentValues();
		values.put("name", name);
		values.put("phone", phone);

		db.update("users", values, "_id="+id, null);
		//db.update("users", values, "_id=?", new String[]{id+""});
	}

	//刪除聯系人
	public void delete(int id) {

		//打開連接
		SQLiteDatabase db = dbOperHelper.getWritableDatabase();

		//刪除數據
		db.execSQL("delete from users where _id="+id);
	}

}
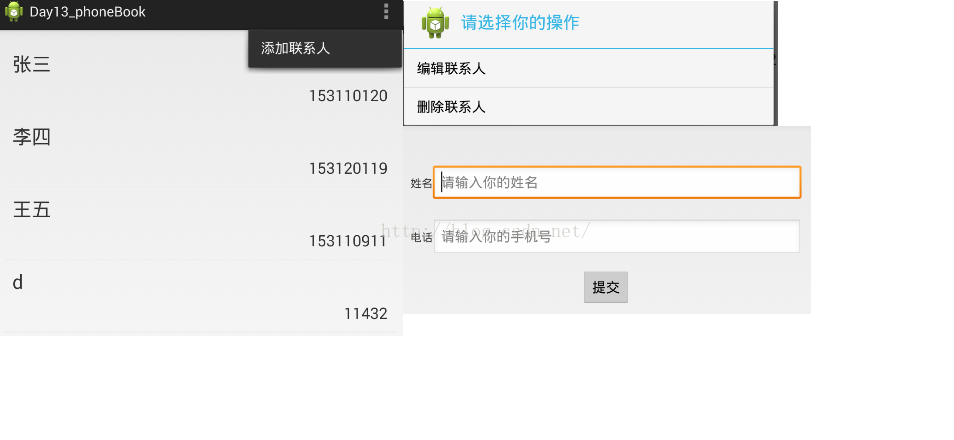
mainactivity 布局
etit activity布局
item_lv小的demo 聯系人存儲

 myeclipse android環境搭建圖文教程
1,基本環境准備:安裝JDK1.5以上,Eclipse3.3以上版本.(MyEclipse也可以),筆者安裝了JDK1.6和MyEclipse 8.6。JDK1.6MyE
 android使用orm框架ormlite在控制台打印log日志信息
在默認情況下,在android下默認只打印info級別的日志信息,所以在默認情況只能打印ormlite中創建數據庫表的語句,而對於數據的插入和查詢等sql語句是不會打印出
 在Android中通過Intent使用Bundle傳遞對象的使用方法
Android開發中有時需要在應用中或進程間傳遞對象,下面詳細介紹Intent使用Bundle傳遞對象的方法。被傳遞的對象需要先實現序列化,而序列化對象有兩種方式:jav
 Android實現一鍵獲取課程成績dome
兩周廢寢忘食的創作終於成功了,現在拿出來分享一下。先不說別的看一下程序運行效果圖,我沒怎麼設計ui所以界面不是很好看但是能說明問題~~~現在我們來看看實現這個功能需要些什