編輯:關於Android編程
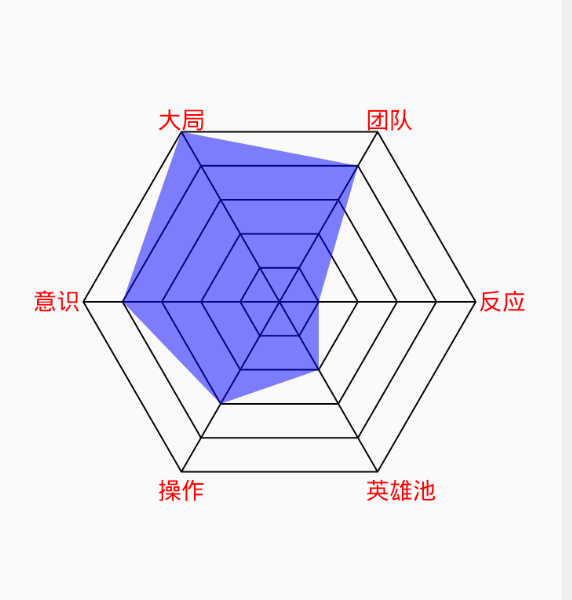
這種繪制屬於自定義View的基本練習,網絡上也有很多案例;可以根據需要將其中的代碼進行修改,集成到項目中去:
效果:
 vc/RocrWtcTKtcGmo6zL48rHsci9z9axudu1xNK71tbVucq+t73KvaGjPC9wPg0KPGgxIGlkPQ=="相關代碼">相關代碼
自定義View的代碼:
public class Polygon extends View {

    private int mHeight;
    private int mWidth;

    //邊框的畫筆
    private Paint mPaint;
    //文字的畫筆
    private Paint textPaint;
    //實力區域的畫筆
    private Paint realPaint;

    //正n邊型
    private int count = 6;
    //角度
    private float angle = (float) (Math.PI * 2 / count);
    //圓的半徑
    private float r = 50;
    //等級分級的個數
    private int levelCount = 5;
    //一些標注
    private String[] explains = {"反應", "英雄池", "操作", "意識", "大局", "團隊"};
    //文字大小
    private int textSize = 30;
    //文字與圖形的距離
    private int margin = 4;
    //實力數據
    private int[] realData;
    //邊框顏色
    private int strokeColor = 0xFF000000;
    //實力區域顏色
    private int strengthColor = 0x800000ff;
    //文字顏色
    private int textColor = 0xFFFF0000;
    //線的粗細
    private int strokeWidth = 2;

    //坐標
    private float x;
    private float y;


    public Polygon(Context context) {
        super(context);
    }

    public Polygon(Context context, AttributeSet attrs) {
        super(context, attrs);
    }

    public Polygon(Context context, AttributeSet attrs, int defStyleAttr) {
        super(context, attrs, defStyleAttr);
    }

    @Override
    protected void onSizeChanged(int w, int h, int oldw, int oldh) {
        super.onSizeChanged(w, h, oldw, oldh);
        mWidth = w;
        mHeight = h;
    }

    @Override
    protected void onDraw(Canvas canvas) {
        super.onDraw(canvas);
        boolean isDraw = initData();
        if (isDraw) {
            canvas.translate(mWidth / 2, mHeight / 2);
            initPaint();

            drawPolygon(canvas);
            drawLines(canvas);
            drawText(canvas);
            drawReal(canvas);
        }
    }

    /**
     * 數據做一些校驗
     */
    private boolean initData() {
        boolean flag = true;
        if (realData == null || realData.length == 0) {
            flag = false;
            return flag;
        }
        if (realData.length != count) {
            throw new IllegalArgumentException("realData的大小必須為" + count + "個");
        }
        return flag;
    }


    /**
     * 繪制多邊形
     *
     * @param canvas
     */
    private void drawPolygon(Canvas canvas) {
        Path path = new Path();
        for (int j = 1; j <= levelCount; j++) {
            float r = this.r * j;
            path.reset();
            for (int i = 1; i <= count; i++) {
                x = (float) (Math.cos(i * angle) * r);
                y = (float) (Math.sin(i * angle) * r);
                if (i == 1) {
                    path.moveTo(x, y);
                } else {
                    path.lineTo(x, y);
                }
            }
            path.close();
            canvas.drawPath(path, mPaint);
        }
    }

    /**
     * 繪制線條
     *
     * @param canvas
     */
    private void drawLines(Canvas canvas) {
        Path path = new Path();
        float r = this.r * levelCount;
        for (int i = 1; i <= count; i++) {
            path.reset();
            //移動到中心
            path.moveTo(0, 0);
            x = (float) (Math.cos(i * angle) * r);
            y = (float) (Math.sin(i * angle) * r);
            path.lineTo(x, y);
            canvas.drawPath(path, mPaint);
        }
    }

    /**
     * 繪制文本;如果直接用x,y來繪制,丑陋不堪,這裡做了些調整
     *
     * @param canvas
     */
    private void drawText(Canvas canvas) {
        float r = this.r * levelCount;
        for (int i = 0; i < count; i++) {
            x = (float) (Math.cos(i * angle) * r);
            y = (float) (Math.sin(i * angle) * r);

            //文本
            String text = explains[(i ) % explains.length];
            //文本長度
            float textLength = textPaint.measureText(text);

            //說明:點在x軸上話,y理論上為0,但是現實很殘酷,只是接近0,所以給了個粗糙的判斷
            if (y < 30 && y > -30 && x > 0) {
                //x軸的正方向
                x = x + margin;
                y = y + textSize / 3;
                canvas.drawText(text, x, y, textPaint);
            } else if (y < 30 && y > -30 && x < 0) {
                //x軸的負方向
                x = x - textLength - margin;
                y = y + textSize / 3;
                canvas.drawText(text, x, y, textPaint);
            } else if (x > 0 && y > 0) {
                //第一象限
                y = y + textSize + margin;
                x = x - textSize / 2;
                canvas.drawText(text, x, y, textPaint);
            } else if (x > 0 && y < 0) {
                //第二象限
                x = x - textSize / 2;
                y = y - margin;
                canvas.drawText(text, x, y, textPaint);
            } else if (x < 0 && y < 0) {
                //第三象限
                y = y - margin;
                x = x - textLength / 2;
                canvas.drawText(text, x, y, textPaint);
            } else if (y > 0 && x < 0) {
                //第四象限
                y = y + textSize + margin;
                x = x - textLength / 2;
                canvas.drawText(text, x, y, textPaint);
            }
            /*打印坐標*/
//            String print = String.format("x-->%f,y-->%f", x, y);
//            Log.e("dd", print);
            /*打印坐標*/
        }
    }

    /**
     * 繪制實力狀況
     *
     * @param canvas
     */
    private void drawReal(Canvas canvas) {
        Path path = new Path();
        for (int i = 0; i < realData.length; i++) {
            int realLevel = realData[i];
            if (realData == null || realData.length == 0) {
                return;
            }
            if (realData.length != count) {
                throw new IllegalArgumentException("realData的大小必須為" + count + "個");
            }
            if (realLevel < 0 || realLevel > levelCount) {
                throw new IllegalArgumentException(String.format("水平數據必須大於等於0且小於等於%d", levelCount));
            }
            float r = this.r * realLevel;
            x = (float) (Math.cos(i * angle) * r);
            y = (float) (Math.sin(i * angle) * r);
            if (i == 0) {
                path.moveTo(x, y);
            } else {
                path.lineTo(x, y);
            }
        }
        path.close();
        canvas.drawPath(path, realPaint);
    }

    /**
     * 初始化畫筆
     */
    private void initPaint() {
        if (mPaint != null)
            return;
        mPaint = new Paint();
        mPaint.setAntiAlias(true);
        mPaint.setStyle(Paint.Style.STROKE);
        mPaint.setColor(strokeColor);
        mPaint.setStrokeWidth(strokeWidth);

        textPaint = new Paint();
        textPaint.setTextSize(textSize);
        textPaint.setColor(textColor);
        textPaint.setAntiAlias(true);

        realPaint = new Paint();
        realPaint.setColor(strengthColor);
        realPaint.setAntiAlias(true);
        realPaint.setStyle(Paint.Style.FILL_AND_STROKE);
    }

    /**
     * 設置數據
     *
     * @param realData
     */
    public void setRealData(int[] realData) {
        this.realData = realData;
        invalidate();
    }
}
Activity中的代碼:
public class MainActivity extends Activity {

    @Override
    protected void onCreate(Bundle savedInstanceState) {
        super.onCreate(savedInstanceState);
        initPolygon();
    }

    private void initPolygon() {
        setContentView(R.layout.polygon);
        Polygon poly = (Polygon) findViewById(R.id.poly);
        poly.setRealData(new int[]{1, 2, 3, 4, 5, 4});
    }

}
xml中的代碼
如果項目急用,可以把上面的代碼復制到demo中,看下效果,根據需求做一些更改;如果想要了解制作流程,且慢慢看:
先來一種動態圖壓壓驚:

分析一下步驟:
畫一個正六邊形 畫N個正六邊形 從中心到頂點用直線連接 在頂點附近寫上文字 將實際的分數繪制到圖形中,並展示出相應的圖案最難得部分是會知正六邊形,知道如何會知正六邊形,其余的部分就不在話下了。
如果你在網上搜索割圓術,會有以下印象:

割圓術的描述(來自 維基百科)
劉徽割圓術是建立在圓面積論的基礎之上的。他首先論證,將圓分割成多邊形,分割來越細,多邊形的邊數越多,多邊形的面積就和圓面積沒有差別了。他說,將6邊形一邊的長度乘以圓半徑,再乘3,得12邊形的面積。將12邊形的一邊長乘半徑,再乘6,得24邊形面積。越割越細,多邊形和圓面積的差越小。如此割了再割,最後終於和圓合為一體,毫無差別了。
用點逆向思維:如果知道一個圓,可以在圓的內部畫出相應大小的正多邊形。
下面這段代碼片,就是根據一個圓,來繪制相應的多邊形
//正n邊型
private int count = 6;
//角度(360/count)
private float angle = (float) (Math.PI * 2 / count);
//圓的半徑
private float r = 50;
//繪制點的坐標
private float x;
private float y;

//去繪制
for (int i = 1; i <= count; i++) {
    //根據高中數學的知識,去求相應的坐標
    x = (float) (Math.cos(i * angle) * r);
    y = (float) (Math.sin(i * angle) * r);

    if (i == 1) {
        //當i為1時,該點為起點,不必與之前的點建立鏈接;所以使用moveTo,而不用lineTo
        path.moveTo(x, y);
    } else {
        path.lineTo(x, y);
    }
}
path.close();
canvas.drawPath(path, mPaint);
知道正多邊形如何繪制,其余的代碼也就沒有什麼難度了,只是一些細節的處理,花點時間,就可以搞定。
自定義View主要是分解步驟,能把圖形繪制的流程分割成若干步,任務基本上就完成了一半。
 Android學習筆記之Shared Preference
如果沒有特殊要求,我們可以使用Android提供的框架來創建系統樣式的Preference Screen,在其內部可以包含PreferenceCategory和Prefe
 360手機衛士來電顯示歸屬地設置圖解詳細教程
360來電顯示歸屬地怎麼設置? 1、如果你使用的是安卓手機,那麼下載安裝並打開安卓版360安全衛士,切換到隱私保護然後點擊右上角三點符號找到衛士設置;3
 Android中實現為TextView添加多個可點擊的文本
本文實例展示了Android中實現為TextView添加多個可點擊的文本的方法。該功能在Android社交軟件的制作中非常具有實用價值。分享給大家供大家參考。具體如下:很
 Android Proguard工具使用和配置詳解
Android開發中的ProguardProguard是Android開發時經常會用到的一個工具,在Android SDK中已經集成了一個免費的Proguard版本,位於