編輯:關於Android編程
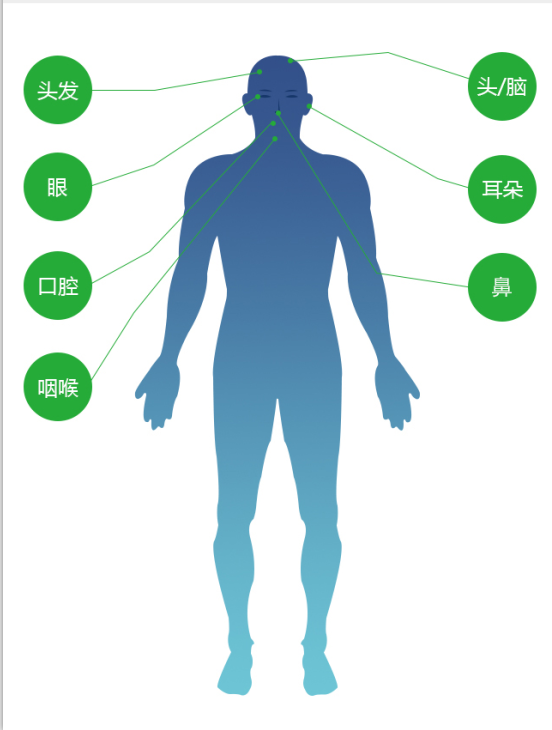
有時候我們拿到一張背景圖片,客戶要求點擊圖片的不同區域去跳轉或者實現不同的操作事件。我們首先要確認圖片的點擊區域,往往我們會在布局文件那裡下手,但是這樣不好做適配,所以我實現了以下方法,基本功能可以實現,而且也做好了適配,可以參考一下。

1.找到對應區域的像素點。圖片中需要點擊的區域是圓,所以只要找到圓心和測量出半徑即可(介紹一款圖片軟件Mark Man),由於得到的是PX,所以要轉換為dip(dp=px/2);
arrays.xml
- man_hair
- man_eye
- man_mouth
- man_throat
- man_mind
- man_ear
- man_nose
- hair
- 頭發
- eye
- 眼
- mouth
- 口腔
- throat
- 咽喉
- mind
- 頭/腦
- ear
- 耳朵
- nose
- 鼻
- 30
- 46
- 20
- 30
- 103
- 20
- 30
- 160
- 20
- 30
- 220
- 20
- 289
- 44
- 20
- 289
- 105
- 20
- 289
- 162
- 20
2.實現自定義ImageView控件,用來存放圖片。
BaseBodyView.java
/**
 * 類說明:身體區域
 *      array必存三個點 圓中心坐標 x,y 半徑 r
 * Author: gaobaiq
 * Date: 2016/7/23 11:22
 */
public abstract class BaseBodyView extends ImageView {
    protected Context mContext;

    // 保存所有點擊區域
    private Map mBodyArea ;

    // 保存點擊的區域
    private Set mFocus;

    protected Paint paint = new Paint();

    // 點擊時Path區域的轉換,用於觸摸點的判斷
    protected RectF mPathRectF = new RectF();


    protected OnBodyClickListener mBodyClick;


    public BaseBodyView(Context context) {
        this(context, null);
    }


    public BaseBodyView(Context context, AttributeSet attrs) {
        this(context, attrs, 0);
    }


    public BaseBodyView(Context context, AttributeSet attrs, int defStyleAttr) {
        super(context, attrs, defStyleAttr);
        mContext = context;
        initDatas();
    }


    private void initDatas() {
        mBodyArea = new HashMap<>();
        mFocus = new HashSet<>();
        //paint.setStyle(Paint.Style.FILL);
        //paint.setARGB(170, 0, 205, 0);
        initBodyArea();
    }

    @Override
    protected void onDraw(Canvas canvas) {
        super.onDraw(canvas);
        // 進行觸摸區域繪制
        //for(String key : mFocus) {
        //    Path path = mBodyArea.get(key).getPath();
        //    canvas.drawPath(path, paint);
        //}
    }

    @Override
    public boolean onTouchEvent(MotionEvent event) {
        if (mBodyClick != null) {
            checkAreas(event);
            if(!mFocus.isEmpty()) {
                BodyArea area = null;
                for(String key : mFocus){
                    area = mBodyArea.get(key);
                    //invalidate();     // 渲染選中區域顏色
                    mBodyClick.onBodyClick(0, area.getPtKeys());
                }
            }
        }
        return super.onTouchEvent(event);
    }

    private void checkAreas(MotionEvent event) {
        mFocus.clear();
        for(String key : mBodyArea.keySet()) {
            mPathRectF.setEmpty();
            Path path = mBodyArea.get(key).getPath();
            path.computeBounds(mPathRectF, true);
            if(mPathRectF.contains(event.getX(),event.getY())) {
                mFocus.add(key);
                break;
            }
        }
    }

    public void initBodyArea() {
        mBodyArea.clear();
        mFocus.clear();
        String[] keys = mContext.getResources().getStringArray(initArray());
        BodyArea bodyArea = null;
        int idenId = -1;
        if(keys != null) {
            for(String key : keys) {
                idenId = mContext.getResources().getIdentifier(key, "array", initPackage());
                int[] paths = mContext.getResources().getIntArray(idenId);
                idenId = mContext.getResources().getIdentifier(key + "_code", "array", initPackage());
                String[] ptKeys = mContext.getResources().getStringArray(idenId);
                bodyArea = new BodyArea(ptKeys, paths);
                mBodyArea.put(key, bodyArea);
            }
        }
    }


    /**
     * 進行不同材質機器的兼容
     * */
    private float toDip(Context context,float pxValue){
        final float scale = context.getResources().getDisplayMetrics().density;
        return (int) (pxValue * scale + 0.5f);
    }


    protected abstract int initArray();
    protected abstract String initPackage();


    /**
     * 點擊事件抽象方法
     */
    public void setOnBodyClickListener(OnBodyClickListener listener) {
        this.mBodyClick = listener;
    }

    public interface OnBodyClickListener {
        void onBodyClick(int position, String[] keys);
    }


    /**
     * 圓形區域對象
     * */
    class BodyArea {
        private String[] mPtKeys;
        private Path mPath;
        public BodyArea(String[] ptKeys, int[] paths) {
            super();
            this.mPtKeys = ptKeys;
            mPath = new Path();
            int len = paths.length;
            if (len >= 3) {
                mPath.addCircle(toDip(mContext, paths[0]), toDip(mContext,
                        paths[1]), toDip(mContext, paths[2]),
                        Path.Direction.CW);
            }

            mPath.close();
        }

        public String[] getPtKeys() {
            return mPtKeys;
        }

        public void setPtKeys(String[] ptKeys) {
            this.mPtKeys = ptKeys;
        }

        public Path getPath() {
            return mPath;
        }
    }
}
ManHeadView.java
/**
 * 類說明:男頭部圖片區域點擊
 *         自定義控件命名要與array的一樣
 * Author: gaobaiq
 * Date: 2016/7/22 10:00
 */
public class ManHeadView extends BaseBodyView {

    public ManHeadView(Context context) {
        this(context, null);
    }


    public ManHeadView(Context context, AttributeSet attrs) {
        this(context, attrs, 0);
    }


    public ManHeadView(Context context, AttributeSet attrs, int defStyleAttr) {
        super(context, attrs, defStyleAttr);
    }


    @Override protected int initArray() {
        return R.array.man_head;
    }


    @Override protected String initPackage() {
        return mContext.getPackageName();
    }
}
3.布局(切記android:scaleType="matrix")
4.實現方法
mImgHead.setOnBodyClickListener(new ManHeadView.OnBodyClickListener() {
    @Override public void onBodyClick(int position, String[] keys) {
        String message  ="Code:" + keys[0] + ", Name:" + keys[1];
        ToastUtils.ToastMessage(getActivity(), message);
    }
});
 Android之SAX解析XML
首先我們來了解一下SAX解析器的基本知識: SAX(Simple API for XML)解析器是一種基於事件的解析器,事件驅動的流式解析方式是,從文件的開始順序解析到文
 Android開發中在TableView上添加懸浮按鈕的方法
如果直接在TableVIewController上貼Button的話會導致這個會隨之滾動,下面解決在TableView上實現位置固定懸浮按鈕的兩種方法: 1.在view
 android之文件下載
android之文件下載android文件下載有三個要點不能在主線程中下載文件 在配置文件中給定權限 使用http協議的get方法連接網絡下載文件做好這三點就可以成功的下
 自定義view實現塗鴉(畫板)功能
自定義view實現塗鴉功能,包括撤銷、恢復、重做、保存以及橡皮擦(在風格中實現)功能,小模塊包括畫筆顏色調整、畫筆尺寸調整、畫筆類型(包括正常畫筆以及橡皮擦功能),之後又