編輯:關於Android編程
項目意義:對於2016年Google I/O大會上提出的Instant Apps,即用戶不需下載app,就可以運行app的這個新鮮的理念
聰明你的可能會聯想到H5App,webApp也是如此的效果,沒錯,今天帶大家做一個免下載,免安裝,即點即用的應用收納集
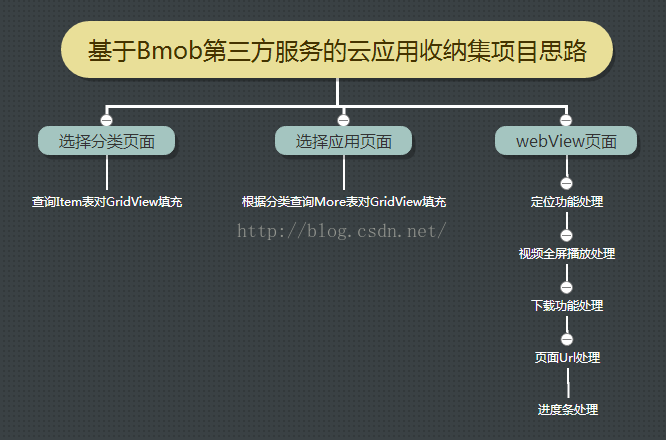
具體思路:
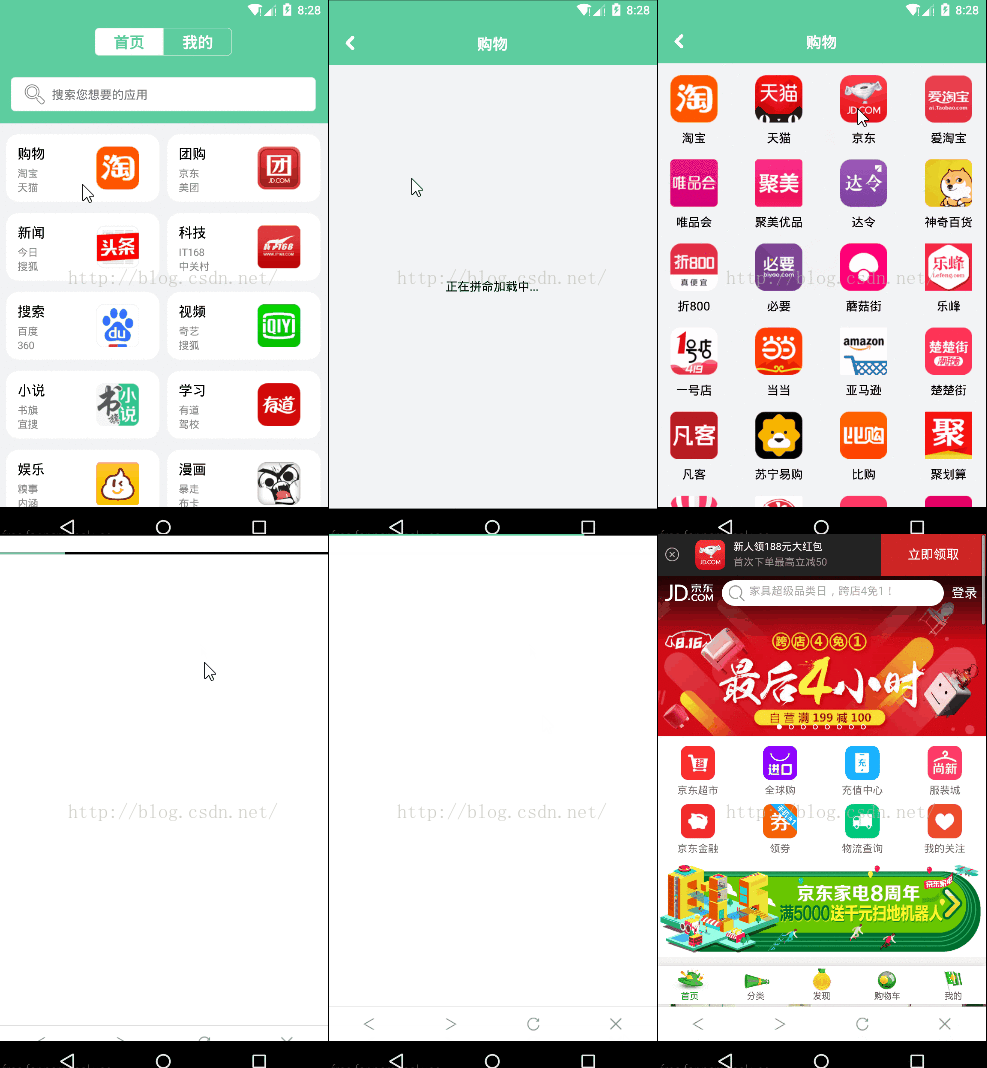
項目效果圖:
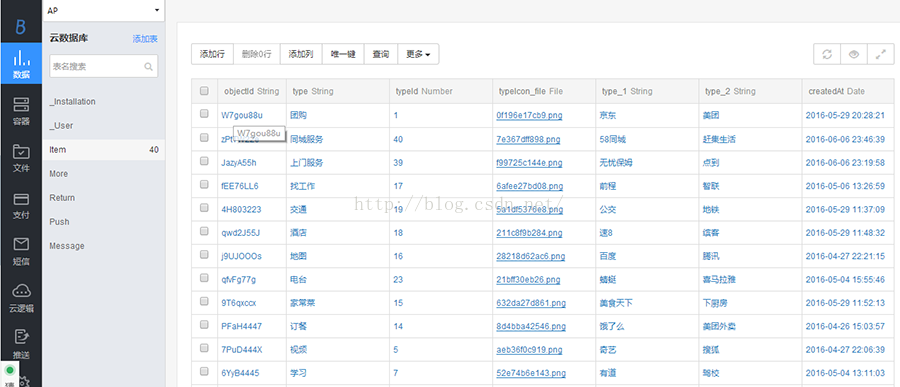
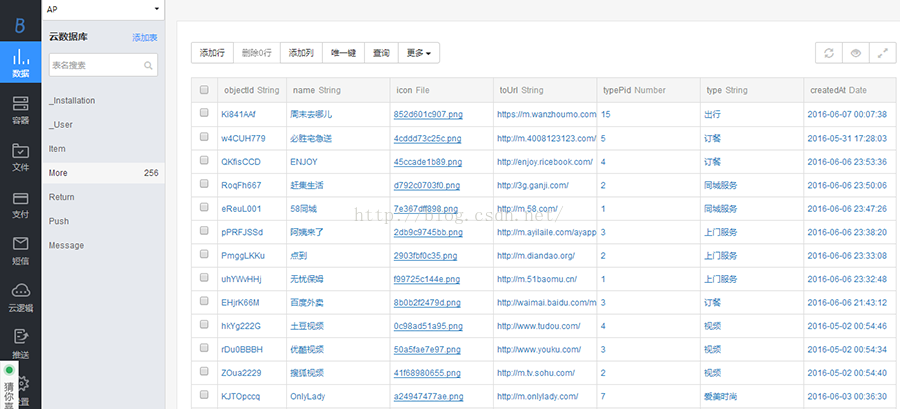
後台數據庫表的結構:(右鍵在新標簽打開可看原圖)
步驟一:javaBean的介紹
分類實體類:
public class Item {
    //分類名
    private String type;
    //分類名下面的2個應用名
    private String type_1;
    private String type_2;
    //根據id可排序
    private int typeId;
    //分類圖標
    private BmobFile typeIcon_file;

    public String getType_1() {
        return type_1;
    }

    public void setType_1(String type_1) {
        this.type_1 = type_1;
    }

    public String getType_2() {
        return type_2;
    }

    public void setType_2(String type_2) {
        this.type_2 = type_2;
    }

    public BmobFile getTypeIcon_file() {
        return typeIcon_file;
    }

    public void setTypeIcon_file(BmobFile typeIcon_file) {
        this.typeIcon_file = typeIcon_file;
    }

    public String getType() {
        return type;
    }

    public void setType(String type) {
        this.type = type;
    }

    public int getTypeId() {
        return typeId;
    }

    public void setTypeId(int typeId) {
        this.typeId = typeId;
    }
}
應用實體類:
public class More {
    //應用名
    private String name;
    //應用圖標
    private BmobFile icon;
    //應用跳轉的H5頁面
    private String toUrl;
    //根據pid可以排序
    private int typePid;
    //對應的分類
    private String type;

    public String getType() {
        return type;
    }

    public void setType(String type) {
        this.type = type;
    }

    public String getName() {
        return name;
    }

    public void setName(String name) {
        this.name = name;
    }

    public BmobFile getIcon() {
        return icon;
    }

    public void setIcon(BmobFile icon) {
        this.icon = icon;
    }

    public String getToUrl() {
        return toUrl;
    }

    public void setToUrl(String toUrl) {
        this.toUrl = toUrl;
    }

    public int getTypePid() {
        return typePid;
    }

    public void setTypePid(int typePid) {
        this.typePid = typePid;
    }
}
步驟二:選擇分類頁面和選擇應用頁面,GridView的填充(這裡只介紹分類頁的填充,應用頁的填充步驟是一樣的)
創建一個GridView布局(由於前面帶有一個搜索欄,所以用到的是開源框架GridViewWithHeaderAndFooter):
創建一個View布局用於填充GridView(左邊文字右邊圖片,可看效果圖分類頁):
創建一個GridView的Adapter來適配View(這裡用Xutils來加載圖片,通過下面2句代碼,new一個對象,display就可以了):
public class HomeAdapter extends BaseAdapter {
//模塊數據
private List- list;
private LayoutInflater mInflater;
private Context context;
private Item item;
private Intent intent;
private BitmapUtils bitmapUtils;
public HomeAdapter(Context context, List
- list) {
this.list = list;
mInflater = LayoutInflater.from(context);
this.context = context;
bitmapUtils = new BitmapUtils(context);
}
@Override
public int getCount() {
return list.size();
}
@Override
public Object getItem(int position) {
return list.get(position);
}
@Override
public long getItemId(int position) {
return position;
}
@Override
public View getView(int position, View convertView, ViewGroup parent) {
if (convertView == null) {
convertView = mInflater.inflate(R.layout.adapter_home, null);
}
final ViewHolder holder = getViewHolder(convertView);
item = list.get(position);
//模塊名稱
holder.tv_type.setText(item.getType());
holder.tv_type.setTag(item.getType());
holder.tv_type_1.setText(item.getType_1());
holder.tv_type_2.setText(item.getType_2());
//模塊導航圖片
if (item.getTypeIcon_file() != null) {
bitmapUtils.display(holder.iv_type, item.getTypeIcon_file().getFileUrl(context));
}
//模塊點擊事件
holder.ly_type.setOnClickListener(new View.OnClickListener() {
@Override
public void onClick(View v) {
intent = new Intent(context, MoreActivity.class);
intent.putExtra("title", holder.tv_type.getTag() + "");
context.startActivity(intent);
}
});
return convertView;
}
/**
* 獲得控件管理對象
*
* @param view
* @return
*/
private ViewHolder getViewHolder(View view) {
ViewHolder holder = (ViewHolder) view.getTag();
if (holder == null) {
holder = new ViewHolder(view);
view.setTag(holder);
}
return holder;
}
/**
* 控件管理類
*/
private class ViewHolder {
private TextView tv_type,tv_type_1,tv_type_2;
private LinearLayout ly_type;
private ImageView iv_type;
ViewHolder(View view) {
tv_type = (TextView) view.findViewById(R.id.tv_type);
tv_type_1 = (TextView) view.findViewById(R.id.tv_type_1);
tv_type_2 = (TextView) view.findViewById(R.id.tv_type_2);
ly_type = (LinearLayout) view.findViewById(R.id.ly_type);
iv_type = (ImageView) view.findViewById(R.id.iv_type);
}
}
}
代碼填充GridView數據:
/**
* 初始化模塊數據
*/
private void initItemData() {
query = new BmobQuery<>();
query.setCachePolicy(BmobQuery.CachePolicy.CACHE_THEN_NETWORK);
query.order("typeId");
query.setLimit(200);
query.findObjects(getActivity(), new FindListener- () {
@Override
public void onSuccess(List
- object) {
itemList = object;
//顯示模塊數據
adapter = new HomeAdapter(getActivity(), itemList);
gv_home.setNumColumns(2);
gv_home.setAdapter(adapter);
}
@Override
public void onError(int code, String msg) {
}
@Override
public void postOnFailure(int code, String msg) {
}
});
}
步驟三:WebView頁面(即第三個頁面)對WebView頁面處理
這裡可以關注我博客上面的有關對WebView處理的文章:http://blog.csdn.net/qq_30379689/article/details/51898640
步驟四:部分H5App出現定位功能(百度地圖等),那麼應該對必須解決安卓6.0系統的權限問題,將權限請求放在應用頁面開啟之前的頁面,之後檢查到H5App需要定位功能時會自動彈出權限申請,這裡使用的是Bmob封裝好的PermissionManager
以下是Bmob的官方說明:
Android6.0中對特定的權限進行了動態授權的方式,需要在運行時用戶手動授予,如果用戶拒絕後再次申請還可以向用戶彈框說明權限的作用,用戶點擊確認後再去申請。
因此,我們提供了一個權限管理的工具類PermissionManager(cn.bmob.v3.helper),具體使用如下:
注:在v3.4.6的BmobSDK內部集成PermissionManager類,自v3.4.7以後的SDK內部將不再提供該類,開發者可以在下載的配套官方Demo的com.example.bmobexample.permission包下面查看該類源碼。
第一步:在項目的Gradle上添加下面這些信息:
android {
    compileSdkVersion 23
    buildToolsVersion '23.0.2'

    //**bmob-sdk:3.4.6版本依賴包,用於兼容Android6.0系統**
    useLibrary 'org.apache.http.legacy'
添加依賴:
compile 'com.android.support:support-v4:23.2.1'
第二步:構建PremissionManager類
PermissionManager helper;
helper = PermissionManager.with(MainActivity.this)
        //添加權限請求碼
        .addRequestCode(MainActivity.REQUEST_CODE_CAMERA)
        //設置權限,可以添加多個權限
        .permissions(Manifest.permission.ACCESS_FINE_LOCATION)
        //設置權限監聽器
        .setPermissionsListener(new PermissionListener() {

            @Override
            public void onGranted() {
                //當權限被授予時調用
               Toast.makeText(MainActivity.this, "Camera Permission granted",Toast.LENGTH_LONG).show();
            }

            @Override
            public void onDenied() {
                //用戶拒絕該權限時調用
               Toast.makeText(MainActivity.this, "Camera Permission denied",Toast.LENGTH_LONG).show();
            }

            @Override
            public void onShowRationale(String[] permissions) {
                //當用戶拒絕某權限時並點擊`不再提醒`的按鈕時,下次應用再請求該權限時,需要給出合適的響應(比如,給個展示對話框來解釋應用為什麼需要該權限)
                Snackbar.make(btn_camera, "需要相機權限去拍照", Snackbar.LENGTH_INDEFINITE)
                        .setAction("ok", new View.OnClickListener() {
                            @Override
                            public void onClick(View v) {
                                //必須調用該`setIsPositive(true)`方法
                                helper.setIsPositive(true);
                                helper.request();
                            }
                        }).show();
            }
        })
        //請求權限
        .request();
第三步:覆寫onResultPermissionResult方法:
@Override
public void onRequestPermissionsResult(int requestCode, String[] permissions, int[] grantResults) {
    super.onRequestPermissionsResult(requestCode, permissions, grantResults);
    switch (requestCode) {
        case REQUEST_CODE_CAMERA:
            helper.onPermissionResult(permissions, grantResults);
            break;
    }
}
 Android N Preview 行為變更
AndroidN 除了提供諸多新特性和功能外,還對系統和 API 行為做出了各種變更。本文重點介紹您應該了解並在開發應用時加以考慮的一些重要變更。如果您之前發布過 And
 cocos2d-2.0-x-2.0.3 交叉編譯到android報錯解決
我用的是cocos2d-2.0-x-2.0.3 之前弄了一天也沒成功 今天來了下載了最新的ndk8 更新了sdk 又重新是了一遍 居然成功了,不知道是工具的版本問題還是哪
 Android下拉刷新與輪播圖滑動沖突解決方案
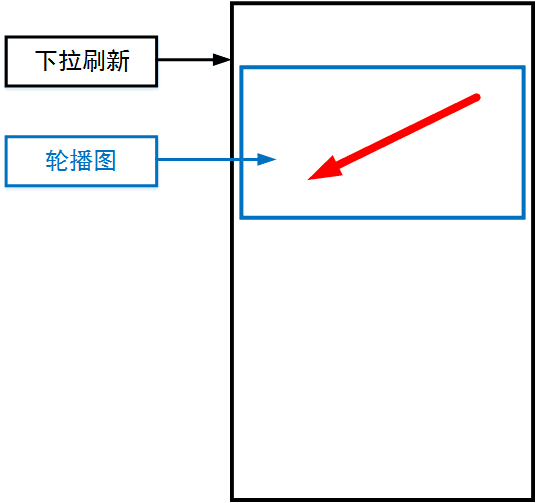
最近在開發中遇到了這樣一個問題,在下拉刷新組件中包含了一個輪播圖組件,當左右滑動的圖片時很容易觸發下拉刷新,如下圖所示:如圖中紅色箭頭所示方向切換輪播圖,很容易觸發下拉刷
 一加手機3和樂視max2哪個好 一加手機3和樂MAX2對比評測
一加3手機,這款手機搭載了骁龍820處理器和氫OS系統,並且采用了金屬材質機身,該機售價2499元,6月16日上午10:00在京東和一加官方商城同步開始發售