編輯:關於Android編程
package com.dragon.testfuction;
import android.os.Handler;
import android.os.Message;
import android.support.v7.app.AppCompatActivity;
import android.os.Bundle;
import android.view.View;
import android.widget.ImageView;
import android.widget.Toast;
import java.util.Timer;
import java.util.TimerTask;


public class Main extends AppCompatActivity  {
//    定義圖片顯示ID
    int[] imageIds = new int[]{
            R.drawable.one,
            R.drawable.two,
            R.drawable.three,
            R.drawable.four
    };
    int currentImageId = 0;

    @Override
    protected void onCreate(Bundle savedInstanceState) {
        super.onCreate(savedInstanceState);
        setContentView(R.layout.main);
        final ImageView show = (ImageView) findViewById(R.id.show);
        final Handler myHandler = new Handler(){
            @Override
            public void  handleMessage(Message msg){
//                檢查消息發送來源,如果是本程序發送的
                if(msg.what == 0x1233){
//                    動態修改圖片
                    show.setImageResource(imageIds[currentImageId++%imageIds.length]);
                }
            }
        };
//定義一個定時器,周期性的執行指定任務
        new Timer().schedule(new TimerTask(){
            @Override
            public void run(){
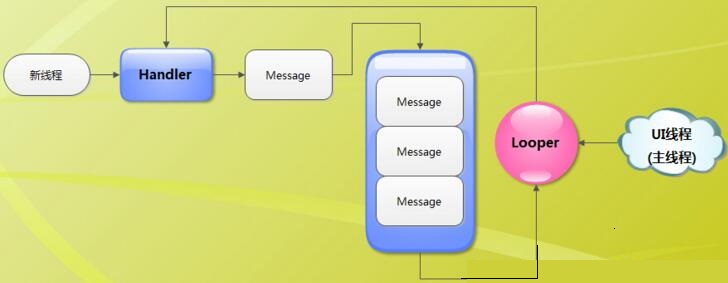
            //在子線程中拿到父線程中創建的handle對象,通過該對象來向父線程的消息隊列發送消息(通過這種方式,可以在其它子線程中與主線程通信來由UI線程更新界面)
                myHandler.sendEmptyMessage(0x1233);
            }
    },0,1200);
}
}
package com.dragon.testfuction;
import android.os.Handler;
import android.os.Looper;
import android.os.Message;
import android.support.v7.app.AppCompatActivity;
import android.os.Bundle;
import android.view.View;
import android.widget.EditText;
import android.widget.Toast;
import java.util.ArrayList;
import java.util.List;


public class Main extends AppCompatActivity  {
    static final String UPPER_NUM = "upper";
    EditText etNum;
    CalThread calThread;
//    定義一個線程類
    class CalThread extends Thread {
            public Handler mHandler;
            public void run(){
//                創建looper對象,每一個線程使用Handle都要有一個looper對象
                Looper.prepare();
//                子線程中定義handler獲取處理消息
                mHandler = new Handler(){
//                    定義處理信息的方法
                    @Override
                    public void handleMessage(Message msg){
                            if(msg.what == 0x123){
                                int upper = msg.getData().getInt(UPPER_NUM);
                                List nums = new ArrayList();
                                outer:
//                                質數也是素數,除了1和它本身外,不能被其它整除
                                for(int i =2;i <=upper;i++){
                                    for(int j=2; j<= Math.sqrt(i);j++){
//                                        如果可以整除,說明不是質數
                                        if(i!=2 && i%j==0){
                                            continue outer;
                                        }
                                    }
                                    nums.add(i);
                                }
//                                用Toast顯示所有統計出來的質數
                                Toast.makeText(Main.this,nums.toString(),Toast.LENGTH_LONG).show();
                            }
                    }
                };
                Looper.loop();//啟動looper
            }
    }
    @Override
    public void onCreate(Bundle savedInstanceState){
        super.onCreate(savedInstanceState);
        setContentView(R.layout.main);
        etNum = (EditText) findViewById(R.id.etNum);
        calThread = new CalThread();
        calThread.start();//啟動新線程
    }
//按鈕事件點擊處理函數
    public void cal(View source){
//        創建消息
        Message msg = new Message();
        msg.what = 0x123;
        Bundle bundle = new Bundle();
        bundle.putInt(UPPER_NUM,Integer.parseInt(etNum.getText().toString()));
        msg.setData(bundle);
//        在主線程中想新線程中的Handler發送消息
        calThread.mHandler.sendMessage(msg);//在主線程中發送消息
    }
}


  /** Initialize the current thread as a looper.
      * This gives you a chance to create handlers that then reference
      * this looper, before actually starting the loop. Be sure to call
      * {@link #loop()} after calling this method, and end it by calling
      * {@link #quit()}.
      */
    public static void prepare() {
        prepare(true);
    }

    private static void prepare(boolean quitAllowed) {
        if (sThreadLocal.get() != null) {
            throw new RuntimeException("Only one Looper may be created per thread");
        }
        sThreadLocal.set(new Looper(quitAllowed));
    }
 dialog dismiss時鍵盤不消失的問題淺析及解決辦法
當setCanceledOnTouchOutside(true),點擊陰影處,dialog dismiss時鍵盤不消失的問題。如圖一開始覺得很簡單,監聽下onDimiss
 Android增量更新與CMake構建工具
研究增量更新的熱情被激發了,通過幾天的資料查找和學習,搞懂增量更新之余,也順便練習了下NDK開發。效果圖預覽開發環境Android Studio 2.2.1 For W
 Android 側滑菜單的實現
Android 側滑菜單的實現,參考網上的代碼,實現側滑菜單。最重要的是這個動畫類UgcAnimations,如何使用動畫類來側滑的封裝FlipperLayout。&nb
 Android實戰教程第五篇之一鍵鎖屏應用
Device Administration對於這個應用,市場上很多,但是看一下評論就知道效果有多差了,因為99%一鍵鎖屏應用沒辦法卸載。今天就開發一個小應用,實現輕松點擊