編輯:關於Android編程
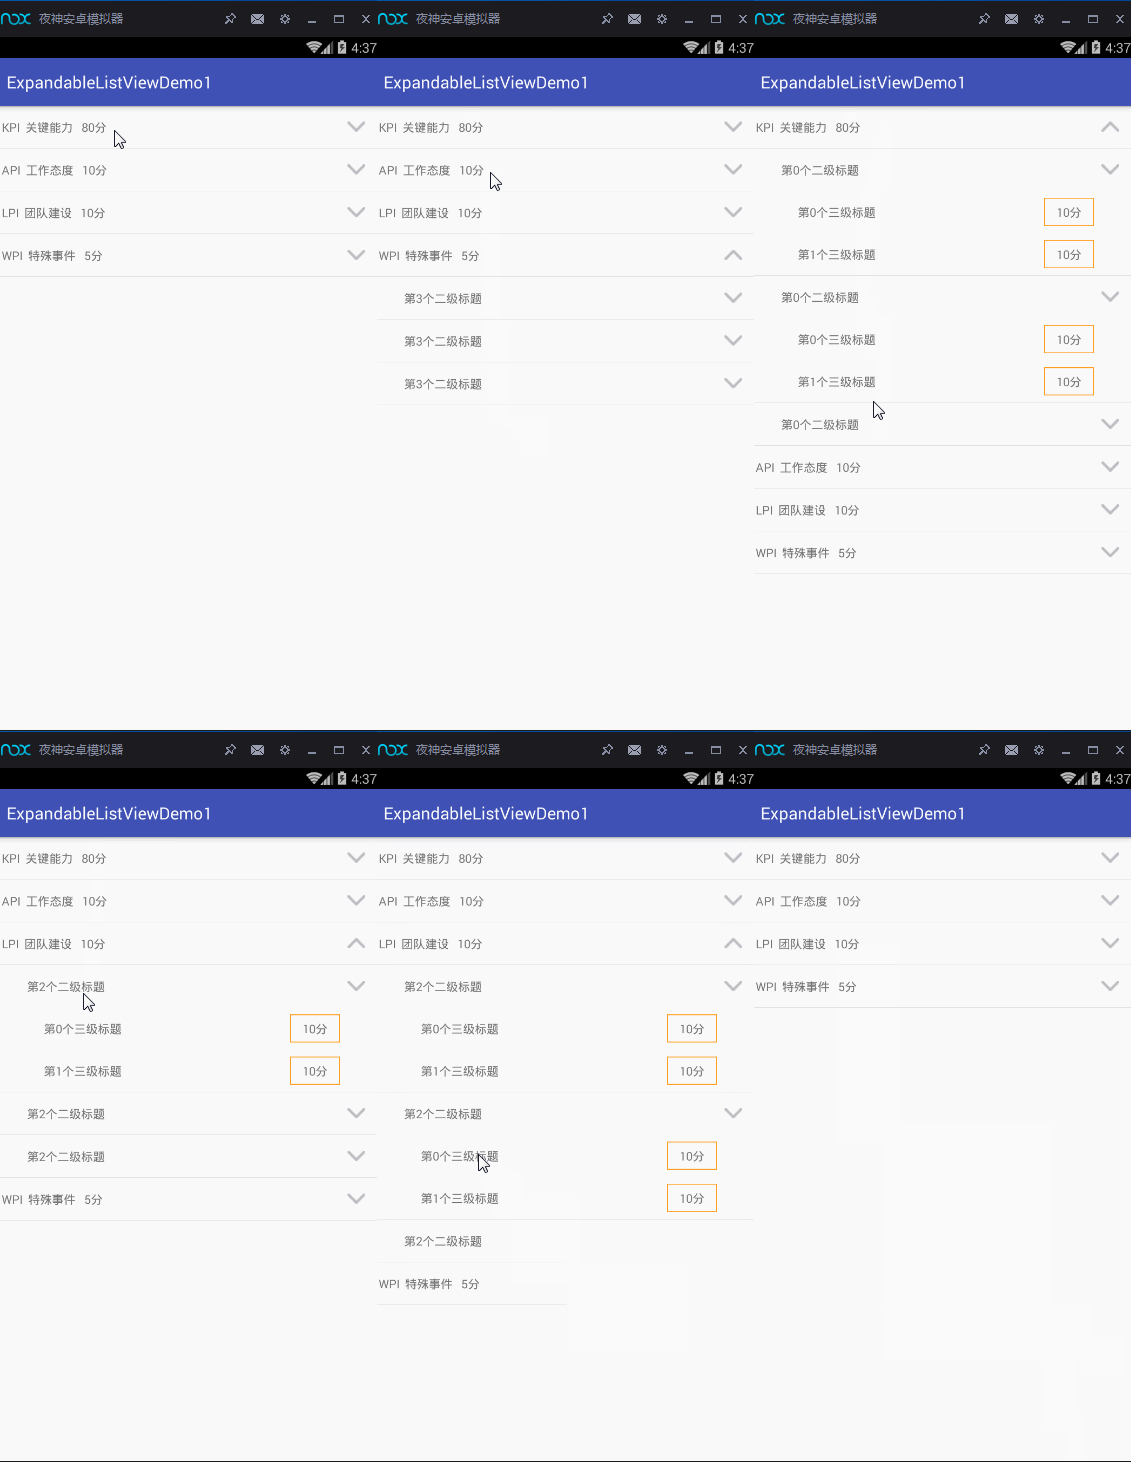
由於本人所作的項目需要用到這種列表式的收縮與展開,因此,就好好研究了有關這方面的一些知識,當然,也借鑒了網上一些成功的案列。下面就是我模擬測試的一個展示界面。

實現上面的這些功能,我主要是通過ExpandableListView這一控件,以及BaseExpandableListAdapter適配器。這兩者關聯實現的。好的,那接下來,就對這些進行詳細的展示。
所有的xml布局展示
## parent_group_item.xml##
## child_adapter.xml##
## child_child.xml##
## activity_content.xml##
接下來就是獲取數據、適配數據,以及對控件的操作事件。首先是獲取數據,由於項目接口不宜公開,固這裡采用的是測試數據其主要代碼如下。
 /**
     * 初始化數據
     */
    private void initData() {
        for(int i=0;i<4;i++){
            FirstBean firstBean = new FirstBean();
            ArrayList mArrlistSecondBean = new ArrayList();
            if(i==0){
                firstBean.setScore("80分");
                firstBean.setTitle("KPI  關鍵能力");
            }else if(i==1){
                firstBean.setScore("10分");
                firstBean.setTitle("API  工作態度");
            }else if(i==2){
                firstBean.setScore("10分");
                firstBean.setTitle("LPI  團隊建設");
            }else if(i==3){
                firstBean.setScore("5分");
                firstBean.setTitle("WPI  特殊事件");
            }
            for(int j=0;j<3;j++){
                SecondBean secondBean = new SecondBean();
                secondBean.setTitle("第"+i+"個二級標題");
                ArrayList mArrlistBean = new ArrayList();
                for(int k=0;k<2;k++){
                    ThirdBean thirdBean = new ThirdBean();
                    thirdBean.setTitle("第"+k+"個三級標題");
                    mArrlistBean.add(thirdBean);
                }
                secondBean.setSecondBean(mArrlistBean);
                mArrlistSecondBean.add(secondBean);
            }
            firstBean.setFirstData(mArrlistSecondBean);
            mDatas.add(firstBean);

            Log.e("xxx",mDatas.get(i).getTitle());
        }
    }
由於是三級菜單,所以這裡的實體用了3個,理論上,n級菜單的話,那就得n個實體,但是一般的app用到的至多就是3級,4級以上的都比較少見。其適配器那就得用兩個。接下來講解第一個適配器,它不是繼承BaseAdapter,繼承的是BaseExpandableListAdapter,通過重寫它的方法能很好的把數據與控件結合在一起。其主要的方法有:getGroupView()、getChildView()….主要代碼如下。
/**
     *  第一級菜單適配器布局
     * @param parentPosition
     * @param isExpanded
     *
     * @param convertView
     * @param viewGroup
     * @return
     */
    @Override
    public View getGroupView(int parentPosition, boolean isExpanded, View convertView, ViewGroup viewGroup) {
        if (convertView == null) {
            convertView = LayoutInflater.from(mContext).inflate(
                    R.layout.parent_group_item, null);
            holder = new ViewHolder();
            holder.upImg = (ImageView) convertView.findViewById(R.id.kpi_back_img);
            holder.score = (TextView) convertView.findViewById(R.id.kpi_score);
            holder.title = (TextView) convertView.findViewById(R.id.title);
            convertView.setTag(holder);
        } else {
            holder = (ViewHolder) convertView.getTag();
        }
        //區分箭頭往上還是
        if(isExpanded){
            holder.upImg.setImageResource(R.drawable.dowm);
        }else{
            holder.upImg.setImageResource(R.drawable.up);
        }
        holder.title.setText(mData.get(parentPosition).getTitle());
        holder.score.setText(mData.get(parentPosition).getScore());
        return convertView;
    }
    class ViewHolder{
        private TextView title;
        private TextView score;
        private ImageView upImg;
    }
    public ExpandableListView getExpandableListView() {
        ExpandableListView mExpandableListView = new ExpandableListView(
                mContext);
        AbsListView.LayoutParams lp = new AbsListView.LayoutParams(
                ViewGroup.LayoutParams.MATCH_PARENT, (int) mContext
                .getResources().getDimension(
                        R.dimen.parent_list_height));
        mExpandableListView.setLayoutParams(lp);
        mExpandableListView.setDividerHeight(0);// 取消group項的分割線
        mExpandableListView.setChildDivider(null);// 取消child項的分割線
        mExpandableListView.setGroupIndicator(null);// 取消展開折疊的指示圖標
        return mExpandableListView;
    }
    /**
     * 第二級菜單式配
     * @param parentPosition
     * @param childPosition
     * @param isExpanded
     * @param view
     * @param viewGroup
     * @return
     */
    @Override
    public View getChildView(final int parentPosition, final int childPosition, boolean isExpanded, View view, ViewGroup viewGroup) {
        final ExpandableListView childListView = getExpandableListView();
        //獲取子菜單的數據
        final ArrayList childData = new ArrayList();
        final SecondBean bean = getChild(parentPosition,childPosition);
        childData.add(bean);
        ChildAdapter adapter = new ChildAdapter(mContext,childData,parentPosition);
        childListView.setAdapter(adapter);

        /**
         * 點擊最小級菜單,調用該方法
         * */
        childListView.setOnChildClickListener(new ExpandableListView.OnChildClickListener() {

            @Override
            public boolean onChildClick(ExpandableListView arg0, View arg1,
                                        int groupIndex, int childIndex, long arg4) {
                if(mListener != null){
                    mListener.onclick(parentPosition,childPosition, childIndex);
                    //點擊三級菜單,跳轉到編輯菜單界面
                    Intent intent = new Intent(mContext, ContentActivity.class);
                    intent.putExtra("content","你點的位置是:  "+"parentPosition>>"+parentPosition+
                    "childPosition>>"+childPosition+"childIndex>>"+childIndex);
                    mContext.startActivity(intent);
                }
                return false;
            }
        });
        /**
         *子ExpandableListView展開時,因為group只有一項,所以子ExpandableListView的總高度=
         * (子ExpandableListView的child數量 + 1 )* 每一項的高度
         * */
        childListView.setOnGroupExpandListener(new ExpandableListView.OnGroupExpandListener() {
            @Override
            public void onGroupExpand(int groupPosition) {
                Log.e("xxx",groupPosition+"onGroupExpand>>");
                AbsListView.LayoutParams lp = new AbsListView.LayoutParams(
                        ViewGroup.LayoutParams.MATCH_PARENT,
                        (bean.getSecondBean().size() + 1)* (int) mContext
                        .getResources().getDimension(R.dimen.parent_list_height));
                childListView.setLayoutParams(lp);
            }
        });
        /**
         *子ExpandableListView關閉時,此時只剩下group這一項,
         * 所以子ExpandableListView的總高度即為一項的高度
         * */
        childListView.setOnGroupCollapseListener(new ExpandableListView.OnGroupCollapseListener() {
            @Override
            public void onGroupCollapse(int groupPosition) {
                Log.e("xxx",groupPosition+">>onGroupCollapse");
                AbsListView.LayoutParams lp = new AbsListView.LayoutParams(
                        ViewGroup.LayoutParams.MATCH_PARENT, (int) mContext
                        .getResources().getDimension(R.dimen.parent_list_height));
                childListView.setLayoutParams(lp);
                holder.upImg.setImageResource(R.drawable.up);
            }
        });
        /**
         * 在這裡對二級菜單的點擊事件進行操作
         */
        childListView.setOnGroupClickListener(new ExpandableListView.OnGroupClickListener() {
            @Override
            public boolean onGroupClick(ExpandableListView parent, View v, int Position, long id) {
//                if(isClick){
//                    holder.mUpImg.setImageResource(R.drawable.dowm);
//                    isClick = false;
//                }else{
//                    holder.mUpImg.setImageResource(R.drawable.up);
//                    isClick = true;
//                }
                Log.e("Xxx","恭喜你,點擊了"+parentPosition+"childpos>>>"+childPosition);
                return false;
            }
        });
        return childListView;
    }
第二個適配器與上述差不多,也是主要通過以上的方法來實現的。
 Android自定義ViewGroup(一)——帶箭頭的圓角矩形菜單
今天要做一個帶箭頭的圓角矩形菜單,大概長下面這個樣子: 要求頂上的箭頭要對准菜單錨點,菜單項按壓反色,菜單背景色和按壓色可配置。最簡單的做法就是讓UX給個三角形
 直接拿來用的Android刮獎控件
直接上效果圖 功能特色: 1、可以設置刮開後顯示文字或圖片 2、可以統計已刮開區域所占百分比 Demo下載地址:RubberDem
 Android實習札記(5)---Fragment之底部導航欄的實現
在Part 4我們回顧了一下Fragment的基本概念,在本節中我們就來學習Fragment應用的簡單例子吧! 就是使用Fragment來實現
 Android Studio配置SVN
一、 Android Studio配置SVN Android Studio關聯配置SVN很簡單,在Settings裡面,找到Version Control->Sub