編輯:關於Android編程
類類型Class的實例獲取方式有一下三種
public static void main(String[] arg0) {
        String result = "Hello ReflectionText..";
        System.out.println(result);

        Class userClass1 = User.class;

        Class userClass2 = new User().getClass();

        try {
            Class userClass3 = Class
                    .forName("idea.analyzesystem.reflection.User");

            System.out.println(userClass1);
            System.out.println(userClass2);
            System.out.println(userClass3);
        } catch (ClassNotFoundException e) {
            e.printStackTrace();
        }

    }
我們可以通過類類型創建類實例對象(這裡newInstance要求該類必須擁有無參構造函數)
public static void main(String[] arg0) {

        try {
            User user = User.class.newInstance();
            System.out.println(user);
        } catch (InstantiationException e) {
            e.printStackTrace();
        } catch (IllegalAccessException e) {
            e.printStackTrace();
        }
    }
類的加載方式分為動態加載和靜態加載,而上面提到的Class.format(“”)方法不僅是獲取類類型Class,還表示動態加載。而編譯時為靜態加載,運行時為動態加載,下面再注解使用中還會提到,這裡不做過多說明了。
首先我們可以通過class獲取類的名稱,名稱可以包含包名可以不包含。
public static void main(String[] arg0) {

        System.out.println(User.class.getSimpleName());
        System.out.println(User.class.getName());

    }

// .................輸出結果................

User
idea.analyzesystem.reflection.User
獲取一個類的所有public方法以及他的父類的所有public方法可以通過getMethods獲取
Class cls = User.class;
Method[] methods = cls.getMethods();
如果我們想要獲取自己類內部定義的其他private、 protected方法怎麼辦呢?可以采取以下方法(該方法不管訪問權限,只要是方法都會被獲取)
Method[] allSelfMethods = cls.getDeclaredMethods();
獲取方法的名字通過getName得到
for(Method method: methods){
            System.out.println(method.getName());
        }
//.....下面輸出User的結果................

setLevel
setAge
getNickName
getLevel
getUserName
getAge
getPassword
getEmail
setGender
getIdCard
setIdCard
有時候我們需要反射得到返回值判斷具體類型,可以通過method.getReturnType()方法得到。方法有無參函數和有參數的函數,我們可以通過method.getParameterTypes()方法獲取方法的所有參數對應的類類型集合。
通過反射獲取定義的成員變量的相關信息可以通過getFields獲取所有public定義的成員變量,getDeclaredFields呢則是獲取所有定義的成員變量(field.getType獲取成員變量類型),下面是相關代碼塊實例和輸出結果對比
public static void main(String[] arg0) {

        Class cls = User.class;
         Field[] fieldspublic = cls.getFields();
            for(Field field : fieldspublic){
                System.out.println(field.getName());
            }

        System.out.println("********************");

        Field[] fields = cls.getDeclaredFields();
        for(Field field : fields){
            System.out.println(field.getName());
        }

    }
//............輸出結果................

a
test
********************
a
test
uid
userName
password
獲取構造函數的名字以及參數列表可以通過cls.getConstructors()獲取所有的public修飾的構造函數,cls.getDeclaredConstructors()則可以獲取所有關鍵詞修飾的構造函數。
我們可以通過Class獲取到Method,再通過Method調用invoke方法操作對象的方法。下面請看實例代碼
public static void main(String[] arg0) {

        User user = new User();
        user.setNickName("hello");

        User user2 = new User();
        user2.setNickName("world");

        Class cls = user.getClass();
        try {
            Method method = cls.getDeclaredMethod("setNickName", String.class);
            method.invoke(user, "idea");
            System.out.println(user.getNickName());
            System.out.println(user2.getNickName());
        } catch (Exception e) {
            e.printStackTrace();
        }
    }
通過反射修改User對象的setNickName,下面是測試結果
idea
world
invoke方法的返回值根據方法的返回值判斷,void返回null,其他的默認object類型,我們可以根據自己需求強轉類型。
反射的操作都是編譯後的操作,編譯後的泛型是去泛型化的操作。這裡通過ArrayList相關操作來論證這一觀點。
public static void main(String[] arg0) {

        ArrayList list = new ArrayList<>();
        ArrayList userList= new ArrayList<>();
        userList.add(new User());

        System.out.println(list.getClass()==userList.getClass());

    }
//..........輸出結果..........

true
我們在同個反射的方式調用,為userList的方式添加不同於User對象的類型,是可以添加成功的,下面是相關測試代碼塊
public static void main(String[] arg0) {

        ArrayList list = new ArrayList<>();
        ArrayList userList= new ArrayList<>();
        userList.add(new User());

        System.out.println(list.getClass()==userList.getClass());

        try {
            Method method = userList.getClass().getMethod("add", Object.class);
            method.invoke(userList, "Test ArrayList add other type data");
            System.out.println(userList.toString());
        } catch (Exception e) {
            e.printStackTrace();
        }
    }
輸出結果
true
[User [uid=null, userName=null, password=null, age=0,
 gender=null, idCard=null, level=0, nickName=null, Email=null],
 Test ArrayList add other type data]
事實證明我們是可以往List裡面添加任何類型的!這裡用這麼多篇幅來理解反射不是閒的蛋疼的事,在下面的真主注解埋下鋪墊,這裡不過多透露了,如想知道更多請往下接著看..
如果你不用注解,請不要@me 。說個最簡單的例子,Android中通過findViewById得到控件,這是一件繁瑣的事情,重復著這些代碼好累,使用注解可以把他簡單化,注解框架有xtuils、butterknife等,也許你在項目中只希望用到 Inject View這個功能,又或者你想知道這個實現的原理是怎樣的。本文主要是解決這兩個問題,實現一個最簡單的ViewInject.
我們的Activity重寫父類的onCreate方法如下(@Override注解表示重寫父類方法)
public class MainActivity extends AppCompatActivity {

    @Override
    protected void onCreate(Bundle savedInstanceState) {
        super.onCreate(savedInstanceState);
        setContentView(R.layout.activity_main);
    }
}
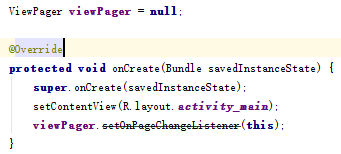
下面在看一幅圖

setOnPageChangListener方法在某個版本後過時了( @Deprecated標記某個方法過時)
  @Deprecated
  public void setOnPageChangeListener(OnPageChangeListener listener) {
      mOnPageChangeListener = listener;
  }
過時方法會有警告提示,我們可以在方法/類名上面添加忽略警告的注解,警告提示就不會再存在了(@SuppressWarnings(“Deprecated”)),我們Android開發很多時候如果是因為版本問題忽略警告需要注意版本的兼容性
注解按照運行機制來分類可以分為三大類
源碼注解
編譯時注解
運行時注解
源碼注解表示注解只在源碼存在,編譯成class就不存在了,編譯時注解編譯成class還存在,編譯時存在。運行時注解表示在運行階段還會起作用。(元注解是注解的注解,稍後再提一下)
下面通過一個自定義注解來幫助認知自定義注解的要素
@Target(ElementType.FIELD)
@Inherited
@TargetApi(14)
@Retention(RetentionPolicy.RUNTIME)
@Documented
public @interface ViewInject{
    int id();

    int[] ids();

    int age() default 18;
}
@interface 表示一個注解定義,注解的方法必須是無參數的,如果有返回值可以默認返回值,如果注解的方法只有一個用value()表示,注解類型支持基本類型、String、Class、Annotation、Enumeration.@Target表示注解的作用域,可以是方法或類、字段上面。@Retention注解的生命周期控制。@Inherited表示允許被繼承,@Documented描述注解信息,@TargetApi指定Anddroid開發中的Api可以使用的最低等級。注解使用可以沒有成員,我們稱之為表示注解。
通過上面反射相關的了解,我們知道可以通過反射獲取類函數變量,並可以執行變量賦值、方法調用。cls.isAnnotationPresent(xx.class)用於判斷是否存在指定的注解類型。Method同樣支持這個方法,具體用法在我們接下來的xutils viewUtils注解模塊來詳細了解。下面先看看Xutils使用的注解代碼塊。(當然實際開發ViewUtils.inject初始化方法都放在基類,實現類Activity都可以不用重寫onCreate方法)
@ContentView(R.layout.activity_splash)
public class MainActivity extends Activity{

    @ViewInject(R.id.button_login)
    private TextView textView;

    @Override
    protected void onCreate(Bundle savedInstanceState) {
        super.onCreate(savedInstanceState);
        ViewUtils.inject(this);
    }

    @OnClick(R.id.button_login)
    public void onClick(View v){

    }

    @OnClick({R.id.button_login,R.id.searchView})
    public void onClicks(View v){

    }
}
ViewUtils.inject(this);方法在做解析操作,我們先來看看這些注解定義:ContentView
package com.lidroid.xutils.view.annotation;

import java.lang.annotation.ElementType;
import java.lang.annotation.Retention;
import java.lang.annotation.RetentionPolicy;
import java.lang.annotation.Target;

@Target(ElementType.TYPE)
@Retention(RetentionPolicy.RUNTIME)
public @interface ContentView {
    int value();
}
在我們inject方法調用後解析類名上面的注解是這樣的
  @SuppressWarnings("ConstantConditions")
    private static void injectObject(Object handler, ViewFinder finder) {

        Class handlerType = handler.getClass();

        // 判斷是否存在ContentView注解,如果存在,理解通過注入的方式setContentView(int)
        ContentView contentView = handlerType.getAnnotation(ContentView.class);
        if (contentView != null) {
            try {
                Method setContentViewMethod = handlerType.getMethod("setContentView", int.class);
                setContentViewMethod.invoke(handler, contentView.value());
            } catch (Throwable e) {
                LogUtils.e(e.getMessage(), e);
            }
        }
下面再來看onClick的注解實現,首先有個定義EventBase注解作用於注解
/**
 * Author: wyouflf
 * Date: 13-9-9
 * Time: 下午12:43
 */
@Target(ElementType.ANNOTATION_TYPE)
@Retention(RetentionPolicy.RUNTIME)
public @interface EventBase {
    Class listenerType();

    String listenerSetter();

    String methodName();
}
OnClick注解定義如下(指定了設置OnClickListener的方法名字以及回調方法名稱,支持注解多個控件,這裡的value表示view的id值)
/**
 * Author: wyouflf
 * Date: 13-8-16
 * Time: 下午2:27
 */
@Target(ElementType.METHOD)
@Retention(RetentionPolicy.RUNTIME)
@EventBase(
        listenerType = View.OnClickListener.class,
        listenerSetter = "setOnClickListener",
        methodName = "onClick")
public @interface OnClick {
    int[] value();

    int[] parentId() default 0;
}
解析這些方法注解在ViewUtils源碼塊如下
 // inject event
        Method[] methods = handlerType.getDeclaredMethods();//獲取所有方法
        if (methods != null && methods.length > 0) {//方法不為空
            for (Method method : methods) {
                Annotation[] annotations = method.getDeclaredAnnotations();//獲取所有的方法上面的注解
                if (annotations != null && annotations.length > 0) {
                    for (Annotation annotation : annotations) {
                        Class annType = annotation.annotationType();
                        if (annType.getAnnotation(EventBase.class) != null) {//如果存在EventBase注解
                            method.setAccessible(true);
                            try {
                                // ProGuard:-keep class * extent java.lang.annotation.Annotation { *; }
                                //如果使用了注解要添加混淆規則,保證注解不能被混淆
                                //下面開始為EventListenerManager添加監聽事件,EventBase注解了添加事件的方法名稱以及回調方法名稱
                                Method valueMethod = annType.getDeclaredMethod("value");
                                Method parentIdMethod = null;
                                try {
                                    parentIdMethod = annType.getDeclaredMethod("parentId");
                                } catch (Throwable e) {
                                }
                                Object values = valueMethod.invoke(annotation);
                                Object parentIds = parentIdMethod == null ? null : parentIdMethod.invoke(annotation);
                                int parentIdsLen = parentIds == null ? 0 : Array.getLength(parentIds);
                                int len = Array.getLength(values);
                                for (int i = 0; i < len; i++) {
                                    ViewInjectInfo info = new ViewInjectInfo();
                                    info.value = Array.get(values, i);
                                    info.parentId = parentIdsLen > i ? (Integer) Array.get(parentIds, i) : 0;
                                    EventListenerManager.addEventMethod(finder, info, annotation, handler, method);
                                }
                            } catch (Throwable e) {
                                LogUtils.e(e.getMessage(), e);
                            }
                        }
                    }
                }
            }
        }
    }
inject方法的調用變量賦值這塊,關於ViewInject注解定義如下(不得不說注解value只支持單個控件,個人覺得支持批量注解控件多好的,可以減少很多代碼,如果你有興趣可以嘗試修改它):
package com.lidroid.xutils.view.annotation;

import java.lang.annotation.ElementType;
import java.lang.annotation.Retention;
import java.lang.annotation.RetentionPolicy;
import java.lang.annotation.Target;

@Target(ElementType.FIELD)//作用在字段上面
//運行時任然有效,如果改為class 或者編譯時就會有問題了,findById找不到
//變量為空引用時拋出空指針異常,如果混淆了注解,也會導致找不到控件
@Retention(RetentionPolicy.RUNTIME)
public @interface ViewInject {

    int value();

    /* parent view id */
    int parentId() default 0;
}
注解變量的解析在ViewUtils的實現如下:
    private static void injectObject(Object handler, ViewFinder finder) {

      //...................略...................

        Field[] fields = handlerType.getDeclaredFields();//查找出所有控件變量
        if (fields != null && fields.length > 0) {
            for (Field field : fields) {
                //控件變量注解找到後通過finder提供的findById獲取控件實例
                ViewInject viewInject = field.getAnnotation(ViewInject.class);
                if (viewInject != null) {
                    try {
                        View view = finder.findViewById(viewInject.value(), viewInject.parentId());
                        //打開權限然後用反射賦值
                        if (view != null) {
                            field.setAccessible(true);
                            field.set(handler, view);
                        }
                    } catch (Throwable e) {
                     //如果用ViewInject注解了但是找不到視圖的話直接拋出了運行時異常
                        LogUtils.e(e.getMessage(), e);
                    }
                } else {
                   //..............略過其他注解解析................
                }
            }
        }
}
通過反射和注解的系統的學習了解,我們可以把我們的代碼玩的更好了,再也不用愁看不懂別人寫的注解代碼了,根據慕課視頻還get到一點,我們應用開發的數據緩存是家常便飯,我們可以通過注解的方式創建數據庫表,注解的方式實現增刪改sqlite的表數據,雖然我們當前使用的多數為第三方的sqlite相關的開源庫,我們遇到注解如此的實現還是可以去了解一下的,xutils的db模塊可以參考,盡管xutils目前已經不再維護有了xutils3.0,我們不能否定xutils是一個非常不錯的開源項目。
 Android Service(不和用戶交互應用組件)案例分析
Service是在一段不定的時間運行在後台,不和用戶交互應用組件。每個Service必須在manifest中 通過<service>來聲明。可以通過conte
 ListView 分頁加載更新實例分享
ListView是android中最常用的控件之一。 在實際運用中往往會遇到一次性加載全部數據過多,需要分頁加載增加程序運行效率! 本demo是將更新的監聽放在listv
 自定義SwipeLayout實現側滑菜單
先看 SwipeLayout的效果圖圖太多了,我這只上傳一張,想看 listview和GridView效果的,和想看源碼的 —> GitHub怎麼實現後
 Android基礎入門教程——7.6.1 Socket學習網絡基礎准備
Android基礎入門教程——7.6.1 Socket學習網絡基礎准備標簽(空格分隔): Android基礎入門教程本節引言: 為了照顧沒學過Ja