編輯:關於Android編程
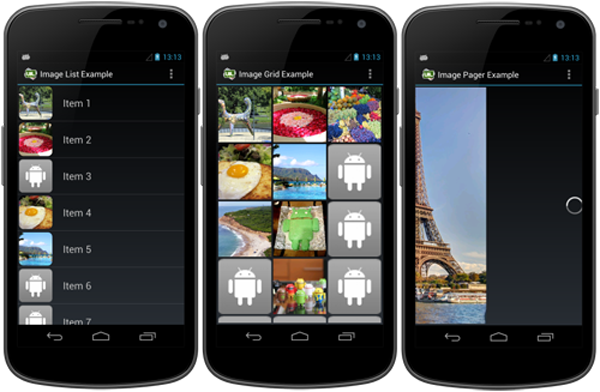
Android開源框架Universal-Image-Loader就像圖片加載守護者,為我們提供了豐富的功能特性:
(1)多線程加載圖像(異步或同步);
(2)高度可定制化imageloader配置(線程池、圖片下載器、解碼器、內存和磁盤緩存、顯示圖像選項等);
(3)每一個顯示圖像有許多自定義選項(存根圖片,緩存開關,解碼選項,位圖處理和顯示等);
(4)支持內存和磁盤上的圖像緩存(設備的文件系統和SD卡);
(5)監聽加載過程(包括下載進度);

下來我們詳解如何配置使用Universal-Image-Loader來加載網絡圖片
Github下載:
https://github.com/nostra13/Android-Universal-Image-Loader
Maven下載:
http://central.maven.org/maven2/com/nostra13/universalimageloader/universal-image-loader/
(1)首先關聯Universal-Image-Loader的庫文件。然後在Application的onCreate中初始化ImageLoader
public class MyApplication extends Application{
    @Override
    public void onCreate() {
        super.onCreate();
        initImageLoader(this);
    }

    public static void initImageLoader(Context context) {
        // This configuration tuning is custom. You can tune every option, you may tune some of them,
        // or you can create default configuration by
        ImageLoaderConfiguration.Builder config = new ImageLoaderConfiguration.Builder(context);
        config.threadPriority(Thread.NORM_PRIORITY - 2);
        config.denyCacheImageMultipleSizesInMemory(); // 不會在內存中緩存多個大小的圖片
        config.diskCacheFileNameGenerator(new Md5FileNameGenerator()); // 為了保證圖片名稱唯一
        config.diskCacheSize(50 * 1024 * 1024); // 50 MiB
        // 內存緩存大小默認是:app可用內存的1/8
        config.tasksProcessingOrder(QueueProcessingType.LIFO);
        config.writeDebugLogs(); // Remove for release app
        // Initialize ImageLoader with configuration.
        ImageLoader.getInstance().init(config.build());
    //ImageLoader.getInstance().init(ImageLoaderConfiguration.createDefault(this));
    }
}
(2)在AndroidManifest中配置Application
(3)在MyImageApadter中加載圖片,初始化DisplayImageOptions(為了方便使用,我們將其抽取成一個類)
/**
 * Universal-Image-Loader-master options參數
 */
public interface ImageLoaderOptions {
    DisplayImageOptions options = new DisplayImageOptions.Builder()
        .showImageOnLoading(R.drawable.ic_default)// 加載圖片過程中顯示哪張圖片
        .showImageForEmptyUri(R.drawable.ic_default)// url為空的話顯示哪張圖片
        .showImageOnFail(R.drawable.ic_default)// 加載圖片失敗顯示哪張圖片
        .cacheInMemory(true)// 在內存中緩存該圖片
        .cacheOnDisk(true)// 在硬盤中緩存該圖片
        .imageScaleType(ImageScaleType.EXACTLY)// 將會對圖片進一步縮放,縮放的程度參考ImageVIew的寬高
        .bitmapConfig(Bitmap.Config.RGB_565)// 該種渲染模式也是比較節省內存的
        .considerExifParams(true)// 會識別圖片的方向信息
        // .displayer(new FadeInBitmapDisplayer(800)).build();//漸漸顯示的動畫效果
        .displayer(new RoundedBitmapDisplayer(28)).build();// 圓角的效果
    // 顯示大圖的options
    DisplayImageOptions pager_options = new DisplayImageOptions.Builder()
        .showImageOnLoading(R.drawable.ic_default)// 加載圖片過程中顯示哪張圖片
        .showImageForEmptyUri(R.drawable.ic_default)// url為空的話顯示哪張圖片
        .showImageOnFail(R.drawable.ic_default)// 加載圖片失敗顯示哪張圖片
        .cacheInMemory(false)// 不在內存中緩存該圖片
        .cacheOnDisk(true)// 在硬盤中緩存該圖片
        .imageScaleType(ImageScaleType.EXACTLY)// 將會對圖片進一步縮放,縮放的程度參考ImageVIew的寬高
        .bitmapConfig(Bitmap.Config.RGB_565)// 該種渲染模式也是比較節省內存的
        .considerExifParams(true)// 會識別圖片的方向信息
        .displayer(new FadeInBitmapDisplayer(500)).build();// 漸漸顯示的動畫效果
    // .displayer(new RoundedBitmapDisplayer(28)).build();// 圓角的效果
}
(4)在getView方法中調用加載圖片
/**
 * displayImage(uri, imageView, options, listener, progressListener);
 * 參數解析:
 *      imageUrl : 圖片的URL地址
 *      imageView : 顯示圖片的ImageView控件
 *      options : DisplayImageOptions配置信息
 *      listener : 圖片下載情況的監聽
 *      progressListener : 圖片下載進度的監聽
 */
//加載圖片
ImageLoader.getInstance().displayImage(Url.IMAGE, holder.iv_icon, ImageLoaderOptions.options);
–>拓展
漸漸顯示的動畫效果和圓角的效果不能同時設置,解決方法:我們在(3)中設置圓角效果,然後捨棄(4)的方法加載圖片,而采用下面方法,到此,我們魚與熊掌兼得。
//加載圖片
ImageLoader.getInstance().displayImage(Url.IMAGE,holder.iv_icon, options
        ,new SimpleImageLoadingListener(){
    @Override
    public void onLoadingComplete(String imageUri, View view,
            Bitmap loadedImage) {
        super.onLoadingComplete(imageUri, view, loadedImage);
        FadeInBitmapDisplayer.animate(view, 800);//漸漸顯示的效果
    }
});
(1)遇到橫屏大圖(width>height),低配置的手機或有的手機無法顯示圖片的問題
解決方法:在應用中配置ImageLoaderConfiguration參數,最好在Application中進行設置和配置(如上的MyApplication.java中),只能配置一次,如多次配置,則系統默認第一次的配置參數。
ImageLoaderConfiguration config = new ImageLoaderConfiguration.Builder(
    getApplicationContext())
        .memoryCacheExtraOptions(480, 800) // 保存每個緩存圖片的最大長和寬
        .threadPoolSize(3) // 線程池的大小 這個其實默認就是3
        .threadPriority(Thread. NORM_PRIORITY - 2) //設置線程優先級
        .denyCacheImageMultipleSizesInMemory() // 當同一個Uri獲取不同大小的圖片,緩存到內存時,只緩存一個。默認會緩存多個不同的大小的相同圖片
        .memoryCache( new UsingFreqLimitedMemoryCache(2 * 1024 * 1024))
        .memoryCacheSize(2 * 1024 * 1024) // 設置緩存的最大字節
        .tasksProcessingOrder(QueueProcessingType. LIFO) //設置圖片下載和顯示的工作隊列排序
        .defaultDisplayImageOptions(DisplayImageOptions. createSimple())
        .imageDownloader(new BaseImageDownloader(getApplicationContext(),
                5 * 1000, 30 * 1000))// connectTimeout : 超時時間
        .writeDebugLogs().build(); // 開始構建
ImageLoader. getInstance().init(config); // 全局初始化此配置
按上面的設置和配置就解決了橫屏大圖在某些手機上不顯示的問題,建議在Application中進行設置和配置,代碼中配置的缺點:用一次配一次。
(2)低配置手機中大量圖片時經常發生OOM的問題
項目中圖片數量大、大小也大,在後台收集到的crash信息中看到發生了大量的OOM現象。
解決方法:
1)禁用在內存中緩存cacheInMemory(false)
2)減少配置的線程池的大小(.threadPoolSize(…)),建議1~5
3)在顯示選項中使用 .bitmapConfig(Bitmap.Config.RGB_565) 因為RGB_565模式消耗的內存比ARGB_8888模式少兩倍
4)配置中使用 .memoryCache(newWeakMemoryCache()) 或者完全禁用在內存中緩存
5)在顯示選項中使用.imageScaleType(ImageScaleType.EXACTLY) 或 .imageScaleType(ImageScaleType.IN_SAMPLE_INT)
6)避免使用 RoundedBitmapDisplayer. 調用的時候它使用ARGB-8888模式創建了一個新的Bitmap對象來顯示
上面的條件,不一定都這樣設置,可能改變其中的一些選項進行設置就能解決問題,對此要靈活運用
(1)只有在你需要讓Image的尺寸比當前設備的尺寸大的時候,你才需要配置maxImageWidthForMemoryCache( )和maxImageHeightForMemoryCache( )這兩個參數,比如縮放圖片的時候。其他情況下,不需要做這些配置,因為默認的配置會根據屏幕尺寸以最節約內存的方式處理Bitmap。
(2)在設置中配置線程池的大小。一個大的線程池會允許多條線程同時工作,但是也會顯著的影響到UI線程的速度。但是可以通過設置一個較低的優先級來解決:當ImageLoader在使用的時候,可以降低它的優先級,這樣UI線程會更加流暢。在使用ListView的時候,UI 線程經常會不太流暢,所以在你的程序中最好設置threadPoolSize( )和threadPriority( )這兩個參數來優化你的應用。
(3)memoryCache( )和memoryCacheSize( )這兩個參數會互相覆蓋,所以在ImageLoaderConfiguration中使用一個即可。
(4)diskCacheSize( )、diskCache( )和diskCacheFileCount( )這三個參數會互相覆蓋,只使用一個即可。
特別注意:不要使用discCacheSize( )、discCache( )和discCacheFileCount( )這三個參數,因為他們已經棄用了。
 Android中ContentProvider組件詳解
一.Android四大組件Android四大組件是Activity, Service, Content Provider,Broadcast Receiver。Activ
 Android 6.0權限管理,sdk)=23請求權限
如果APP運行在Android 6.0或以上版本的手機,並且target sdk>=23,那麼在使用一些相對敏感的權限時,需要征求用戶的許可。比如讀寫sdcard,
 Android自定義View之三種流行進度條的寫法
概述:利用自定義View的onDraw()方法,可以繪制很多種圖形,進度框只是其中之一。Demo這是一個模擬下載的demo。自中央逐漸充滿型圓形進度框demo1publi
 OpenCV實現圖像暗區擴張(腐蝕圖片)
效果圖源碼KqwOpenCVBlurDemo暗區擴張,也叫腐蝕,要實現這樣的效果,我們可以選取一個合適大小的核,用被核覆蓋的最小值代替錨點像素。我們首先定義一個合適大小的