編輯:關於Android編程
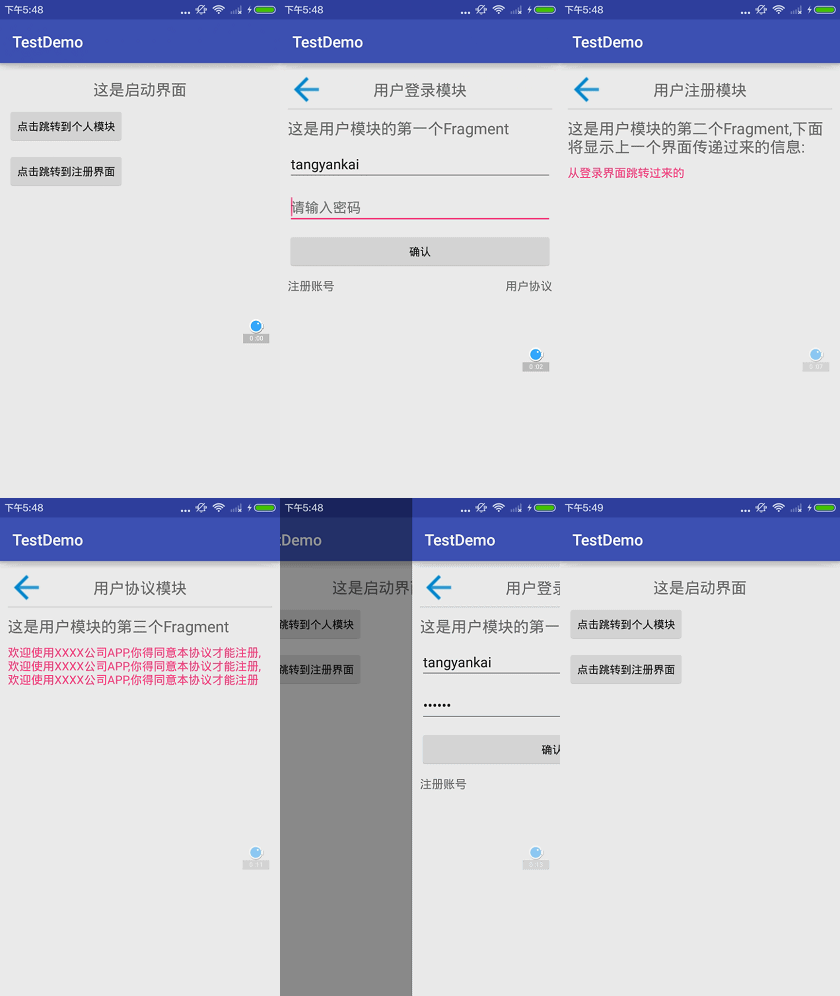
這篇博客主要是從BaseActivity與BaseFragment的封裝開始,總結自己在實戰開發中關於Fragment的注意事項以及心得體會。先看以下效果圖:

這裡模擬的是用戶登錄模塊,你可能會說,很普通的效果嘛,這有啥。嘿嘿,那我要告訴你的是,這麼多模塊僅僅由兩個Activity構成的。等你從頭到尾看完這篇博客,你就會驚歎其中的奧秘了。廢話不多說,開始。
多模塊Activity+多Fragment
開發APP非常適合的架構,相對於多Activity,這種架構APP占用內存降低,性能提升;相對於單Activity+多Fragment,這種開發起來邏輯相對簡單,不容易出錯。
對於多模塊Activity+多Fragment,這裡有兩個概念需要我們了解一下
同級式Fragment:比如QQ的主界面,消息,聯系人,動態,這三個Fragment就屬於同級關系,我們平時項目中主界面的Fragment也是屬於同級Fragment
流程式Fragment:比如我這個示例Demo,可以理解為用戶賬戶流程,可以包括:登錄/注冊模塊—-忘記/找回密碼模塊—-用戶協議模塊,這些Fragent就是屬於流程式Fragment
我的示例Demo使用的是流程式Fragment,結合今天的主題—-BaseActivity與BaseFragment的封裝,我們一探究竟。
1.BaseActivity的封裝:
public abstract class BaseActivity extends AppCompatActivity {

    //布局文件ID
    protected abstract int getContentViewId();

    //布局中Fragment的ID
    protected abstract int getFragmentContentId();

    //添加fragment
    protected void addFragment(BaseFragment fragment) {
        if (fragment != null) {
            getSupportFragmentManager().beginTransaction()
                    .replace(getFragmentContentId(), fragment, fragment.getClass().getSimpleName())
                    .addToBackStack(fragment.getClass().getSimpleName())
                    .commitAllowingStateLoss();
        }
    }

    //移除fragment
    protected void removeFragment() {
        if (getSupportFragmentManager().getBackStackEntryCount() > 1) {
            getSupportFragmentManager().popBackStack();
        } else {
            finish();
        }
    }

    //返回鍵返回事件
    @Override
    public boolean onKeyDown(int keyCode, KeyEvent event) {
        if (KeyEvent.KEYCODE_BACK == keyCode) {
            if (getSupportFragmentManager().getBackStackEntryCount() == 1) {
                finish();
                return true;
            }
        }
        return super.onKeyDown(keyCode, event);
    }
}
(1)兩個必須實現的抽象方法,獲取布局文件Layout的resource ID,獲取布局文件中Fragment的ID
(2)添加fragment:開啟一個事物,替換了當前layout容器中的由getFragmentContentId()標識的fragment。通過調用 addToBackStack(String tag), replace事務被保存到back stack, 因此用戶可以回退事務,並通過按下BACK按鍵帶回前一個fragment,如果沒有調用 addToBackStack(String tag), 那麼當事務提交後, 那個fragment會被銷毀,並且用戶不能導航回到它。其中參數tag將作為本次加入BackStack的Transaction的標志。commitAllowingStateLoss(),這種提交是允許發生異常時狀態值丟失的情況下也能正常提交事物。
(3)移除fragment:與addToBackStack()相對應的接口方法是popBackStack(),調用該方法後會將事務操作插入到FragmentManager的操作隊列,輪詢到該事務時開始執行。這裡進行了一下判斷,獲取回退棧中所有事務數量,大於1的時候,執行回退操作,等於1的時候,代表當前Activity只剩下一個Fragment,直接finish()當前Activity即可
(4)監聽返回鍵的返回事件,當事務數量等於1的時候,直接finish()
2.BaseActivity的進一步封裝—-AppActivity:
/**
 * Created by tangyangkai on 16/5/4.
 */
public abstract class AppActivity extends BaseActivity {

    //獲取第一個fragment
    protected abstract BaseFragment getFirstFragment();

    //獲取Intent
    protected void handleIntent(Intent intent) {

    }

    @Override
    protected void onCreate(Bundle savedInstanceState) {
        super.onCreate(savedInstanceState);
        setContentView(getContentViewId());
        if (null != getIntent()) {
            handleIntent(getIntent());
        }
        //避免重復添加Fragment
        if (null == getSupportFragmentManager().getFragments()) {
            BaseFragment firstFragment = getFirstFragment();
            if (null != firstFragment) {
                addFragment(firstFragment);
            }
        }

    }

    @Override
    protected int getContentViewId() {
        return R.layout.activity_base;
    }

    @Override
    protected int getFragmentContentId() {
        return R.id.fragment_container;
    }
}
(1)一個必須實現的抽象方法來獲取當前Activity應該顯示的第一個Fragment
(2)獲取intent的方法,在需要傳遞或者接受數據的中Activity實現
(3)在Activity的onCreate()方法中拿到intent,並且添加第一個fragment作為Activity的主界面進行顯示
最後貼一下activity_base.xml布局文件代碼
/**
 * Created by tangyangkai on 16/5/4.
 */
public abstract class BaseFragment extends Fragment {

    protected BaseActivity mActivity;

    protected abstract void initView(View view, Bundle savedInstanceState);

    //獲取布局文件ID
    protected abstract int getLayoutId();

    //獲取宿主Activity
    protected BaseActivity getHoldingActivity() {
        return mActivity;
    }

    @Override
    public void onAttach(Activity activity) {
        super.onAttach(activity);
        this.mActivity = (BaseActivity) activity;
    }

    //添加fragment
    protected void addFragment(BaseFragment fragment) {
        if (null != fragment) {
            getHoldingActivity().addFragment(fragment);
        }
    }

    //移除fragment
    protected void removeFragment() {
        getHoldingActivity().removeFragment();
    }


    @Override
    public View onCreateView(LayoutInflater inflater, ViewGroup container, Bundle savedInstanceState) {
        View view = inflater.inflate(getLayoutId(), container, false);
        initView(view, savedInstanceState);
        return view;
    }
}
安卓有一種特殊情況,就是在APP運行在後台的時候,系統資源緊張的時候會把APP的資源全部回收(殺死APP的進程),這時候把APP再從後台返回到前台的時候,APP會重啟。
這種內存不足的情況會導致許多問題,其中之一就是Fragment調用getActivity()的地方卻返回null,報了空指針異常。解決辦法就是在Fragment基類裡設置一個Activity mActivity的全局變量,在onAttach(Activity activity)裡賦值,使用mActivity代替getActivity()。其他的代碼注釋很詳細,大家一看便懂。
4.Activity與Fragment的使用:
BaseActivity與BaseFragment的封裝都已經完成,接下來就是具體在項目中的使用了,這裡分兩種情況。
第一種情況:不接收數據的Activity
/**
 * Created by tangyangkai on 16/5/10.
 */
public class MainActivity extends AppActivity {

    @Override
    protected BaseFragment getFirstFragment() {
        return MainFragment.newInstance();
    }
}
public class MainFragment extends BaseFragment {

    private Button mainBtn, mainSecondBtn;

    public static MainFragment newInstance() {
        return new MainFragment();
    }


    @Override
    protected void initView(View view, Bundle savedInstanceState) {
        mainBtn = (Button) view.findViewById(R.id.main_btn);
        mainBtn.setOnClickListener(new View.OnClickListener() {
            @Override
            public void onClick(View v) {
                Bundle data = new Bundle();
                data.putString("username", "tangyankai");
                Intent intent = new Intent(getActivity(), LoginActivity.class);
                intent.putExtras(data);
                startActivity(intent);

            }
        });

        mainSecondBtn = (Button) view.findViewById(R.id.main_second_btn);
        mainSecondBtn.setOnClickListener(new View.OnClickListener() {
            @Override
            public void onClick(View v) {
                addFragment(SecondFragment.newInstance("從首界面跳轉過來的"));
            }
        });
    }

    @Override
    protected int getLayoutId() {
        return R.layout.fragment_main;
    }
}
很簡單的業務邏輯,點擊第一個按鈕,攜帶數據,跳轉到LoginActivity;點擊第二個按鈕,跳轉到注冊模塊,這裡故意添加了一個參數,這裡後面會說到。
第二種情況:接收數據的Activity
/**
 * Created by tangyangkai on 16/5/10.
 */
public class LoginActivity extends AppActivity {

    private String username;
    @Override
    protected void handleIntent(Intent intent) {
        super.handleIntent(intent);
        Bundle bundle = intent.getExtras();
        if (null != bundle) {
            username = bundle.getString("username");
        }
    }

    @Override
    protected BaseFragment getFirstFragment() {
        return FirstFragment.newInstance(username);
    }

}
可以看到,LoginActivity與MainActivity不一樣的是,重寫了handleIntent()這個方法來獲取傳遞過來的數據,更加重要的一點,創建Fragment的時候傳遞了一個參數這是為什麼呢,先來看看fragment的代碼你就知道了
/**
 * Created by tangyangkai on 16/5/10.
 */
public class FirstFragment extends BaseFragment {
    @Override
    protected int getLayoutId() {
        return R.layout.fragment_first;
    }

    public static String FIRST_FRAGMENT = "first_fragment";
    private String msg;
    private EditText usernameEdt;
    private TextView registerTxt, promiseTxt;
    private ImageView backImg;

    public static FirstFragment newInstance(String msg) {
        FirstFragment fragment = new FirstFragment();
        Bundle bundle = new Bundle();
        bundle.putSerializable(FIRST_FRAGMENT, msg);
        fragment.setArguments(bundle);
        return fragment;
    }

    @Override
    public void onCreate(Bundle savedInstanceState) {
        super.onCreate(savedInstanceState);
        if (null != getArguments()) {
            msg = (String) getArguments().getSerializable(FIRST_FRAGMENT);
        }
    }

    @Override
    protected void initView(View view, Bundle savedInstanceState) {
        usernameEdt = (EditText) view.findViewById(R.id.username_edt);
        usernameEdt.setText(msg);
        registerTxt = (TextView) view.findViewById(R.id.register_txt);
        registerTxt.setOnClickListener(new View.OnClickListener() {
            @Override
            public void onClick(View v) {
                addFragment(SecondFragment.newInstance("從登錄界面跳轉過來的"));
            }
        });

        backImg = (ImageView) view.findViewById(R.id.first_back);
        backImg.setOnClickListener(new View.OnClickListener() {
            @Override
            public void onClick(View v) {
                removeFragment();
            }
        });

        promiseTxt = (TextView) view.findViewById(R.id.promise_txt);
        promiseTxt.setOnClickListener(new View.OnClickListener() {
            @Override
            public void onClick(View v) {
                addFragment(ThirdFragment.newInstance());
            }
        });

    }


}
    public static FirstFragment newInstance(String msg) {
        FirstFragment fragment = new FirstFragment();
        Bundle bundle = new Bundle();
        bundle.putSerializable(FIRST_FRAGMENT, msg);
        fragment.setArguments(bundle);
        return fragment;
    }

    @Override
    public void onCreate(Bundle savedInstanceState) {
        super.onCreate(savedInstanceState);
        if (null != getArguments()) {
            msg = (String) getArguments().getSerializable(FIRST_FRAGMENT);
        }
    }
給Fragment添加newInstance方法,將需要的參數傳入,設置到bundle中,然後setArguments(bundle),最後在onCreate中進行獲取。
這種使用arguments來創建Fragment的方法,強烈推薦使用:
(1)這樣就完成了Fragment和Activity間的解耦,使用Fragment的一個很大的原因,就是為了復用。這一點在我主界面點擊第二個按鈕跳轉到注冊界面有所體現
(2)對Fragment傳遞數據,建議使用setArguments(Bundle args),而後在onCreate中使用getArguments()取出,在 內存不足導致異常時,系統會幫你保存數據,不會造成數據的丟失。和Activity的Intent原理一致。
(3)使用newInstance(參數) 創建Fragment對象,優點是調用者只需要關系傳遞的哪些數據,而無需關心傳遞數據的Key是什麼。
然後就是業務邏輯:
(1)點擊注冊按鈕,跳轉到注冊模塊,注意這裡我傳遞了一個和主界面不一樣的參數,為了區分,並且都在注冊模塊進行了顯示。你會發現,示例Demo中,點擊登錄模塊的注冊按鈕與點擊首界面的注冊按鈕跳轉到注冊模塊時候,顯示的文字不一樣。這裡純屬演示,實際項目中,我們可以根據傳遞的不同參數,對Fragment進行不一樣的操作,顯示不一樣的數據。達到最大程度的Fragment復用!
(2)點擊返回按鈕,一句話就幫你搞定,輕松返回上一個界面:
removeFragment();
當然,點擊手機返回鍵效果也是一樣的
(3)點擊用戶協議按鈕,跳轉到用戶協議模塊。
至於其他的界面大同小異,你可以加上忘記密碼/修改密碼等模塊,完全沒問題。關於流程式Fragment,就先到這裡,看看同級式Fragment應該注意的問題。
5.hide()與show()導致的Fragment重疊:
同級式Fragment在內存不足導致的異常情況下,會出現重疊現象,處理方法是在基類Activity的onCreate函數,先去判斷savedInstanceState是否為null,如果不為null,則表示裡面有保存這個fragment。則不再重新去add這個fragment,而是通過Tag從前保存的數據中直接去讀取,看一下代碼:
在add的時候,加上一個tab參數
transaction.add(R.id.content, IndexFragment,”fg1″);
public void onCreate(Bundle savedInstanceState) {
    fManager = getFragmentManager();
    if (savedInstanceState != null) {
        fg1 = (AllOfficialAccountFragment) fManager.findFragmentByTag("fg1");
        fg2 = (MovieOfficialAccountFragment) fManager.findFragmentByTag("fg2");
        fg3 = (NewsOfficialAccountFragment) fManager.findFragmentByTag("fg3");
        fg4 = (OtherOfficialAccountFragment) fManager.findFragmentByTag("fg4");
    }
    super.onCreate(savedInstanceState);
}
到這裡,BaseActivity與BaseFragment的封裝已經結束了,這只是最最最基礎的封裝,大家可以把一些常用的方法封裝到基類當中,讓基類Activity與Fragment發揮最大程度的作用。
當然,業務邏輯簡單的界面,一個Activity就可以搞定的那種,那就沒必要使用這種方法了。這裡把自己封裝過程中關於Fragment的一些心得記錄下來。關於Fragment的深度解析與其他注意事項,大家可以參考剛才給出的資料。
 Android新手入門2016(10)--GridView
GridView跟ListView一樣是多控件布局。實現九宮圖是最方便的。還是先看看圖,沒圖說個雞雞是不是如上圖,是一種應用方式,在每個格子裡面,放入應用圖標,和顯示應用
 Android初識之Activity組件
之前自己的編程完全是在PC上進行的,而且主要是在算法和數據結構上。由於某些需要加之認識到Android的重要性,且大學走到現在基本上沒什麼課了,空閒時間很多,於是就開始學
 Android中Dialog的使用
在Android中經常要使用Dialog來實現一些提示以及一些特殊的效果,而且樣式也不一樣,每次都得查一大堆資料,還不一定能解決,這裡總結一些常用的Dialog的實踐。普
 Android 使用Vitamio打造自己的萬能播放器(8)——細節優化
前言 成功的產品往往在細節之處也做到極致,產品和項目從使用的角度來看最大的區別我認為也就是細節的處理上。開播視頻的目標是產品,前面7篇文章高歌猛進,添加了很多的功能,也