編輯:關於Android編程
Android開發中Activity和Fragment是非常重要的兩個知識點,這裡我們就分別歸納一下,在使用Activity和Fragment時需要注意的一些事項,特別是對於Fragment,在對其進行管理時我們要選擇好的一些方式。
Activity負責展示UI給用戶,負責和用戶的交互操作。本部分主要對Activity的生命周期、如何保存狀態信息、如何講一個Activity設置成窗口模式、啟動模式和完全退出Activity的方式,五部分進行總結。
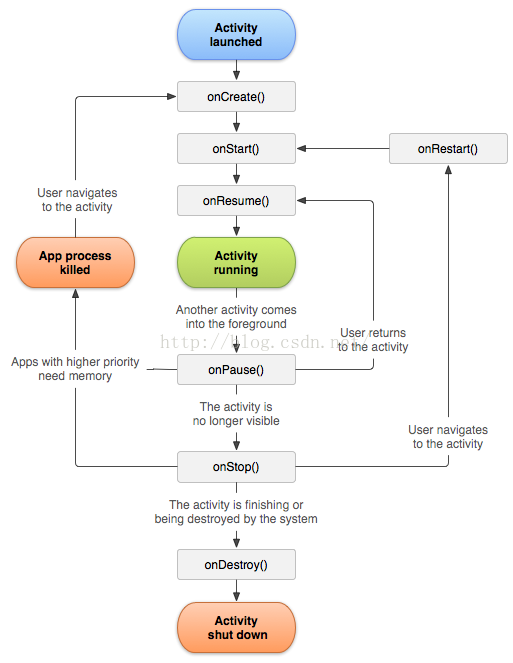
 當我們通過context.startActivity()啟動一個新的Activity,這個新的Activity被壓入到Activity棧頂,來到了屏幕的前台,開始一個完整的Activity生命周期。
--onCreate():只在Activity被剛創建時執行,在onCreate方法中我們初始化我們的Activity,比如,加載布局文件,獲取控件(findViewById),綁定觸摸事件與用戶進行操作等。一般情況下,Activity生命周期的切換不會再觸發這個方法的執行,只有當系統極度缺乏內存資源,並且這個Activity沒有處在用戶前台時,此時該Activity可能被殺死,當再次回到這個Activity,因為這個Activity已被殺死,此時就需要重新創建(就相當於重新startActivity()了),因此會再次進入onCreate進行初始化工作。
--onStart()、onResume():在加載完布局後,系統執行一些內部的啟動操作,執行到onResume時,用戶可以看到完整的UI界面了,此時Activity處於運行狀態。
--onPause():當前的Activity失去了焦點,但依然可以看見,比如當我們點擊了一個對話框出來、打開了一個非全屏的Activity、打開了一個透明的Activity,此時原來的Activity就會進入onPause()方法,它依然持有狀態信息和內存資源,只有當系統極度缺乏內存資源時,才會殺死處於onPause狀態的Activity。
--onStop():當一個Activity被另一個Activity完全覆蓋的時候,對用戶來說這個Activity不可見了,此時這個Activity就進入onPause狀態,它也依然保存著狀態信息和資源,但是容易被系統殺死,當內存不是那麼充足的時候。
--onDestory():當Activity處於onPause和onStop狀態時,系統可能因系統資源吃緊會殺死該Activity,在系統回收該Activity之前,會調用onDestory()方法,在裡面進行一些資源的釋放工作。onDestory()的調用,可能是用戶主動的行為,也可能是因系統資源不足系統需要回收該Activity,在回收前調用。
在Activity被殺死的情況下,當這個Activity再次回到用戶前台時,需要重新初始化,即再次進入onCreate,如上圖左邊的環形圖。
在Activity沒有被殺死的情況下,處於onPause和onStop狀態的Activity再次回到前台時,需要系統還原一些狀態,對於onPause狀態,由於它處於"比較活躍的一種狀態",只需要進入到onResume中由系統設置一些信息即可重新回到前台,對於onStop狀態,因為它處於很有可能被銷毀的一種狀態,部分資源可能丟失,需要先進入onRestart(),然後再次進入onStart()方法,進行回到前台的准備工作。
The visible lifetime(可見的生命周期) :從onStart()到進入onStop()前(即onStart-->onPause),這個Activity都可被用戶看見,這期間,不一定處於前台,也不一定能夠供用戶交互(比如處於onPause狀態時)
The foreground lifetime(前台生命周期):從onResume()到進入onPause前,這個期間,Activity處於可以和用戶交互時期。這個時期,可能也會頻繁在onResume和onPause狀態間切換。
@Override
protected void onSaveInstanceState(Bundle outState) {
    super.onSaveInstanceState(outState);
outState.putString("name","lly");
}
當我們這個Activity被銷毀而重新創建re-created的時候,通過onCreate(Bundle)中的參數獲取到該信息,如下:
@Override
protected void onCreate(Bundle savedInstanceState) {
super.onCreate(savedInstanceState);
setContentView(R.layout.activity_main);
    if(savedInstanceState != null){
        name = savedInstanceState.getString("name");
}
}
注意:onSaveInstanceState()方法只是在Activity“很容易被銷毀的時候調用”,它並不是Activity的生命周期方法,這個調用時機是不確定的,對於點擊返回按鈕這種主動行為不會去調用這個方法。網上很多說在按下HOME鍵和旋轉屏幕的時候會去調用,但是經過我測試一下,發現不管是我按下HOME鍵還是旋轉屏幕,這個方法都沒有被調用。按我理解,這個方法只有在“很容易被銷毀的時候調用”,這個尺度應該是系統根據手機具體內存資源情況決定是否調用。因此官方文檔中推薦在onPause中進行數據信息的保存操作。(Note that it is important to save persistent data in onPause() instead of onSaveInstanceState(Bundle) because the latter is not part of the lifecycle callbacks, so will not be called in every situation as described in its documentation.)
ononSaveInstanceState()方法在Activity、Fragment、Service、各類View中都有提供。其實,默認的ononSaveInstanceState、onRestoreInstanceState()方法的默認實現中,就幫我們保存了系統的一些狀態信息,如果我們要保存自己的一些狀態信息,就需要重寫上面的方法。特別地,在View中,使用ononSaveInstanceState時,對應的這個View一定要在布局文件中定義id,否則沒有id,是不會進入到ononSaveInstanceState方法中的。
2.在res/drawable文件夾下新建float_box.xml文件,代碼如下:
3.在AndroidMainifest.xml中Activity的聲明中加入 android:theme= "@style/Theme.FloatActivity" 效果如圖:
 圖中顯示了一個activity啟動另一個activity的效果,布局文件是同一個。其中被啟動的activity2是以對話框樣式顯示,不完全覆蓋住啟動它的activit1,類似alertDialog。
這與普通的activity不同,默認情況下,activity2會完全遮住activity1,啟動activity2後,會調用activity1的onStop方法,而這種以對話框樣式顯示的activity不會,此時調用的是onPause()。(詳見Activity的生命周期)
/**
 * APP管理類
 *
 */
public class AppManager {
    private static Stack activityStack;
    private static AppManager instance;
    private PendingIntent restartIntent;

    private AppManager() {
    }

    /**
     * 單一實例
     */
    public static AppManager getAppManager() {
        if (instance == null) {
            instance = new AppManager();
        }
        return instance;
    }

    /**
     * 添加Activity到堆棧
     */
    public void addActivity(Activity activity) {
        if (activityStack == null) {
            activityStack = new Stack();
        }
        activityStack.add(activity);
    }

    /**
     * 獲取當前Activity(堆棧中最後一個壓入的)
     */
    public Activity currentActivity() {
        Activity activity = activityStack.lastElement();
        return activity;
    }

    /**
     * 結束當前Activity(堆棧中最後一個壓入的)
     */
    public void finishActivity() {
        Activity activity = activityStack.lastElement();
        finishActivity(activity);
    }

    /**
     * 結束指定的Activity
     */
    public void finishActivity(Activity activity) {
        if (activity != null) {
            activityStack.remove(activity);
            activity.finish();
            activity = null;
        }
    }

    /**
     * 結束指定類名的Activity
     */
    public void finishActivity(Class cls) {
        for (Activity activity : activityStack) {
            if (activity.getClass().equals(cls)) {
                finishActivity(activity);
            }
        }
    }

    /**
     * 結束所有Activity
     */
    public void finishAllActivity() {
        for (int i = 0, size = activityStack.size(); i < size; i++) {
            if (null != activityStack.get(i)) {
                activityStack.get(i).finish();
            }
        }
        activityStack.clear();
    }

    /**
     * 退出應用程序
     */
    public void exitApp(Context context) {
        try {
            finishAllActivity();
            System.exit(0);
            android.os.Process.killProcess(android.os.Process.myPid());
        } catch (Exception e) {
        }
    }
}
方案二:利用廣播的方式
這個可以具體看這篇文章:http://blog.csdn.net/way_ping_li/article/details/8031125
//在添加Fragment時
        FragmentManager fm = getSupportFragmentManager();
        FragmentTransaction tx = fm.beginTransaction();
        tab1Fragment = new Fragment1();
        tx.add(R.id.content, tab1Fragment,"fragment1");
         tx.commit();

        //在使用時,比如切換到tab2時
        if(tab1Fragment != null){
            tx.hide(tab1Fragment);
            tx.show(tab2Fragment);
            tx.commit();
        }else{
            tab1Fragment = (Fragment1) fm.findFragmentByTag("fragment1");
            tx.hide(tab1Fragment);
            tx.show(tab2Fragment);
            tx.commit();
        }
關於上面的缺陷實例,具體可以看這篇文章:http://blog.csdn.net/shimiso/article/details/44677007
public class MainActivity extends Activity  {
    @Override
    protected void onCreate(Bundle savedInstanceState)  {
        super.onCreate(savedInstanceState);
        setContentView(R.layout.activity_main);

        FragmentManager fm = getSupportFragmentManager();
        FragmentTransaction tx = fm.beginTransaction();
        tx.add(R.id.content, new Fragment1(),"fragment1");
        tx.commit();
    }
}
進入Activity時初始化加載第一個Fragment1,這裡我們並沒有把它加入到回退棧中,這是因為當目前顯示的是Fragment1時,按下返回鍵我們就是需要直接退出,因為這是最初的那個Fragment,如果我們加入到了回退棧,那按下返回鍵後將是一片空白,再按一次返回鍵後才會退出這個Activity,這是因為第一次按下返回鍵時,相當於是將Fragment1從棧中彈出,此時被銷毀了,Activity的FrameLayout也就沒有了Fragment依附,因此一片空白。
在Fragment1中,有了一個按鈕,點擊後打開第二個Fragment2,
public class Fragment1 extends Fragment implements OnClickListener  {
          private Button mBtn;
        @Override
        public View onCreateView(LayoutInflater inflater, ViewGroup container,
                Bundle savedInstanceState)  {
            View view = inflater.inflate(R.layout.fragment_one, container, false);
            mBtn = (Button) view.findViewById(R.id.id_fragment_one_btn);
            mBtn.setOnClickListener(this);
            return view;
        }

        @Override
        public void onClick(View v)  {
            Fragment2 fTwo = new Fragment2();
            FragmentManager fm = getFragmentManager();
            FragmentTransaction tx = fm.beginTransaction();
            tx.replace(R.id.content, fTwo, "fragment2");
            tx.addToBackStack(null);  //將當前事務添加到回退棧
            tx.commit();
        }
    }
在Fragment2中,
public class Fragment2 extends Fragment implements OnClickListener {
        private Button mBtn ;
        @Override
        public View onCreateView(LayoutInflater inflater, ViewGroup container,
                Bundle savedInstanceState)  {
            View view = inflater.inflate(R.layout.fragment_two, container, false);
            mBtn = (Button) view.findViewById(R.id.id_fragment_two_btn);
            mBtn.setOnClickListener(this);
            return view ;
        }
        @Override
        public void onClick(View v)  {  //打開Fragment3
            Fragment3 fThree = new Fragment3();
            FragmentManager fm = getFragmentManager();
            FragmentTransaction tx = fm.beginTransaction();
            tx.hide(this);  //隱藏當前顯示的Fragment2
            tx.add(R.id.content , fThree, "fragment3");  //添加Fragment3
            tx.addToBackStack(null);  //將當前事務添加到回退棧
            tx.commit();
        }
    }
在Fragment3中我們只是打印了一些消息,就不再寫了。
當當前顯示到Fragment3時,我們按下返回鍵,將會顯示出Fragment2出來,繼續按下返回鍵,顯示出Fragment1出來,再按下後,直接退出Activity。
因為我們在Fragment1和Fragment2中,在事務提交之前,即tx.commit()之前,我們把當前的事務(用新的Fragment替換當前顯示Fragment或者hide當前Fragment)加入到了回退棧,即tx.addToBackStack(null),點擊返回鍵後,就從回退棧中退出棧頂元素,即上一個加入的事務。
上面我們使用了前面介紹的兩種添加Fragment的方式,即replace方式和hide()、add()方式,replace方式,Fragment綁定的視圖一定會銷毀,如果該事務加入到了回退棧,Fragment實例就不會被銷毀,只是視圖銷毀了;而hide()、add()方式隱藏當前Fragment,加入新的Fragment,隱藏的Fragment綁定的視圖也不會被銷毀。
這裡的視圖銷不銷毀,指的是我們的數據有沒有被保存下來,如果視圖被銷毀了,說明重新回到這個Fragment後,會重新進入onCreate及之後的周期方法區創建一個新的視圖,這個時候數據肯定就不在了;
如果視圖沒有被銷毀,在重新回到這個Fragment時,原來的輸入數據還在,沒有丟失。
當然,在Fragment裡面也有onSaveInstanceState(Bundle)方法,可以通過這個來保存數據,然後再onCreate或其他方法裡面獲取到數據來解決數據丟失的問題。
因為Fragment依附於Activity,Activity與Fragment通信,可以有以下幾種辦法:
(1)如果你Activity中包含自己管理的Fragment的引用,可以通過引用直接訪問所有的Fragment的public方法
(2)如果Activity中沒有保存任何Fragment的引用,那麼沒關系,每個Fragment都有一個唯一的TAG或者ID,可以通過getSupportFragmentManager().findFragmentByTag()或者findFragmentById()獲得任何Fragment實例,然後進行操作。
(3)在Fragment中可以通過getActivity得到當前綁定的Activity的實例,然後進行操作。
 Android小程序-Walker注冊頁面(四)
目標效果: 程序運行出現圖一walker的歡迎界面,從模糊變清晰,過了幾秒自動跳到圖二的導航界面,下邊有小圓點表示第幾個頁面,第四個導航頁面有一個Go按鈕,點擊跳轉到
 Android Dialog 對話框詳解及示例代碼
Android Dialog 對話框 1、Dialog介紹 2、AlertDialog的基本使用 3、自定義對話框 Custom Dialog一、Dialog介紹 Dia
 Android UI實現底部切換標簽fragment
本篇博客要分享的一個UI效果——實現底部切換標簽,想必大家在一些應用上面遇到過這種效果了,最典型的就是微信了,可以左右滑動切換頁面,也可以點擊標簽頁滑動頁面,它們是如何實
 Android Studio +MAT 分析內存洩漏實戰
對於內存洩漏,在Android中如果不注意的話,還是很容易出現的,尤其是在Activity中,比較容易出現,下面我就說下自己是如何查找內存洩露的。首先什麼是內存洩漏?內存