編輯:關於Android編程
在經過measure階段以後,系統確定了View的測量大小,接下來就進入到layout的過程。
在該過程中會確定視圖的顯示位置,即子View在其父控件中的位置。
嗯哼,我們直接扒開源碼從View的layout( )開始入手。
//l, t, r, b分別表示子View相對於父View的左、上、右、下的坐標
public void layout(int l, int t, int r, int b) {
        if ((mPrivateFlags3 & PFLAG3_MEASURE_NEEDED_BEFORE_LAYOUT) != 0) {
            onMeasure(mOldWidthMeasureSpec, mOldHeightMeasureSpec);
            mPrivateFlags3 &= ~PFLAG3_MEASURE_NEEDED_BEFORE_LAYOUT;
        }

        int oldL = mLeft;
        int oldT = mTop;
        int oldB = mBottom;
        int oldR = mRight;

        boolean changed = isLayoutModeOptical(mParent) ?
                setOpticalFrame(l, t, r, b) : setFrame(l, t, r, b);

        if (changed || (mPrivateFlags & PFLAG_LAYOUT_REQUIRED) == PFLAG_LAYOUT_REQUIRED) {
            onLayout(changed, l, t, r, b);
            mPrivateFlags &= ~PFLAG_LAYOUT_REQUIRED;

            ListenerInfo li = mListenerInfo;
            if (li != null && li.mOnLayoutChangeListeners != null) {
                ArrayList listenersCopy =
                        (ArrayList)li.mOnLayoutChangeListeners.clone();
                int numListeners = listenersCopy.size();
                for (int i = 0; i < numListeners; ++i) {
                    listenersCopy.get(i).onLayoutChange(this,l,t,r,b,oldL,oldT,oldR,oldB);
                }
            }
        }

        mPrivateFlags &= ~PFLAG_FORCE_LAYOUT;
        mPrivateFlags3 |= PFLAG3_IS_LAID_OUT;
    }
在該方法中的主要實現
1 確定該View在其父View中的位置,請參見代碼第13-14行。
在該處調用setFrame()方法,在該方法中把l,t, r, b分別與之前的mLeft,mTop,mRight,mBottom一一作比較,假若其中任意一個值發生了變化,那麼就判定該View的位置發生了變化
2 若View的位置發生了變化則調用onLayout()方法,請參見代碼第17行
嗯哼,我們就順著這個思路去看看onLayout()的源碼
protected void onLayout(boolean changed, int left, int top, int right, int bottom) {

}
額,View的onLayout()方法竟然是一個空方法!這是為啥呢?
先瞅瞅官方文檔對該方法的介紹:
Called from layout when this view should assign a size and position to each of its children.
噢,原來文檔中說了:在layout方法中調用該onLayout()用於指定子View的大小和位置。
誰才有子View呢?用你的小腦袋瓜想想。
哇哈,當然是ViewGroup!
這也就是說:ViewGroup會調用onLayout()決定子View的顯示位置。
好吧,既然如此就去看ViewGroup中的onLayout()方法是怎麼實現的;嗯哼,接著看源碼
protected abstract void onLayout(boolean changed,int l, int t, int r, int b);
額,ViewGroup的onLayout()竟然是一個抽象方法!這就意味著啥呢?
這就是說ViewGroup的子類都必須重寫這個方法,實現自己的邏輯。比如:FrameLayou,LinearLayout,RelativeLayout等等布局都需要重寫這個方法,在該方法內依據各自的布局規則確定子View的位置。
在此以LinearLayout為例,看看ViewGroup對於onLayout()方法的實現。
protected void onLayout(boolean changed, int l, int t, int r, int b) {
        if (mOrientation == VERTICAL) {
            layoutVertical(l, t, r, b);
        } else {
            layoutHorizontal(l, t, r, b);
        }
    }
在LinearLayout的onLayout()方法中分別處理了水平線性布局和垂直線性布局。在此,就選擇layoutVertical()繼續往下看。
void layoutVertical(int left, int top, int right, int bottom) {
    final int paddingLeft = mPaddingLeft;
    int childTop;
    int childLeft;
    final int width = right - left;
    int childRight = width - mPaddingRight;

    int childSpace = width - paddingLeft - mPaddingRight;

    final int count = getVirtualChildCount();

    final int majorGravity = mGravity & Gravity.VERTICAL_GRAVITY_MASK;
    final int minorGravity = mGravity & Gravity.RELATIVE_HORIZONTAL_GRAVITY_MASK;

    switch (majorGravity) {
          case Gravity.BOTTOM:
              childTop = mPaddingTop + bottom - top - mTotalLength;
               break;

          case Gravity.CENTER_VERTICAL:
              childTop =mPaddingTop+(bottom-top-mTotalLength) / 2;
              break;

          case Gravity.TOP:
          default:
              childTop = mPaddingTop;
              break;
    }

    for (int i = 0; i < count; i++) {
        final View child = getVirtualChildAt(i);
        if (child == null) {
            childTop += measureNullChild(i);
        } else if (child.getVisibility() != GONE) {
            final int childWidth = child.getMeasuredWidth();
            final int childHeight = child.getMeasuredHeight();

            final LinearLayout.LayoutParams lp =
                        (LinearLayout.LayoutParams) child.getLayoutParams();

            int gravity = lp.gravity;
            if (gravity < 0) {
                gravity = minorGravity;
            }
            final int layoutDirection = getLayoutDirection();
            final int absoluteGravity = Gravity.getAbsoluteGravity(gravity, layoutDirection);
            switch (absoluteGravity & Gravity.HORIZONTAL_GRAVITY_MASK) {
                case Gravity.CENTER_HORIZONTAL:
                    childLeft = paddingLeft + ((childSpace - childWidth) / 2)
                                + lp.leftMargin - lp.rightMargin;
                    break;

                case Gravity.RIGHT:
                    childLeft = childRight - childWidth - lp.rightMargin;
                    break;

                case Gravity.LEFT:
                default:
                    childLeft = paddingLeft + lp.leftMargin;
                    break;
            }

            if (hasDividerBeforeChildAt(i)) {
                childTop += mDividerHeight;
            }

            childTop += lp.topMargin;
            setChildFrame(child,childLeft,childTop+ getLocationOffset(child),
                        childWidth, childHeight);
            childTop += childHeight + lp.bottomMargin + getNextLocationOffset(child);

            i += getChildrenSkipCount(child, i);
        }
    }
}
這裡的邏輯不是特別簡單,我們看幾個重要的步驟。
第一步:
計算child可使用空間的大小,請參見代碼第8行
第二步:
獲取子View的個數,請參見代碼第10行
第三步:
計算childTop從而確定子View的開始布局位置,請參見代碼第12-28行
第四步:
確定每個子View的位置,請參見代碼第30-74行
這一步是最關鍵的步驟,我們瞅瞅它的主要操作
1 得到子View測量後的寬和高,請參見代碼第35-36行.
這裡獲取到的childWidth和childHeight就是在measure階段所確立的寬和高
2 得到子View的LayoutParams,請參見代碼第38-39行.
3 依據子View的LayoutParams確定子View的位置,請參見代碼第41-69行.
我們可以發現在setChildFrame()中又調用了View的layout()方法來確定子View的位置。
到這我們就可以理清楚思路了:
ViewGroup首先調用了layout()確定了自己本身在其父View中的位置,然後調用onLayout()確定每個子View的位置,每個子View又會調用View的layout()方法來確定自己在ViewGroup的位置。
概況地講:
View的layout()方法用於View確定自己本身在其父View的位置
ViewGroup的onLayout()方法用於確定子View的位置
為了更好的理解,在此用一個簡單的示例模擬ViewGroup的onLayout()過程
首先我們自定義一個ViewGroup
package com.cc.testlayout;
import android.content.Context;
import android.graphics.Canvas;
import android.util.AttributeSet;
import android.view.View;
import android.view.ViewGroup;

public class ViewGroupSubClass extends ViewGroup{
    public ViewGroupSubClass(Context context, AttributeSet attrs) {
        super(context, attrs);
    }

    @Override
    protected void onMeasure(int widthMeasureSpec, int heightMeasureSpec) {
        super.onMeasure(widthMeasureSpec, heightMeasureSpec);
        int childCount=getChildCount();
        if(childCount>0){
            View child=getChildAt(0);
            measureChild(child,widthMeasureSpec,heightMeasureSpec);
        }
    }

    @Override
    protected void onLayout(boolean changed, int l, int t, int r, int b) {
        int childCount=getChildCount();
        if(childCount>0){
            View child=getChildAt(0);
            int measuredWidth=child.getMeasuredWidth();
            int measuredHeight=child.getMeasuredHeight();
            child.layout(0,0,measuredWidth,measuredHeight);
        }
    }

    @Override
    protected void onDraw(Canvas canvas) {
        super.onDraw(canvas);
    }
}
主要步驟如下:
第一步:
在onMeasure()中測量子View
第二步:
在onLayout()中確定子View的位置
定義好ViewGroup之後,將其放入布局文件中
代碼有了,布局文件也寫了,運行一下瞅瞅效果。

嗯哼,看到了吧,我把一個ImageView放入自定義ViewGroup中展示了我女朋友的照片。
至此,我們已經看完了measure和layout這兩個過程,對於一些問題我們做一個小的總結
1 獲取View的測量大小measuredWidth和measuredHeight的時機。
在某些復雜或者極端的情況下系統會多次執行measure過程,所以在onMeasure()中去獲取View的測量大小得到的是一個不准確的值。為了避免該情況,最好在onMeasure()的下一階段即onLayout()中去獲取。
2 getMeasuredWidth()和getWidth()的區別
在絕大多數情況下這兩者返回的值都是相同的,但是結果相同並不說明它們是同一個東西。
首先,它們的獲取時機是不同的。
在measure()過程結束後就可以調用getMeasuredWidth()方法獲取到View的測量大小,而getWidth()方法要在layout()過程結束後才能被調用從而獲取View的實際大小。
其次,它們返回值的計算方式不同。
getMeasuredWidth()方法中的返回值是通過setMeasuredDimension()方法得到的,這點我們之前已經分析過,在此不再贅述;而getWidth()方法中的返回值是通過View的右坐標減去其左坐標(right-left)計算出來的。
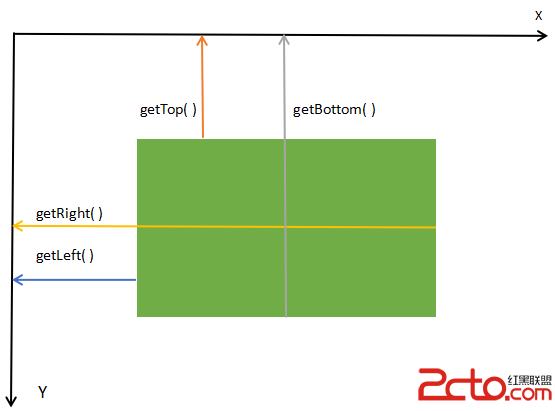
3 剛才說到了關於View的坐標,在這就不得不提一下:
view.getLeft(),view.getRight(),view.getBottom(),view.getTop();
這四個方法用於獲取子View相對於父View的位置。
但是請注意:
getLeft( )表示子View的左邊距離父View的左邊的距離
getRight( )表示子View的右邊距離父View的左邊的距離
getTop( )表示子View的上邊距離父View的上邊的距離
getBottom( )表示子View的下邊距離父View的上邊的距離
在此,畫一個示例圖作為參考
4 直接繼承自ViewGroup可能帶來的復雜處理。
剛通過一個例子簡單模擬了ViewGroup的onLayout()過程;其實,說簡單已經算是含蓄的了;如果要粗暴地說那就是簡單得令人發指。因為項目開發中實際的情況可能遠比這個復雜;比如,在ViewGroup中包含了多個View,每個View都設置了padding和margin,除此之外還可能包含各種嵌套。在這種情況下,我們在onMeasure()和onLayout()中都要花費大量的精力來處理這些問題。所以在一般情況下,我們可以選擇繼承自LinearLayout,RelativeLayout等系統已有的布局從而簡化這兩部分的處理。
 Android UI之ImageView實現圖片旋轉和縮放
這一篇,給大家介紹一下ImageView控件的使用,ImageView主要是用來顯示圖片,可以對圖片進行放大、縮小、旋轉的功能。android:sacleType屬性指定
 Android實現本地上傳圖片並設置為圓形頭像
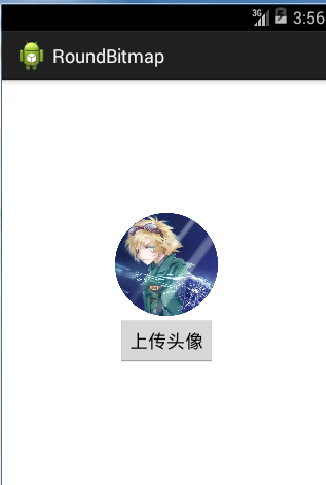
先從本地把圖片上傳到服務器,然後根據URL把頭像處理成圓形頭像。因為上傳圖片用到bmob的平台,所以要到bmob(http://www.bmob.cn)申請密鑰。效果圖:
 Android游戲——2048的設計(2)
在去年的時候曾經寫了一個Android小游戲——2048,也在應用商店上線了,當初設計的時候還不覺得什麼,最近在整理代碼時卻覺得當時代碼設計得很是
 Android Eclipse 導入 AS Gradle AAR 庫手冊
序言這是一篇半技術類文章。眾所周知現在Google主推Android Studio開發工具,而Eclipse已經被閒置一陣子了,但是Eclipse項目卻還有很多沒有遷移到