編輯:關於Android編程

在Android中開發動效有兩套框架可以使用,分別為 Animation 和 Property Animation;
相對來說,Animator比Animation要強大太多,兩者之間的主要區別在於:
區別一:需要的Anroid API level不一樣總的來說可以分為:Tween Animation(補間動畫) 和Frame Animation(幀動畫)
幀動畫其實就是按照一定的時間間隔進行快速的圖片切換,達到視覺上的動畫效果,這種動畫相對來說缺點較多,比如:
1.根據動畫的復雜度需要切多張圖,這樣就不可避免的增大了包大小
2.由於是多張圖,運行時需要加載到內存,那麼又會增大運行時的內存大小
所以如果在動效上有別的方案選擇,個人不太建議使用幀動畫的實現方式,當然有時候不得不用,這時我們可以盡可能的在效果連貫的基礎上減少圖片張數;
幀動畫的實現也相對簡單,就舉一個例子,但是例子之中有幾條幀動畫的使用規則,是我以前在使用的過程中遇到問題後總結出來的;
1.在drawable目錄下xml中定義如下文件,節點為animation-list,oneshot代表是否執行一次,duration代表每張圖對應展示時間:
<code class=" hljs xml"><animation-list xmlns:android="http://schemas.android.com/apk/res/android" android:oneshot="true">
    <item android:drawable="@drawable/rocket_thrust1" android:duration="200">
    <item android:drawable="@drawable/rocket_thrust2" android:duration="200">
    <item android:drawable="@drawable/rocket_thrust3" android:duration="200">
</item></item></item></animation-list></code>
2.然後將該drawable設置給對應的imageview
3.在activity中
animDrawable = (AnimationDrawable) imageView.getBackground();
4.在onWindowFocusChanged()中調用:
animDrawable.stop();
animDrawable.start();
如果不這麼做,那麼在性能比較差的機器上很可能就會出現沒有播放的情況,因為只顯示出了第一幀,問題在於動畫沒有和view完成關聯,所以不要在onCreate中去調用啟動,而需要在onWindowFocusChanged中進行調用;
在極特殊的情況下如果還無法播放,則可以mHandler.postDelay 200 毫秒作為終極殺手锏,當然只要按照我上面的步驟,應該不會出現問題;
好了,幀動畫最大的問題是按照上面的步驟開發,接下來看補間動畫(Tween Animation)
Animation下有五個子類:AlphaAnimation(漸變),RotateAnimation(旋轉),ScaleAnimation(縮放),TranslateAnimation(位移)
在實現原理上除了AlphaAnimation是動態的去改變view的alpha值,其他三個都是去改變裡面的Matrix(矩陣,後面會專門講);
在Animation框架裡,主要的類主要有Animation和Transformation、Interpolator(插值器,後面也會專門講)
Transformation裡面主要對alpha和matrix進行了封裝,而改變view的透明度就是改變alpha,移動、旋轉、縮放甚至錯切則都是改變matrix
Animation裡有一個重要的方法applyTransformation,實現自定義Animation也主要是實現這個方法:
以AlphaAnimation為例:
    /**
     * Changes the alpha property of the supplied {@link Transformation}
     */
    @Override
    protected void applyTransformation(float interpolatedTime, Transformation t) {
        final float alpha = mFromAlpha;
        t.setAlpha(alpha + ((mToAlpha - alpha) * interpolatedTime));
    }
漸變動畫只需要在裡面根據當前的interpolatedTime(已經由插值器轉換後的值)動態計算出對應的alpha,重新設置到Transformation中即可;
Animation的使用也相對比較簡單,可以通過xml配置,也可以通過代碼生成:
1.xml配置:


        android:duration="500"

        android:fillAfter="true"

        android:fillBefore="false"

        android:fromXScale="1"
        android:fromYScale="1"

        android:interpolator="@android:anim/accelerate_interpolator"

        android:pivotX="50%"
        android:pivotY="50%"

        android:repeatCount="infinite"

        android:repeatMode="restart"

        android:startOffset="100"

        android:toXScale="0"
        android:toYScale="0" />


        android:fromYDelta="300"
        android:interpolator="@android:anim/accelerate_interpolator"
        android:toYDelta="0" />
當要多個效果同時使用時,則如上使用set標簽進行組合,在代碼中使用如下:
Animation animation = AnimationUtils.loadAnimation(getApplicationContext(), R.anim.app_clean_animation);
view.startAnimation(animation);
2.純代碼生成:
        // false代表裡面的子animation不共用一個插值器
        AnimationSet animationSet = new AnimationSet(false);
        // 從alpha 完全透明變為完全不透明
        AlphaAnimation alphaAnimation = new AlphaAnimation(0, 1);
        alphaAnimation.setDuration(500);
        alphaAnimation.setFillAfter(true);
        // 運行完成後是否回到開始時的狀態
        alphaAnimation.setFillBefore(false);
        alphaAnimation.setInterpolator(new AccelerateInterpolator());
        // 重復的次數,infinite代表永久循環
        alphaAnimation.setRepeatCount(Animation.INFINITE);
        // 重復的模式, restart代表重新開始,reverse代表反轉
        alphaAnimation.setRepeatMode(Animation.RESTART);
        // 給動畫設置對應的監聽,可以在動畫開始、結束或重復執行時做對應操作
        alphaAnimation.setAnimationListener(new AnimationListener() {

            @Override
            public void onAnimationStart(Animation animation) {
                 //開始時候回調
            }

            @Override
            public void onAnimationRepeat(Animation animation) {
                 //重復執行時回調
            }

            @Override
            public void onAnimationEnd(Animation animation) {
                 //一輪結束時回調
            }
        });
        RotateAnimation rotateAnimation = new RotateAnimation(0, 360);
        rotateAnimation.setDuration(500);
        animationSet.addAnimation(alphaAnimation);
        animationSet.addAnimation(rotateAnimation);
        view.startAnimation(animationSet);
好了,animation就講到這裡,上面的注釋應該比較詳盡了,主要是弄清楚其使用方式和使用場景!
屬性動畫,它更改的是對象的實際屬性,在View Animation(Tween Animation)中,其改變的是View的繪制效果,真正的View的屬性保持不變,比如無論你在對話中如何縮放Button的大小,Button的有效點擊區域還是沒有應用動畫時的區域,其位置與大小都不變。而在Property Animation中,改變的是對象的實際屬性,如Button的縮放,Button的位置與大小屬性值都改變了。而且Property Animation不止可以應用於View,還可以應用於任何對象。Property Animation只是表示一個值在一段時間內的改變,當值改變時要做什麼事情完全是你自己決定的。
在Property Animation中,可以對動畫應用以下屬性:
1.TimeInterpolator(插值器,和低版本的Interpolator一樣):屬性值的計算方式,如先快後慢
2.TypeEvaluator:根據屬性的開始、結束值與TimeInterpolator計算出的因子計算出當前時間的屬性值
3.Repeat Count and behavoir:重復次數與方式,如播放3次、5次、無限循環,可以此動畫一直重復,或播放完時再反向播放
4.Animation sets:動畫集合,即可以同時對一個對象應用幾個動畫,這些動畫可以同時播放也可以對不同動畫設置不同開始偏移
5.Frame refreash delay:多少時間刷新一次,即每隔多少時間計算一次屬性值,默認為10ms,最終刷新時間還受系統進程調度與硬件的影響
上面都是些概念,但這些東西不必刻意去記,或去理解插值器這樣的比較生澀的概念,我們只需要使用他最實用的部分,並熟悉動畫的實現套路;
所以對於屬性動畫主要帶大家熟悉兩個類,ValueAnimator和ObjectAnimator,通過這兩個類我們平常遇到的動效大部分都能夠加以解決;
1.ValueAnimator:
ValueAnimator包含了 Property Animation 動畫的所有核心功能,如動畫時間,開始、結束屬性值,相應時間屬性值計算方法等。
在我看來,使用 ValueAnimator 只是為我們創建了一個過程,我們可以用ValueAnimator.ofXXX()進行創建,然後通過各種setXXX()給其設定過程的時間,速率變化效果等,然後通過addUpdateListener()中去拿這個過程中回調回來的中間值,然後使用這些中間值改變view的屬性形成動態效果;
上面這句話通過代碼表現如下:
比如我們使用 ValueAnimator 在2S內將view橫向拉長為2倍,縱向壓縮為0:
            // 在2S內將view橫向拉長為2倍,縱向壓縮為0
            // 創建0-1的一個過程,任何復雜的過程都可以采用歸一化,然後在addUpdateListener回調裡去做自己想要的變化
            ValueAnimator valueAnimator = ValueAnimator.ofFloat(0, 1);
            // 設置過程的時間為2S
            valueAnimator.setDuration(SCALE_ANIM_TIME);
            // 設置這個過程是速度不斷變快的
            valueAnimator.setInterpolator(new AccelerateInterpolator());
            // 這個過程中不斷執行的回調
            valueAnimator.addUpdateListener(new AnimatorUpdateListener() {
                @Override
                public void onAnimationUpdate(ValueAnimator animation) {
                    // 不斷回調的在0-1這個范圍內,經過插值器插值之後的返回值
                    float value = (Float) animation.getAnimatedValue();
                    // ViewHelper可直接用於修改view屬性
                    // 將寬在2S內放大一倍
                    ViewHelper.setScaleX(mTestImage, 1 + value);
                    // 將高在2S內壓縮為0
                    ViewHelper.setScaleY(mTestImage, 1 - value);
                }
            });
            // AnimatorListenerAdapter是AnimatorListener的空實現,根據需要覆蓋的方法自行選擇
            valueAnimator.addListener(new AnimatorListenerAdapter() {
                @Override
                public void onAnimationStart(Animator animation) {
                    super.onAnimationStart(animation);
                    Toast.makeText(getApplicationContext(), "onAnimationStart", Toast.LENGTH_SHORT)
                            .show();
                }

                @Override
                public void onAnimationEnd(Animator animation) {
                    super.onAnimationEnd(animation);
                    Toast.makeText(getApplicationContext(), "onAnimationEnd", Toast.LENGTH_SHORT)
                            .show();
                }

                @Override
                public void onAnimationCancel(Animator animation) {
                    super.onAnimationCancel(animation);
                }

                @Override
                public void onAnimationRepeat(Animator animation) {
                    super.onAnimationRepeat(animation);
                }
            });
            valueAnimator.start();
動畫其實就是在一個時間段內不斷去改變view的一些屬性值,這些屬性值動態變化,不斷重繪的過程,也就形成了我們所看到的動效;
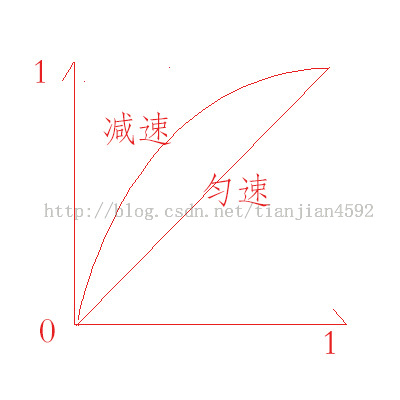
那麼基於此,我們可以知道這個過程都是通過時間來控制的,時間走過的比例肯定在 0-1 之間,如果我們直接用這個走過的時間比例去算當前屬性值,那麼整個過程則是勻速(線性)的;
那麼在這個基礎上,我們想我們的過程是非線性的,我們該怎麼辦呢,那麼只需要對這個時間比例加以加工,具體請看下圖:
 vcC01L3GvaOsy/nS1MuyyrHL2bbI1L3AtNS90KGjrNTy0M6zycHLvPXL2dCnufujuzwvcD4NCjxwPsbky/u1xNCnufvA4MvGo6zEv8ewYW5kcm9pZMDvzOG5qbXEsuXWtcb309DI58/C0rvQqaO6PC9wPg0KQWNjZWxlcmF0ZUludGVycG9sYXRvcqGhoaGhoaGhoaEgvNPL2aOsv6rKvMqxwv3W0LzkvNPL2SBEZWNlbGVyYXRlSW50ZXJwb2xhdG9yoaGhoaGhIKGhoaEgvPXL2aOsv6rKvMqxv+zIu7rzvPXL2SBBY2NlbGVyYXRlRGVjZWxlcmF0ZUludGVyb2xhdG9yoaEgz8i808vZuvO89cvZo6y/qsq8veHK+Mqxwv2jrNbQvOS808vZIEFudGljaXBhdGVJbnRlcnBvbGF0b3KhoaGhoaGhoaGhoaEgt7TP8iCjrM/Iz/LP4Le0t73P8rjEseTSu7bO1Nm808vZsqW3xSBBbnRpY2lwYXRlT3ZlcnNob290SW50ZXJwb2xhdG9yoaEgt7TP8rzTu9i1r6Osz8jP8s/gt7S3vc/yuMSx5KOs1Nm808vZsqW3xaOsu+GzrLP2xL+1xNa1yLu687u6wv3Sxrav1sHEv7XE1rUgQm91bmNlSW50ZXJwb2xhdG9yoaGhoaGhoaGhoaGhoaEgzPjUvqOsv+y1vcS/tcTWtcqx1rW74cz41L6jrMjnxL+1xNa1MTAwo6y688PmtcTWtb/JxNzSwLTOzqo4NaOsNzejrDcwo6w4MKOsOTCjrDEwMCBDeWNsZUlpbnRlcnBvbGF0b3KhoaGhoaGhoaGhoaGhoaGhINGtu7ejrLavu63Rrbu30ru2qLTOyv2jrNa1tcS4xLHkzqrSu9X9z9K6r8r9o7pNYXRoLnNpbigyICogbUN5Y2xlcyAqIE1hdGguUEkgKiBpbnB1dCkgTGluZWFySW50ZXJwb2xhdG9yoaGhoaGhoaGhoaGhoaGhoSDP39DUo6zP39DUvvnUyLjEseQgT3ZlcnNob3R0SW50ZXJwb2xhdG9yoaGhoaGhoaGhoaGhILvYta+jrNfuuvOzrLP2xL+1xNa1yLu687u6wv24xLHktb3Ev7XE1rUgVGltZUludGVycG9sYXRvcqGhoaGhoaGhoaGhoaGhoaEg0ru49r3Tv9qjrNTK0O3E49fUtqjS5WludGVycG9sYXRvcqOs0tTJz7y4uPa2vMrHyrXP1sHL1eK49r3Tv9oNCjxwPsbkyrXP68q1z9a21NOmtcTQp7n7o6zG5Mq1ysfV0tK7zPXH+s/fttS21NOmzPW8/r340NDEo8Tio6zIu7rzuPm+3cf6z9+6r8r9o6y6zVjWtaOstcOz9sO/uPbKsbzktePJz7bU06a1xFnWtaOosuXWtaOpo6zV4tKyvs3Kx7Ll1rXG99StwO2juzwvcD4NCjxoMyBpZD0="2objectanimator">2.ObjectAnimator
我們同樣還是實現在2S內將view橫向拉長為2倍,縱向壓縮為0:
            AnimatorSet animatorSet = new AnimatorSet();
            // 將view在x方向上從原大小放大2倍
            ObjectAnimator scaleXAnimator = ObjectAnimator.ofFloat(mTestImage, "scaleX", 1, 2);
            scaleXAnimator.setDuration(SCALE_ANIM_TIME);
            // 將view在y方向上從原大小壓縮為0
            ObjectAnimator scaleYAnimator = ObjectAnimator.ofFloat(mTestImage, "scaleY", 1, 0);
            scaleYAnimator.setDuration(SCALE_ANIM_TIME);
            // 設置加速模式
            animatorSet.setInterpolator(new AccelerateInterpolator());
            // 設置回調,當然也可以設置在單獨的animator上,eg:scaleXAnimator
            animatorSet.addListener(new AnimatorListenerAdapter() {
                @Override
                public void onAnimationStart(Animator animation) {
                    super.onAnimationStart(animation);
                    Toast.makeText(getApplicationContext(), "onAnimationStart", Toast.LENGTH_SHORT)
                            .show();
                }

                @Override
                public void onAnimationEnd(Animator animation) {
                    super.onAnimationEnd(animation);
                    Toast.makeText(getApplicationContext(), "onAnimationEnd", Toast.LENGTH_SHORT)
                            .show();
                }

                @Override
                public void onAnimationCancel(Animator animation) {
                    super.onAnimationCancel(animation);
                }

                @Override
                public void onAnimationRepeat(Animator animation) {
                    super.onAnimationRepeat(animation);
                }
            });
            animatorSet.playTogether(scaleXAnimator, scaleYAnimator);
            animatorSet.start();
ObjectAnimator 是ValueAnimator 的子類,可以直接改變Object的屬性,目前可供改變的屬性主要有:
translationX,translationY View相對於原始位置的偏移量 rotation,rotationX,rotationY 旋轉,rotation用於2D旋轉角度,3D中用到後兩個 scaleX,scaleY 縮放比 x,y View的最終坐標,是View的left,top位置加上translationX,translationY alpha 透明度關於Animator主要分享這兩個類,其他的比如 PropertyValuesHolder 大家可以自己去看;
分析:
1.浮在桌面上的小圓泡可以蓋在所有應用之上,並且可以獨立操作,不影響其他操作,需要使用WindowManager.addView ;
2.拖動的時候變成小火箭,需要手勢處理 onTouch;
3.拖動到底部區域的時候震動,需要對拖動到的位置做時候判斷;
4.放手時位置如果在底座區,則發射火箭,否則變成小圓回到邊界;
5.火箭噴火效果,可以通過兩張圖幀動畫實現,也可以采用屬性動畫實現(通過看QQ管家的圖,應該是采用的幀動畫方式);
6.底部的底座閃動效果也是三張圖的幀動畫;
package com.itheima.rocket;

import java.nio.channels.AlreadyConnectedException;

import android.os.Bundle;
import android.os.Handler;
import android.os.Message;
import android.app.Activity;
import android.graphics.drawable.AnimationDrawable;
import android.view.Menu;
import android.view.MotionEvent;
import android.view.View;
import android.view.View.OnTouchListener;
import android.view.animation.AlphaAnimation;
import android.view.animation.Animation;
import android.widget.ImageView;
import android.widget.Toast;

public class MainActivity extends Activity {
    private ImageView iv;
    private ImageView iv_bottom;
    private ImageView iv_top;
    private AnimationDrawable rocketAnimation;
    private Handler handler = new Handler(){
        public void handleMessage(android.os.Message msg) {
            int position = (Integer) msg.obj ;
            iv.layout(iv.getLeft(), position, iv.getRight(), position+iv.getHeight());
            if(position<320){
                iv_top.setVisibility(View.VISIBLE);
                AlphaAnimation aa = new AlphaAnimation(0.6f, 1.0f);
                aa.setDuration(300);
                iv_top.startAnimation(aa);
            }
            if(position<20){
                AlphaAnimation aa = new AlphaAnimation(1.0f, 0.0f);
                aa.setDuration(300);
                aa.setFillAfter(true);
                iv_top.startAnimation(aa);
            }

        };
    };

    @Override
    protected void onCreate(Bundle savedInstanceState) {
        super.onCreate(savedInstanceState);
        setContentView(R.layout.activity_main);
        iv = (ImageView) findViewById(R.id.iv);
        iv.setBackgroundResource(R.drawable.rocket);
        iv_top = (ImageView) findViewById(R.id.iv_top);
        iv_bottom = (ImageView) findViewById(R.id.iv_bottom);
        rocketAnimation = (AnimationDrawable) iv.getBackground();
        rocketAnimation.start();

        iv.setOnTouchListener(new OnTouchListener() {
            int startX;
            int startY;

            @Override
            public boolean onTouch(View v, MotionEvent event) {
                switch (event.getAction()) {
                case MotionEvent.ACTION_DOWN:
                    startX =(int) event.getRawX();
                    startY =(int) event.getRawY();
                    break;

                case MotionEvent.ACTION_MOVE:
                    int newX =(int) event.getRawX();
                    int newY =(int) event.getRawY();
                    int dx = newX - startX;
                    int dy = newY - startY;
                    //wm.updateViewLayout();
                    iv.layout(iv.getLeft()+dx, iv.getTop()+dy, iv.getRight()+dx, iv.getBottom()+dy);
                    startX =(int) event.getRawX();
                    startY =(int) event.getRawY();
                    break;
                case MotionEvent.ACTION_UP:
                    int top = iv.getTop();
                    int left = iv.getLeft();
                    int right = iv.getRight();
                    if(top>300&&left>100&&right<220){
                        Toast.makeText(getApplicationContext(), "發射火箭", 0).show();
                        iv_bottom.setVisibility(View.VISIBLE);
                        AlphaAnimation aa = new AlphaAnimation(0.0f, 1.0f);
                        aa.setDuration(500);
                        aa.setRepeatCount(1);
                        aa.setRepeatMode(Animation.REVERSE);
                        aa.setFillAfter(true);
                        iv_bottom.startAnimation(aa);
                        sendRocket();
                    }
                    break;
                }
                return true;
            }
        });
    }

    protected void sendRocket() {
        new Thread(){
            public void run() {
                int start = 380;
                for(int i = 0 ;i<=11;i++){
                    try {
                        Thread.sleep(50);
                    } catch (InterruptedException e) {
                        e.printStackTrace();
                    }
                    //更新一下ui
                    Message msg = Message.obtain();
                    msg.obj = 380 - i*38;//計算出火箭的高度
                    handler.sendMessage(msg);
                }
            };
        }.start();

    }
}
<animation-list xmlns:android="http://schemas.android.com/apk/res/android" android:oneshot="false">
    <item android:drawable="@drawable/desktop_rocket_launch_1" android:duration="200">
    <item android:drawable="@drawable/desktop_rocket_launch_2" android:duration="200">
</item></item></animation-list>
<code class=" hljs xml"><relativelayout xmlns:android="http://schemas.android.com/apk/res/android" xmlns:tools="http://schemas.android.com/tools" android:layout_width="match_parent" android:layout_height="match_parent" tools:context=".MainActivity">

    <imageview android:id="@+id/iv" android:layout_width="40dip" android:layout_height="73dip">

    <imageview android:visibility="invisible" android:id="@+id/iv_bottom" android:layout_width="match_parent" android:layout_height="wrap_content" android:layout_alignparentbottom="true" android:src="@drawable/desktop_smoke_m">

    <imageview android:visibility="invisible" android:id="@+id/iv_top" android:layout_width="match_parent" android:layout_height="wrap_content" android:layout_above="@id/iv_bottom" android:src="@drawable/desktop_smoke_t">

</imageview></imageview></imageview></relativelayout></code>
 自定義控件(陰影,漸變)
一、陰影:Paint 類定義了一個名為 setShadowLayer 的方法:public void setShadowLayer(float radius,float
 學習JNI--Android下使用JNI調用C
一、什麼是JNI: JNI是Java Native Interface的縮寫,中文為JAVA本地調用。從Java1.1開始,Java Native Interface
 RxJava入門之介紹與基本運用
前言因為這個RxJava內容不算少,而且應用場景非常廣,所以這個關於RxJava的文章我們會陸續更新,今天就來先來個入門RxJava吧初識RxJava什麼是Rx很多教程在
 Android隨機生成驗證碼
Android隨機生成驗證碼,Android利用隨機數繪制不規則的驗證碼,加強用戶登錄或者注冊的安全性。具體思路如下:在一塊固定寬高的畫布上,畫上固定個數的隨機數字和字母