編輯:關於Android編程
在Android源碼中,由於AlertDialog被保護起來,沒有辦法直接new出對象,但是同時提供了一個內部類Builder,可以通過Builder類來實現相應的功能。
實現一個簡單的問卷調查,效果圖:
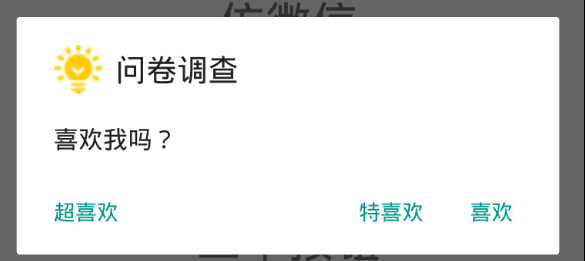
代碼:
 AlertDialog.Builder builder4 = new AlertDialog.Builder(MainActivity.this);
                builder4.setIcon(R.drawable.icon_title);
                builder4.setTitle("問卷調查");
                builder4.setMessage("喜歡我嗎?");
                builder4.setPositiveButton("喜歡", new DialogInterface.OnClickListener() {
                    @Override
                    public void onClick(DialogInterface dialogInterface, int i) {
                        Toast.makeText(MainActivity.this, "謝謝~", Toast.LENGTH_SHORT).show();
                    }
                });
                builder4.setNegativeButton("特喜歡", new DialogInterface.OnClickListener() {
                    @Override
                    public void onClick(DialogInterface dialogInterface, int i) {
                        Toast.makeText(MainActivity.this, "嘿嘿~", Toast.LENGTH_SHORT).show();
                    }
                });
                builder4.setNeutralButton("超喜歡", new DialogInterface.OnClickListener() {
                    @Override
                    public void onClick(DialogInterface dialogInterface, int i) {
                        Toast.makeText(MainActivity.this, "嘻嘻~", Toast.LENGTH_SHORT).show();
                    }
                });
                builder4.show();
在Builder類中,提供了setIcon(),setTitle(),setMessage(),setPositiveButton(),setNegativeButton(),setNeutralButton()等方法,供選擇。
效果圖:
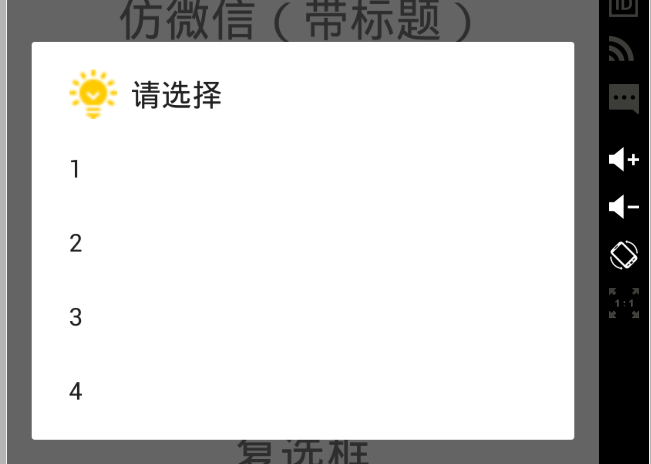
代碼:
  final AlertDialog.Builder builder = new AlertDialog.Builder(MainActivity.this);
                builder.setIcon(R.drawable.icon_title);
                builder.setTitle("請選擇");
                final String[] s2 = new String[]{"1", "2", "3", "4"};
                builder.setItems(s2, new DialogInterface.OnClickListener() {
                    @Override
                    public void onClick(DialogInterface dialogInterface, int i) {
                        Toast.makeText(MainActivity.this, s2[i], Toast.LENGTH_SHORT).show();
                    }
                });
                builder.show();
選擇一個即可。
效果圖:
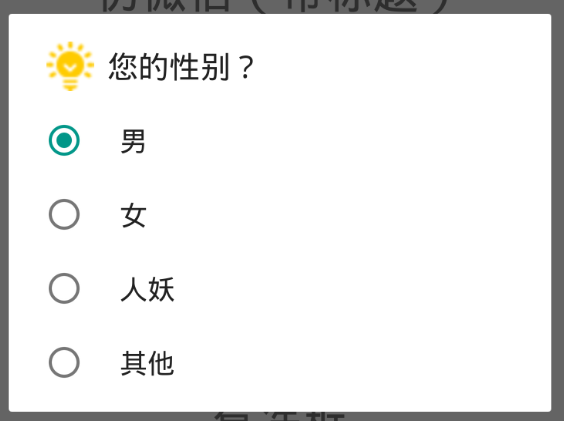
代碼:
  AlertDialog.Builder builder6 = new AlertDialog.Builder(MainActivity.this);
                builder6.setIcon(R.drawable.icon_title);
                builder6.setTitle("您的性別?");
                final String[] strings2 = new String[]{"男", "女", "人妖", "其他"};
                builder6.setSingleChoiceItems(strings2, 0, new DialogInterface.OnClickListener() {
                    @Override
                    public void onClick(DialogInterface dialogInterface, int i) {
                        Toast.makeText(MainActivity.this, strings2[i], Toast.LENGTH_SHORT).show();
                    }
                });
                builder6.show();
通過setSingleChoiceItems()方法實現,單選框。
效果:
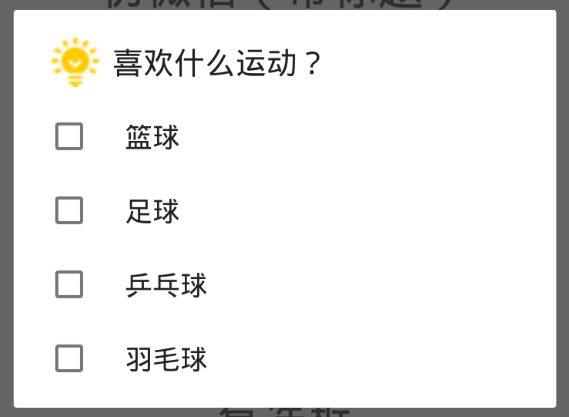
代碼:
  AlertDialog.Builder builder5 = new AlertDialog.Builder(MainActivity.this);
                builder5.setIcon(R.drawable.icon_title);
                builder5.setTitle("喜歡什麼運動?");
                final String[] strings = {"籃球", "足球", "乒乓球", "羽毛球"};
                builder5.setMultiChoiceItems(strings, null, new DialogInterface.OnMultiChoiceClickListener() {
                    @Override
                    public void onClick(DialogInterface dialogInterface, int i, boolean b) {
                        Toast.makeText(MainActivity.this, "我喜歡" + strings[i], Toast.LENGTH_SHORT).show();
                    }
                });
                builder5.show();
復選框通過setMultiChoiceItems()實現。
AlertDialog實現漂亮的彈出框,就必須自定義布局了,通過setView()方法,設置布局。
一個仿照微信彈出框的效果:
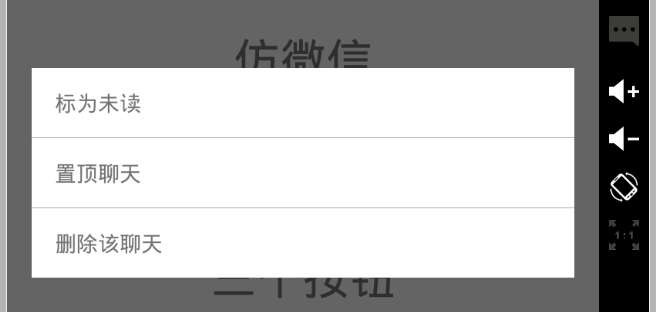
java代碼:
  AlertDialog.Builder builder2 = new AlertDialog.Builder(MainActivity.this);
                View v2 = LayoutInflater.from(MainActivity.this).inflate(R.layout.dialog_view, null);
                v2.findViewById(R.id.tv_no_read).setOnClickListener(this);
                v2.findViewById(R.id.tv_top_one).setOnClickListener(this);
                v2.findViewById(R.id.tv_del).setOnClickListener(this);
                builder2.setView(v2);
                AlertDialog alertDialog = builder2.create();
                alertDialog.show();
dialog_view.xml
但是通過效果發現,彈出的Dialog布局的寬度與高度,不是我所想要的,我想要把寬度占據手機屏幕的0.66,這樣會更美觀些。
效果:
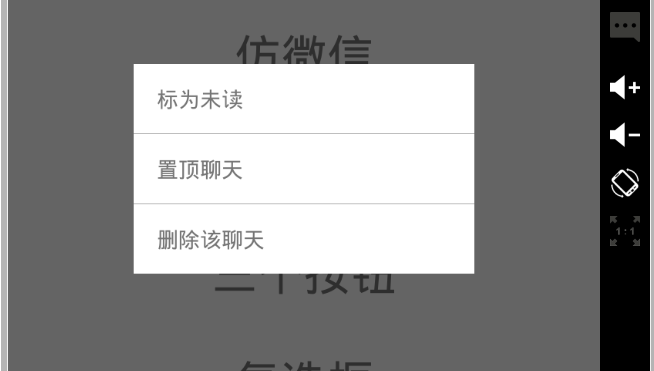
代碼:
  AlertDialog.Builder builder3 = new AlertDialog.Builder(MainActivity.this);
                View v3 = LayoutInflater.from(MainActivity.this).inflate(R.layout.dialog_view, null);
                v3.findViewById(R.id.tv_no_read).setOnClickListener(this);
                v3.findViewById(R.id.tv_top_one).setOnClickListener(this);
                v3.findViewById(R.id.tv_del).setOnClickListener(this);
                builder3.setView(v3);
                AlertDialog dialog3 = builder3.create();
                // 先調用show()方法,再設置params,才會起作用
                dialog3.show();
                Window window = dialog3.getWindow();
                WindowManager.LayoutParams params = window.getAttributes();
                params.width = (int) (getDisply().widthPixels * 0.66);
                window.setAttributes(params);
這樣就美觀多了,但是在這裡有幾點要注意:
在使用builder對象通過create()方法,拿到的dialog,要在給params參數設置值之前,調用show()方法,不然,參數值是無效的。 dialog通過getWindow()拿到當前的window,再通過window的getAttributes()方法拿到參數,然後給參數賦予相應的數值,最後通過window設置參數。現在我又有新的需求,要將dialog彈出的位置放在屏幕的左上方,而不是每次都是放在屏幕的中間,並且dialog的透明度設置為0.6。
效果:
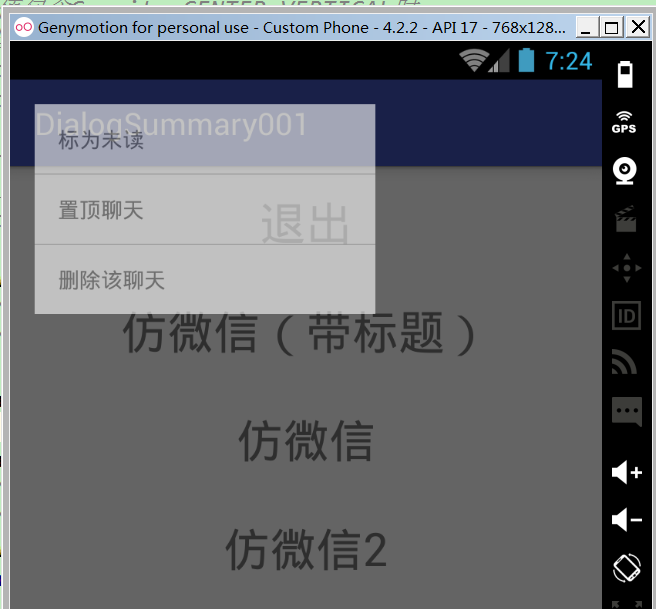
代碼:
AlertDialog.Builder builder2 = new AlertDialog.Builder(MainActivity.this);
                View v2 = LayoutInflater.from(MainActivity.this).inflate(R.layout.dialog_view, null);
                v2.findViewById(R.id.tv_no_read).setOnClickListener(this);
                v2.findViewById(R.id.tv_top_one).setOnClickListener(this);
                v2.findViewById(R.id.tv_del).setOnClickListener(this);
                builder2.setView(v2);
                AlertDialog alertDialog = builder2.create();
                alertDialog.show();
                Window w = alertDialog.getWindow();
                WindowManager.LayoutParams attributes = w.getAttributes();
                w.setGravity(Gravity.LEFT | Gravity.TOP);
                attributes.width = (int) (getDisply().widthPixels * 0.66); // 寬度
                attributes.alpha = 0.6f; // 透明度
                // 當Window的Attributes改變時系統會調用此方法,也可以用setAttributes()
                // alertDialog.onWindowAttributesChanged(attributes);
                w.setAttributes(attributes);
注意:系統默認的Gravity是Gravity.CENTER,所以我們可以根據自己的需要去設置dialog的位置。
由於我們設置了Gravity,dialog的位置得到了改變,但是Gravity設置的位置只是一個大致的位置。要接著改變dialog的位置就需要改變x和y坐標值了。
將上面的dialog,的位置向右偏移100像素,向下偏移100像素:
效果:
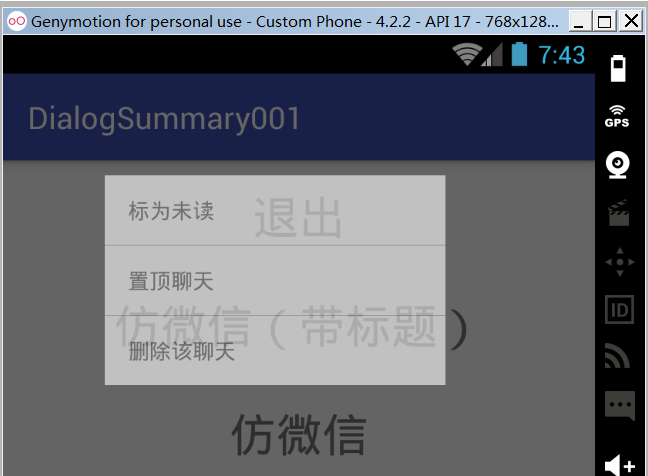
代碼:
AlertDialog.Builder builder2 = new AlertDialog.Builder(MainActivity.this);
                View v2 = LayoutInflater.from(MainActivity.this).inflate(R.layout.dialog_view, null);
                v2.findViewById(R.id.tv_no_read).setOnClickListener(this);
                v2.findViewById(R.id.tv_top_one).setOnClickListener(this);
                v2.findViewById(R.id.tv_del).setOnClickListener(this);
                builder2.setView(v2);
                AlertDialog alertDialog = builder2.create();
                alertDialog.show();
                Window w = alertDialog.getWindow();
                WindowManager.LayoutParams attributes = w.getAttributes();
                w.setGravity(Gravity.LEFT | Gravity.TOP);
                attributes.x = 100; // 新位置X坐標
                attributes.y = 100; // 新位置Y坐標
                attributes.width = (int) (getDisply().widthPixels * 0.66); // 寬度
                attributes.alpha = 0.6f; // 透明度
                // 當Window的Attributes改變時系統會調用此方法,也可以用setAttributes()
                // alertDialog.onWindowAttributesChanged(attributes);
                w.setAttributes(attributes);
注意:
x與y表示相對於原始位置的偏移.
當參數值包含Gravity.LEFT時,對話框出現在左邊,所以x就表示相對左邊的偏移,負值忽略。
當參數值包含Gravity.RIGHT時,對話框出現在右邊,所以x就表示相對右邊的偏移,負值忽略,以此類推。
當參數值包含Gravity.CENTER_HORIZONTAL時 ,對話框水平居中,所以x就表示在水平居中的位置移動x像素,正值向右移動,負值向左移動。
當參數值包含Gravity.CENTER_VERTICAL時 ,對話框垂直居中,所以y就表示在垂直居中的位置移動y像素,正值向右移動,負值向左移動。
Dialog的使用和AlertDialog大致相同,所以就很簡單了。
實現防微信Dialog, 效果(帶標題):
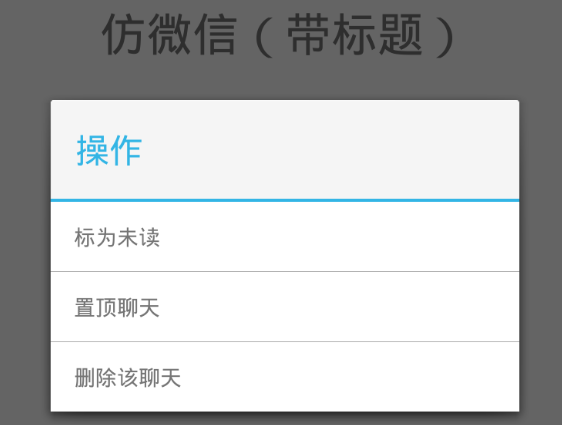
代碼:
 Dialog dialog = new Dialog(MainActivity.this);
                dialog.setTitle("操作");
                //設置是否可以點擊其他區域取消dialog,默認為 true
                //dialog.setCancelable(false);
                //加載布局
                View v = LayoutInflater.from(MainActivity.this).inflate(R.layout.dialog_view, null);
                v.findViewById(R.id.tv_no_read).setOnClickListener(this);
                v.findViewById(R.id.tv_top_one).setOnClickListener(this);
                v.findViewById(R.id.tv_del).setOnClickListener(this);
                //只有setContentView()沒有setView();
                dialog.setContentView(v);
                dialog.show();
注意:
Dialog默認有title,若去掉title,可以采用自定義Theme的方式 Dialog只有setContentView()方法。 Dialog沒有Builder要先create()拿到dialog,就要調show()方法的問題,Dialog在設置完成參數之後再調用show()方法,是沒有問題的。實現Dialog防微信,效果(不帶標題):
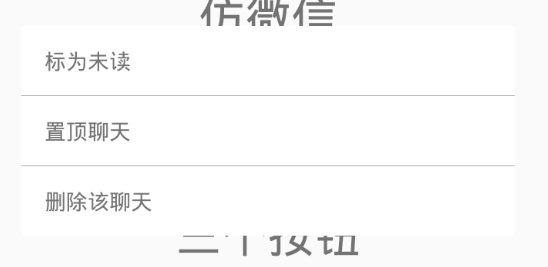
  Dialog dialog = new Dialog(MainActivity.this,R.style.my_dialog);
             //   dialog.setTitle("操作");
                //設置是否可以點擊其他區域取消dialog,默認為 true
                //dialog.setCancelable(false);
                //加載布局
                View v = LayoutInflater.from(MainActivity.this).inflate(R.layout.dialog_view, null);
                v.findViewById(R.id.tv_no_read).setOnClickListener(this);
                v.findViewById(R.id.tv_top_one).setOnClickListener(this);
                v.findViewById(R.id.tv_del).setOnClickListener(this);
                //只有setContentView()沒有setView();
                dialog.setContentView(v);
                dialog.show();
my_dialog代碼:
Dialog的位置大小等屬性和AlertDialog是差不多的,就不再羅嗦了。
再附上一個自定義防QQ的Dialog,效果:
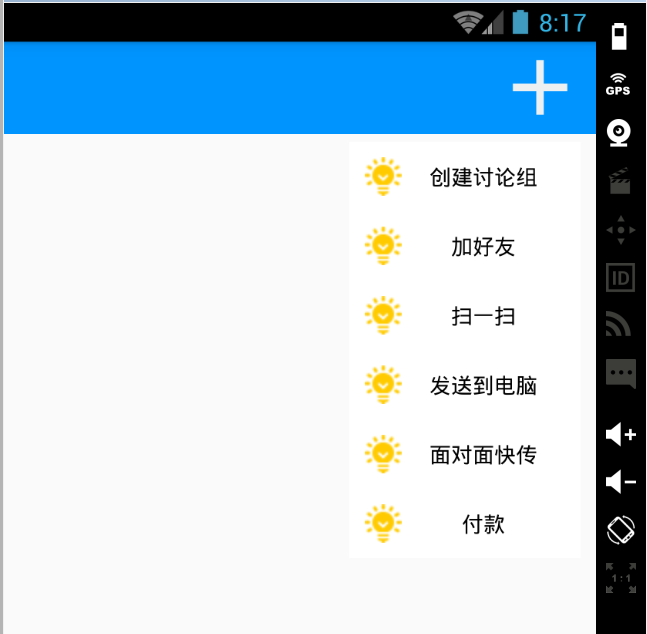
MainActivity.java
/**
 * @author zyc
 * created at 2016/4/28 13:55
 */
public class QQDialogActivity extends Activity implements View.OnClickListener {

    @Override
    protected void onCreate(Bundle savedInstanceState) {
        super.onCreate(savedInstanceState);
        setContentView(R.layout.qq_dialog);

        init();
    }

    private void init() {
        findViewById(R.id.iv_menu).setOnClickListener(this);
    }

    @Override
    public void onClick(View view) {
        CustomDialogView customDialogView = new CustomDialogView(QQDialogActivity.this, R.style.my_dialog);
        Window win = customDialogView.getWindow();
        WindowManager.LayoutParams p = win.getAttributes();
        win.setGravity(Gravity.RIGHT | Gravity.TOP);
        p.x = 20;//設置x坐標
        p.y = 130;//設置y坐標
        win.setAttributes(p);
        //設置點擊Dialog外部任意區域關閉Dialog
        customDialogView.setCanceledOnTouchOutside(true);
        customDialogView.show();
    }
}
CustomDialogView.java
/**
*@author zyc
*created at 2016/4/28 11:36
*/
public class CustomDialogView extends Dialog {

    public CustomDialogView(Context context) {
        super(context);
    }

    public CustomDialogView(Context context, int themeResId) {
        super(context, themeResId);
        setContentView(R.layout.custom_dialog_view);
    }

}
custom_dialog_view.xml
1 dialog 默認有title,可以setContentView() 沒有按鈕;
2 builder 默認沒有title,有 多按鈕、 setSingleChoiceItems()單選框 、setMultiChoiceItems()復選框、 可以setView() 。
Dialog的總結就到這了,干貨會持續不斷的~~~
 Android View體系(十一)自定義ViewGroup
前言此前講了很多,終於可以講到這一節了,本文的例子是一個自定義的ViewGroup,左右滑動切換不同的頁面,類似一個特別簡化的ViewPager,這篇文章會涉及到這個系列
 Android數據存儲方式簡括
Android提供以下四種存儲方式:SharePreferenceSQLiteFileContentProvider如果要實現數據共享,正確的方式是使用ContentPr
 Android系統中添加一個產品----圖文詳解
本文本著開源的精神介紹如何向一個Android系統中添加一個產品的整個過程,按照以下過程筆者有理由相信每個將要從事本行業的人都可以完成,其實添加一個產品並不難,難的是對其
 ANDROID L——Material Design詳解(動畫篇)
Android L: Google已經確認Android L就是Android Lollipop(5