編輯:關於Android編程
Service分為兩種工作狀態,一種是啟動狀態,主要用於執行後台計算;另一種是綁定狀態,主要用於其他組件和Service的交互。這兩種狀態可以共存的,即Service既可以處於啟動狀態也可以同時處於綁定狀態。
本篇博客是對Service的啟動過程和綁定過程進行源碼分析。

從ContextWrapper的startService開始:
@Override
    public ComponentName startService(Intent service) {
        return mBase.startService(service);
    }
mBase的類型是ContextImpl。
@Override
    public ComponentName startService(Intent service) {
        warnIfCallingFromSystemProcess();
        return startServiceCommon(service, mUser);
    }

    private ComponentName startServiceCommon(Intent service, UserHandle user) {
        try {
            validateServiceIntent(service);
            service.prepareToLeaveProcess();
            ComponentName cn = ActivityManagerNative.getDefault().startService(
                mMainThread.getApplicationThread(), service, service.resolveTypeIfNeeded(
                            getContentResolver()), getOpPackageName(), user.getIdentifier());
            if (cn != null) {
                if (cn.getPackageName().equals("!")) {
                    throw new SecurityException(
                            "Not allowed to start service " + service
                            + " without permission " + cn.getClassName());
                } else if (cn.getPackageName().equals("!!")) {
                    throw new SecurityException(
                            "Unable to start service " + service
                            + ": " + cn.getClassName());
                }
            }
            return cn;
        } catch (RemoteException e) {
            throw new RuntimeException("Failure from system", e);
        }
    }
由上可知,startServiceCommon通過ActivityManagerNative.getDefault()(AMS)這個對象啟動一個Service。通過AMS來啟動服務的行為是一個遠程調用過程。
AMS#startService
    @Override
    public ComponentName startService(IApplicationThread caller, Intent service,
            String resolvedType, String callingPackage, int userId)
            throws TransactionTooLargeException {
        enforceNotIsolatedCaller("startService");
        // Refuse possible leaked file descriptors
        if (service != null && service.hasFileDescriptors() == true) {
            throw new IllegalArgumentException("File descriptors passed in Intent");
        }

        if (callingPackage == null) {
            throw new IllegalArgumentException("callingPackage cannot be null");
        }

        if (DEBUG_SERVICE) Slog.v(TAG_SERVICE,
                "startService: " + service + " type=" + resolvedType);
        synchronized(this) {
            final int callingPid = Binder.getCallingPid();
            final int callingUid = Binder.getCallingUid();
            final long origId = Binder.clearCallingIdentity();
            ComponentName res = mServices.startServiceLocked(caller, service,
                    resolvedType, callingPid, callingUid, callingPackage, userId);
            Binder.restoreCallingIdentity(origId);
            return res;
        }
    }
AMS會通過mService來完成Service後續的啟動過程,mService對象的類型是ActivityServices,是一個輔助AMS進行Service管理的類,包括Service的啟動、綁定和停止等。在ActivityServices的startServiceLocked方法會調用startServiceInnerLocked方法,startServiceInnerLocked方法繼續調用bringUpServiceLocked方法,bringUpServiceLocked方法又調用realStartServiceLocked方法。
    private final void realStartServiceLocked(ServiceRecord r,
            ProcessRecord app, boolean execInFg) throws RemoteException {
        if (app.thread == null) {
            throw new RemoteException();
        }
        if (DEBUG_MU)
            Slog.v(TAG_MU, "realStartServiceLocked, ServiceRecord.uid = " + r.appInfo.uid
                    + ", ProcessRecord.uid = " + app.uid);
        r.app = app;
        r.restartTime = r.lastActivity = SystemClock.uptimeMillis();

        final boolean newService = app.services.add(r);
        bumpServiceExecutingLocked(r, execInFg, "create");
        mAm.updateLruProcessLocked(app, false, null);
        mAm.updateOomAdjLocked();

        boolean created = false;
        try {
            if (LOG_SERVICE_START_STOP) {
                String nameTerm;
                int lastPeriod = r.shortName.lastIndexOf('.');
                nameTerm = lastPeriod >= 0 ? r.shortName.substring(lastPeriod) : r.shortName;
                EventLogTags.writeAmCreateService(
                        r.userId, System.identityHashCode(r), nameTerm, r.app.uid, r.app.pid);
            }
            synchronized (r.stats.getBatteryStats()) {
                r.stats.startLaunchedLocked();
            }
            mAm.ensurePackageDexOpt(r.serviceInfo.packageName);
            app.forceProcessStateUpTo(ActivityManager.PROCESS_STATE_SERVICE);
            app.thread.scheduleCreateService(r, r.serviceInfo,
                    mAm.compatibilityInfoForPackageLocked(r.serviceInfo.applicationInfo),
                    app.repProcState);
            r.postNotification();
            created = true;
        } catch (DeadObjectException e) {
            Slog.w(TAG, "Application dead when creating service " + r);
            mAm.appDiedLocked(app);
            throw e;
        } finally {
            if (!created) {
                // Keep the executeNesting count accurate.
                final boolean inDestroying = mDestroyingServices.contains(r);
                serviceDoneExecutingLocked(r, inDestroying, inDestroying);

                // Cleanup.
                if (newService) {
                    app.services.remove(r);
                    r.app = null;
                }

                // Retry.
                if (!inDestroying) {
                    scheduleServiceRestartLocked(r, false);
                }
            }
        }

        requestServiceBindingsLocked(r, execInFg);

        updateServiceClientActivitiesLocked(app, null, true);

        // If the service is in the started state, and there are no
        // pending arguments, then fake up one so its onStartCommand() will
        // be called.
        if (r.startRequested && r.callStart && r.pendingStarts.size() == 0) {
            r.pendingStarts.add(new ServiceRecord.StartItem(r, false, r.makeNextStartId(),
                    null, null));
        }

        sendServiceArgsLocked(r, execInFg, true);

        if (r.delayed) {
            if (DEBUG_DELAYED_STARTS) Slog.v(TAG_SERVICE, "REM FR DELAY LIST (new proc): " + r);
            getServiceMap(r.userId).mDelayedStartList.remove(r);
            r.delayed = false;
        }

        if (r.delayedStop) {
            // Oh and hey we've already been asked to stop!
            r.delayedStop = false;
            if (r.startRequested) {
                if (DEBUG_DELAYED_STARTS) Slog.v(TAG_SERVICE,
                        "Applying delayed stop (from start): " + r);
                stopServiceLocked(r);
            }
        }
    }
在realStartServiceLocked方法中,首先通過app.thread的scheduleCreateService方法來創建Service對象並調用其onCreate,接著調用sendServiceArgsLocked方法來調用Service的其他方法,比如onStartCommand,這兩個過程均是進程間的通信。具體實現是ApplicationThread。
ApplicationThread#scheduleCreateService
        public final void scheduleCreateService(IBinder token,
                ServiceInfo info, CompatibilityInfo compatInfo, int processState) {
            updateProcessState(processState, false);
            CreateServiceData s = new CreateServiceData();
            s.token = token;
            s.info = info;
            s.compatInfo = compatInfo;

            sendMessage(H.CREATE_SERVICE, s);
        }
這個過程和Activity的啟動類似。發送消息給Handler H,H接受消息H.CREATE_SERVICE並通過ActivityThread的handleCreateService方法來完成Service的啟動。
ActivityThread#handleCreateService
    private void handleCreateService(CreateServiceData data) {
        // If we are getting ready to gc after going to the background, well
        // we are back active so skip it.
        unscheduleGcIdler();

        LoadedApk packageInfo = getPackageInfoNoCheck(
                data.info.applicationInfo, data.compatInfo);
        Service service = null;
        try {
            java.lang.ClassLoader cl = packageInfo.getClassLoader();
            service = (Service) cl.loadClass(data.info.name).newInstance();
        } catch (Exception e) {
            if (!mInstrumentation.onException(service, e)) {
                throw new RuntimeException(
                    "Unable to instantiate service " + data.info.name
                    + ": " + e.toString(), e);
            }
        }

        try {
            if (localLOGV) Slog.v(TAG, "Creating service " + data.info.name);

            ContextImpl context = ContextImpl.createAppContext(this, packageInfo);
            context.setOuterContext(service);

            Application app = packageInfo.makeApplication(false, mInstrumentation);
            service.attach(context, this, data.info.name, data.token, app,
                    ActivityManagerNative.getDefault());
            service.onCreate();
            mServices.put(data.token, service);
            try {
                ActivityManagerNative.getDefault().serviceDoneExecuting(
                        data.token, SERVICE_DONE_EXECUTING_ANON, 0, 0);
            } catch (RemoteException e) {
                // nothing to do.
            }
        } catch (Exception e) {
            if (!mInstrumentation.onException(service, e)) {
                throw new RuntimeException(
                    "Unable to create service " + data.info.name
                    + ": " + e.toString(), e);
            }
        }
    }
主要完成了以下四件事:
1. 首先通過類加載器創建Service的實例
2. 然後創建Appliction對象並調用其onCreate
3. 接著調用ContextImpl對象並通過Service的attach方法建立二者的關系,和Activity的類似。
4. 最後調用Service的onCreate方法並將Service對象存儲到ActivityThread中的一個列表中。
由於Service的onCreate被執行,意味著Service已經啟動,除此之外,ActivityThread中還會通過handleServiceArgs方法調用Service的onStartCommand方法。
    private void handleServiceArgs(ServiceArgsData data) {
        Service s = mServices.get(data.token);
        if (s != null) {
            try {
                if (data.args != null) {
                    data.args.setExtrasClassLoader(s.getClassLoader());
                    data.args.prepareToEnterProcess();
                }
                int res;
                if (!data.taskRemoved) {
                    res = s.onStartCommand(data.args, data.flags, data.startId);
                } else {
                    s.onTaskRemoved(data.args);
                    res = Service.START_TASK_REMOVED_COMPLETE;
                }

                QueuedWork.waitToFinish();

                try {
                    ActivityManagerNative.getDefault().serviceDoneExecuting(
                            data.token, SERVICE_DONE_EXECUTING_START, data.startId, res);
                } catch (RemoteException e) {
                    // nothing to do.
                }
                ensureJitEnabled();
            } catch (Exception e) {
                if (!mInstrumentation.onException(s, e)) {
                    throw new RuntimeException(
                            "Unable to start service " + s
                            + " with " + data.args + ": " + e.toString(), e);
                }
            }
        }
    }
Service的綁定過程也是從ContextWrapper開始。
    @Override
    public boolean bindService(Intent service, ServiceConnection conn,
            int flags) {
        return mBase.bindService(service, conn, flags);
    }
ContextImpl#bindServiceCommon
    private boolean bindServiceCommon(Intent service, ServiceConnection conn, int flags,
            UserHandle user) {
        IServiceConnection sd;
        if (conn == null) {
            throw new IllegalArgumentException("connection is null");
        }
        if (mPackageInfo != null) {
            sd = mPackageInfo.getServiceDispatcher(conn, getOuterContext(),
                    mMainThread.getHandler(), flags);
        } else {
            throw new RuntimeException("Not supported in system context");
        }
        validateServiceIntent(service);
        try {
            IBinder token = getActivityToken();
            if (token == null && (flags&BIND_AUTO_CREATE) == 0 && mPackageInfo != null
                    && mPackageInfo.getApplicationInfo().targetSdkVersion
                    < android.os.Build.VERSION_CODES.ICE_CREAM_SANDWICH) {
                flags |= BIND_WAIVE_PRIORITY;
            }
            service.prepareToLeaveProcess();
            int res = ActivityManagerNative.getDefault().bindService(
                mMainThread.getApplicationThread(), getActivityToken(), service,
                service.resolveTypeIfNeeded(getContentResolver()),
                sd, flags, getOpPackageName(), user.getIdentifier());
            if (res < 0) {
                throw new SecurityException(
                        "Not allowed to bind to service " + service);
            }
            return res != 0;
        } catch (RemoteException e) {
            throw new RuntimeException("Failure from system", e);
        }
    }
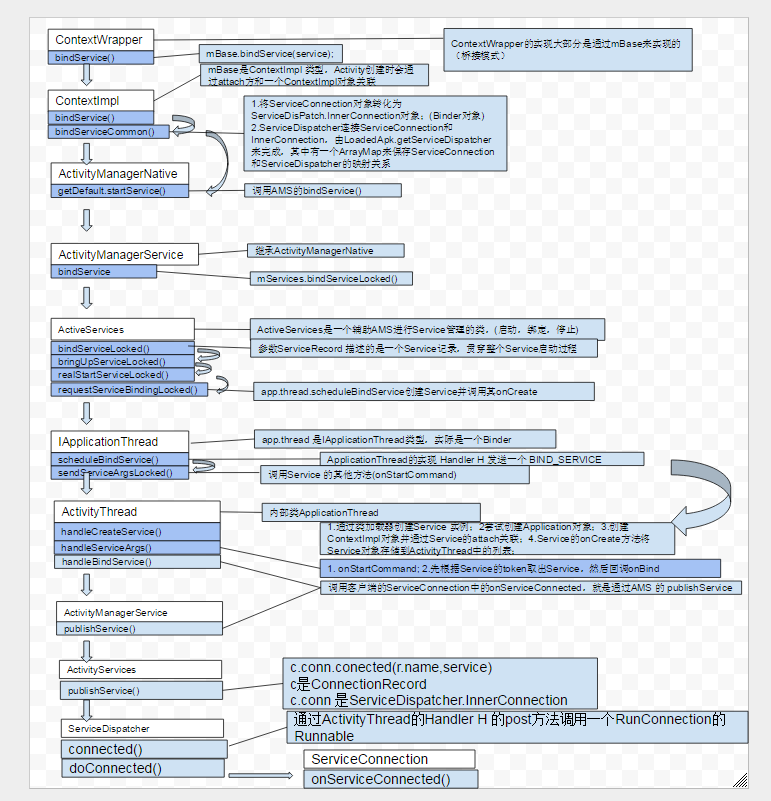
首先將客戶端的ServiceConnection對象轉化為ServiceDispather.InnerConnection對象。因為服務的綁定有可能是跨進程的,ServiceConnection必須借助Binder才能讓遠程服務端回調自己的方法,ServiceDispather.InnerConnection剛好充當了Binder。ServiceDispather起連接ServiceConnection和InnerConnection的作用。此過程由LoadedApk的getServiceDispather方法完成。
LoadedApk#getServiceDispather
    public final IServiceConnection getServiceDispatcher(ServiceConnection c,
            Context context, Handler handler, int flags) {
        synchronized (mServices) {
            LoadedApk.ServiceDispatcher sd = null;
            ArrayMap map = mServices.get(context);
            if (map != null) {
                sd = map.get(c);
            }
            if (sd == null) {
                sd = new ServiceDispatcher(c, context, handler, flags);
                if (map == null) {
                    map = new ArrayMap();
                    mServices.put(context, map);
                }
                map.put(c, sd);
            } else {
                sd.validate(context, handler);
            }
            return sd.getIServiceConnection();
        }
    }
mService是一個ArrayMap存儲了一個應用當前活動的ServiceConnection和ServiceDispatcher的映射關系。
系統首先會查找是否存在相同的ServiceConnection,若不存在,則重新創建一個ServiceDispatcher對象並將其存儲在mService中,在ServiceDispatcher內部又保存了ServiceConnection和InnerConnection對象。當Service和客戶端建立連接後,系統會通過InnerConnection來調用ServiceConnection中的onServiceConnected方法,這個過程可能跨進程。當ServiceDispatcher創建好以後,getServiceDispatcher會返回其保存的InnerConnection對象。
AMS#bindService
    public int bindService(IApplicationThread caller, IBinder token, Intent service,
            String resolvedType, IServiceConnection connection, int flags, String callingPackage,
            int userId) throws TransactionTooLargeException {
        enforceNotIsolatedCaller("bindService");

        // Refuse possible leaked file descriptors
        if (service != null && service.hasFileDescriptors() == true) {
            throw new IllegalArgumentException("File descriptors passed in Intent");
        }

        if (callingPackage == null) {
            throw new IllegalArgumentException("callingPackage cannot be null");
        }

        synchronized(this) {
            return mServices.bindServiceLocked(caller, token, service,
                    resolvedType, connection, flags, callingPackage, userId);
        }
    }
接下來AMS會調用ActivityServices的startServiceLocked方法。在ActivityServices的startServiceLocked方法會調用startServiceInnerLocked方法,startServiceInnerLocked方法繼續調用bringUpServiceLocked方法,bringUpServiceLocked方法又調用realStartServiceLocked方法。最終通過ApplicationThread來完成Service實例的創建並執行onCreate方法,和啟動Service不同的是,Service的綁定過程會調用app.thread的scheduleBindService方法。
        public final void scheduleBindService(IBinder token, Intent intent,
                boolean rebind, int processState) {
            updateProcessState(processState, false);
            BindServiceData s = new BindServiceData();
            s.token = token;
            s.intent = intent;
            s.rebind = rebind;

            if (DEBUG_SERVICE)
                Slog.v(TAG, "scheduleBindService token=" + token + " intent=" + intent + " uid="
                        + Binder.getCallingUid() + " pid=" + Binder.getCallingPid());
            sendMessage(H.BIND_SERVICE, s);
        }
在H內部收到BIND_SERVICE,會交給ActivityThread的handleBindService方法來處理。
ActivityThread#handleBindService
    private void handleBindService(BindServiceData data) {
        Service s = mServices.get(data.token);
        if (DEBUG_SERVICE)
            Slog.v(TAG, "handleBindService s=" + s + " rebind=" + data.rebind);
        if (s != null) {
            try {
                data.intent.setExtrasClassLoader(s.getClassLoader());
                data.intent.prepareToEnterProcess();
                try {
                    if (!data.rebind) {
                        IBinder binder = s.onBind(data.intent);
                        ActivityManagerNative.getDefault().publishService(
                                data.token, data.intent, binder);
                    } else {
                        s.onRebind(data.intent);
                        ActivityManagerNative.getDefault().serviceDoneExecuting(
                                data.token, SERVICE_DONE_EXECUTING_ANON, 0, 0);
                    }
                    ensureJitEnabled();
                } catch (RemoteException ex) {
                }
            } catch (Exception e) {
                if (!mInstrumentation.onException(s, e)) {
                    throw new RuntimeException(
                            "Unable to bind to service " + s
                            + " with " + data.intent + ": " + e.toString(), e);
                }
            }
        }
    }
在handleBindService中,首先根據Service的token取出Service對象,然後調用Service的onBind方法,Service的onBind方法返回一個Binder對象給客戶端使用。原則上來說,Service的onBind方法調用後Service就被綁定成功,但是onBind方法是Service的方法,這個時候客戶端並不知道已經成功連接Service,所以還要調用客戶端的ServiceConnection中的onServiceConnected,這是由AMS的publishService方法完成。
Service有一個特性,當多次綁定同一個Service時,Service的onBind方法只會執行一次,除非Service被終止。當Service的onBind執行以後,系統還需要告知客戶端已經成功連接Service了。由AMS的publishService方法完成。
AMS#publishService
    public void publishService(IBinder token, Intent intent, IBinder service) {
        // Refuse possible leaked file descriptors
        if (intent != null && intent.hasFileDescriptors() == true) {
            throw new IllegalArgumentException("File descriptors passed in Intent");
        }

        synchronized(this) {
            if (!(token instanceof ServiceRecord)) {
                throw new IllegalArgumentException("Invalid service token");
            }
            mServices.publishServiceLocked((ServiceRecord)token, intent, service);
        }
    }
由上可知,AMS的publishService方法將具體的工作交給了ActiveServices類型的mService對象來處理。
     void publishServiceLocked(ServiceRecord r, Intent intent, IBinder service) {
        final long origId = Binder.clearCallingIdentity();
        try {
            if (DEBUG_SERVICE) Slog.v(TAG_SERVICE, "PUBLISHING " + r
                    + " " + intent + ": " + service);
            if (r != null) {
                Intent.FilterComparison filter
                        = new Intent.FilterComparison(intent);
                IntentBindRecord b = r.bindings.get(filter);
                if (b != null && !b.received) {
                    b.binder = service;
                    b.requested = true;
                    b.received = true;
                    for (int conni=r.connections.size()-1; conni>=0; conni--) {
                        ArrayList clist = r.connections.valueAt(conni);
                        for (int i=0; i
核心代碼c.conn.connected(r.name, service); 其中c是ConnectionRecord;c.conn是ServiceDispatcher.InnerConnection,Service就是Service的onBind返回的Binder對象。

LoadedApk#ServiceDispatcher#InnerConnection
        private static class InnerConnection extends IServiceConnection.Stub {
            final WeakReference mDispatcher;

            InnerConnection(LoadedApk.ServiceDispatcher sd) {
                mDispatcher = new WeakReference(sd);
            }

            public void connected(ComponentName name, IBinder service) throws RemoteException {
                LoadedApk.ServiceDispatcher sd = mDispatcher.get();
                if (sd != null) {
                    sd.connected(name, service);
                }
            }
        }
InnerConnection的connected方法調用ServiceDispatcher的connected方法。

LoadedApk#ServiceDispatcher#connected
        public void connected(ComponentName name, IBinder service) {
            if (mActivityThread != null) {
                mActivityThread.post(new RunConnection(name, service, 0));
            } else {
                doConnected(name, service);
            }
        }
ServiceDispatcher的mActivityThread是ActivityThread中的Handler H。如此,RunConnection就可以經由H的post方法從而運行在主線程中,因此客戶端的ServiceConnection中的方法是在主線程被回調的。
        private final class RunConnection implements Runnable {
            RunConnection(ComponentName name, IBinder service, int command) {
                mName = name;
                mService = service;
                mCommand = command;
            }

            public void run() {
                if (mCommand == 0) {
                    doConnected(mName, mService);
                } else if (mCommand == 1) {
                    doDeath(mName, mService);
                }
            }

            final ComponentName mName;
            final IBinder mService;
            final int mCommand;
        }
顯然,RunConnection的潤方法也是簡單的調用了ServiceDispatcher的doConnected方法,由於ServiceDispatcher內部保存了客戶端的ServiceConnection對象,因此它可以很方便地調用ServiceConnection對象的onServiceConnected方法。

LoadedApk#ServiceDispatcher#doConnected
        public void doConnected(ComponentName name, IBinder service) {
            ServiceDispatcher.ConnectionInfo old;
            ServiceDispatcher.ConnectionInfo info;

            synchronized (this) {
                if (mForgotten) {
                    // We unbound before receiving the connection; ignore
                    // any connection received.
                    return;
                }
                old = mActiveConnections.get(name);
                if (old != null && old.binder == service) {
                    // Huh, already have this one.  Oh well!
                    return;
                }

                if (service != null) {
                    // A new service is being connected... set it all up.
                    mDied = false;
                    info = new ConnectionInfo();
                    info.binder = service;
                    info.deathMonitor = new DeathMonitor(name, service);
                    try {
                        service.linkToDeath(info.deathMonitor, 0);
                        mActiveConnections.put(name, info);
                    } catch (RemoteException e) {
                        // This service was dead before we got it...  just
                        // don't do anything with it.
                        mActiveConnections.remove(name);
                        return;
                    }

                } else {
                    // The named service is being disconnected... clean up.
                    mActiveConnections.remove(name);
                }

                if (old != null) {
                    old.binder.unlinkToDeath(old.deathMonitor, 0);
                }
            }

            // If there was an old service, it is not disconnected.
            if (old != null) {
                mConnection.onServiceDisconnected(name);
            }
            // If there is a new service, it is now connected.
            if (service != null) {
                mConnection.onServiceConnected(name, service);
            }
        }
客戶端的onServiceConnected方法執行後,Service的綁定過程也就完成了。
 手機進水怎麼辦?
當你的手機不慎掉進水裡,且你很快就把它撈出來,接下來如何“挽救”你的手機,就可以試試以下的方法。三步“營救”
 進階四之Android UI介面之(Gallery仿圖像集浏覽)
兩個人共嘗一個痛苦只有半個痛苦,兩個人共享一個歡樂卻有兩個歡樂。 本講內容:Gallery仿圖像集浏覽 一、基本原理 在 Activity 中實現 OnGest
 微信授權登陸接入第三方App(步驟總結)Android
這幾天開發要用到微信授權的功能,所以就研究了一下。可是微信開放平台接入指南裡有幾個地方寫的不清不楚。在此總結一下,以便需要的人。很多微信公眾平台的應用如果移植到app上的
 swift版QQ音樂播放器(二)
一 完善部分的QQ音樂效果圖二 需要完善點1 歌曲的切換和暫停播放2 歌曲當前播放時間和歌曲總時間的更新3 進度條的處理4 歌手頭像處理5 頭像動畫效果6 歌詞的進度顯示