編輯:關於Android編程
在sina裡看到了什麼全民奪寶的鏈接,然後忍不住1元的誘惑被坑了10多塊,什麼都沒有抽到,但是還是有人抽到了不知道是不是坑爹的,然後也就動手做一下倒計時的功能。
先看全民奪寶:

說起這個功能是不是感覺so easy,然後就以此來搞2個倒計時效果,順便也學習一下CountDownTimer的使用。
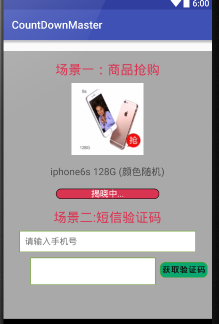
哈哈,看看今天實現的效果圖:

方法一
Timer與TimerTask(Java實現)
public class timerTask extends Activity{
    private int recLen = 11;
    private TextView txtView;
    Timer timer = new Timer();
    public void onCreate(Bundle savedInstanceState){
        super.onCreate(savedInstanceState);

        setContentView(R.layout.timertask);
        txtView = (TextView)findViewById(R.id.txttime);

        timer.schedule(task, 1000, 1000);       // timeTask
    }
    TimerTask task = new TimerTask() {
        @Override
        public void run() {

            runOnUiThread(new Runnable() {      // UI thread
                @Override
                public void run() {
                    recLen--;
                    txtView.setText(""+recLen);
                    if(recLen < 0){
                        timer.cancel();
                        txtView.setVisibility(View.GONE);
                    }
                }
            });
        }
    };
}
方法二
TimerTask與Handler(不用Timer的改進型)
public class timerTask extends Activity{
    private int recLen = 11;
    private TextView txtView;
    Timer timer = new Timer();

    public void onCreate(Bundle savedInstanceState){
        super.onCreate(savedInstanceState);

        setContentView(R.layout.timertask);
        txtView = (TextView)findViewById(R.id.txttime);

        timer.schedule(task, 1000, 1000);       // timeTask
    }

    final Handler handler = new Handler(){
        @Override
        public void handleMessage(Message msg){
            switch (msg.what) {
            case 1:
                txtView.setText(""+recLen);
                if(recLen < 0){
                    timer.cancel();
                    txtView.setVisibility(View.GONE);
                }
            }
        }
    };

    TimerTask task = new TimerTask() {
        @Override
        public void run() {
            recLen--;
            Message message = new Message();
            message.what = 1;
            handler.sendMessage(message);
        }
    };
}
方法三
Handler與Message(不用TimerTask)
public class timerTask extends Activity{
    private int recLen = 11;
    private TextView txtView;
    public void onCreate(Bundle savedInstanceState) {
        super.onCreate(savedInstanceState);
        setContentView(R.layout.timertask);
        txtView = (TextView)findViewById(R.id.txttime);
        Message message = handler.obtainMessage(1);     // Message
        handler.sendMessageDelayed(message, 1000);
    }
    final Handler handler = new Handler(){
        public void handleMessage(Message msg){         // handle message
            switch (msg.what) {
            case 1:
                recLen--;
                txtView.setText("" + recLen);
                if(recLen > 0){
                    Message message = handler.obtainMessage(1);
                    handler.sendMessageDelayed(message, 1000);      // send message
                }else{
                    txtView.setVisibility(View.GONE);
                }
            }
            super.handleMessage(msg);
        }
    };
}
方法四
Handler與Thread(不占用UI線程)
public class timerTask extends Activity{
    private int recLen = 11;
    private TextView txtView;
    public void onCreate(Bundle savedInstanceState){
        super.onCreate(savedInstanceState);
        setContentView(R.layout.timertask);
        txtView = (TextView)findViewById(R.id.txttime);
        new Thread(new MyThread()).start();         // start thread
    }
    final Handler handler = new Handler(){          // handle
        public void handleMessage(Message msg){
            switch (msg.what) {
            case 1:
                recLen--;
                txtView.setText("" + recLen);
            }
            super.handleMessage(msg);
        }
    };
    public class MyThread implements Runnable{      // thread
        @Override
        public void run(){
            while(recLen>0){
                try{
                    Thread.sleep(1000);     // sleep1000ms
                    Message message = new Message();
                    message.what = 1;
                    handler.sendMessage(message);
                }catch (Exception e) {
                }
方法五
Handler與Runnable(最簡單型)
public class timerTask extends Activity{
    private int recLen = 11;
    private TextView txtView;
    public void onCreate(Bundle savedInstanceState){
        super.onCreate(savedInstanceState);
        setContentView(R.layout.timertask);
        txtView = (TextView)findViewById(R.id.txttime);
        handler.postDelayed(runnable, 1000);
    }

    Handler handler = new Handler();
    Runnable runnable = new Runnable() {
        @Override
        public void run() {
            if(recLen>0){
             recLen--;
            }
            txtView.setText("" + recLen);
            handler.postDelayed(this, 1000);
        }
    };
}
回顧了以前最常使用的5種方法是不是覺得還是比較麻煩,要說最好的也就第5種。
使用案列(簡單)
     /**
       * 繼承 CountDownTimer 防范
       *
       * 重寫 父類的方法 onTick() 、 onFinish()
       */

      class MyCountDownTimer extends CountDownTimer {
        /**
         * @param millisInFuture
         *      表示以毫秒為單位 倒計時的總數
         *      例如 millisInFuture=1000 表示1秒
         * @param countDownInterval
         *      表示 間隔 多少微秒 調用一次 onTick 方法
         *      例如: countDownInterval =1000 ; 表示每1000毫秒調用一次onTick()
         *
         */
        public MyCountDownTimer(long millisInFuture, long countDownInterval) {
          super(millisInFuture, countDownInterval);
        }

        @Override
        public void onFinish() {
          .....//記時結束處理
        }

        @Override
        public void onTick(long millisUntilFinished) {
            .....//計時過程中的處理
            }
        }
      }
開始倒計時使用:CountDownTimer .start();
關閉:CountDownTimer .cancle();
這裡拿兩種情況來實現這功能,順便也做成2個自定義view來使用。
布局界面圖:

先看布局:
我們先來 做短信驗證碼的倒計時功能:
package com.losileeya.countdownmaster.view;
import android.content.Context;
import android.os.CountDownTimer;
import android.util.AttributeSet;
import android.view.LayoutInflater;
import android.view.View;
import android.widget.Button;
import android.widget.LinearLayout;
import com.losileeya.countdownmaster.R;
/**
 * 自定義控件,實現驗證碼按鈕倒計時功能。
 * losileeya
 *
 */
public class TimeButton extends LinearLayout {
    private Button timeButton;
    private int default_time = 60*1000;//默認時間
    private TimeButtonCallBack timeButtoncallback;//倒計時按鈕回掉接口
    private MyCountDownTimer mc; //倒計時線程
    public TimeButton(Context context) {
        this(context, null);
    }

    public TimeButton(Context context, AttributeSet attrs)    {
        this(context, attrs, 0);
    }
    public TimeButton(Context context, AttributeSet attrs, int defStyle) {
        super(context, attrs, defStyle);
         LayoutInflater inflater = (LayoutInflater) context
         .getSystemService(Context.LAYOUT_INFLATER_SERVICE);
        //把view和布局綁定
         timeButton = (Button) inflater.inflate(R.layout.view_time_button, this).findViewById(R.id.time);
         initListerner();
    }

    /**
     * 暴露倒計時時間給使用者調
     * @param millis
     */
    public void setTime(int millis){
         this.default_time= millis;
     }
    public void initListerner() {
        timeButton.setOnClickListener(new OnClickListener() {
            @Override
            public void onClick(View v) {
                if (timeButtoncallback != null) {
                    if (timeButtoncallback.Start()) {
                        // 手機號驗證通過了,那麼繼續下面的操作。
                    } else {
                        // 手機號驗證未通過,直接返回了,不執行下面的操作。
                        return;
                    }
                } else {
                    // 回調接口為空,有問題,直接返回了,不執行下面的操作。
                    return;
                }
                timeButton.setClickable(false);
                mc = new MyCountDownTimer(default_time, 1000);
                mc.start(); //倒計時記時
            }
        });
    }

    public void setTimeButtonCallBack(TimeButtonCallBack timeButtoncallback) {
        this.timeButtoncallback = timeButtoncallback;
    }


    /**
     * 倒計時控件回調外部代碼的接口。
     *
     *
     */
    public interface TimeButtonCallBack {

        /**
         * 點擊按鈕後,開始計時前調用的方法。
         *
         * @return 返回true會開始計時,false會退出計時。
         */
        public boolean Start();

        /**
         * 結束啦。
         */
        public void End();

        /**
         * 數字發生變化了。
         *
         * @param num
         * @return
         */
        public void numChanged(int num);

    }
    /**
       * 繼承 CountDownTimer 防范
       *
       * 重寫 父類的方法 onTick() 、 onFinish()
       */

      class MyCountDownTimer extends CountDownTimer {
        /**
         *
         * @param millisInFuture
         *      表示以毫秒為單位 倒計時的總數
         *
         *      例如 millisInFuture=1000 表示1秒
         *
         * @param countDownInterval
         *      表示 間隔 多少微秒 調用一次 onTick 方法
         *
         *      例如: countDownInterval =1000 ; 表示每1000毫秒調用一次onTick()
         *
         */
        public MyCountDownTimer(long millisInFuture, long countDownInterval) {
          super(millisInFuture, countDownInterval);
        }

        @Override
        public void onFinish() {
            mc.cancel();
            timeButton.setText("獲取驗證碼");
            timeButton.setClickable(true);
            if (timeButtoncallback != null) {
                timeButtoncallback.End();
            }
        }

        @Override
        public void onTick(long millisUntilFinished) {
            timeButton.setText(millisUntilFinished/1000 + "秒後重新獲取");
            if (timeButtoncallback != null) {
                timeButtoncallback.numChanged((int)millisUntilFinished/1000);
            }
        }
      }
}
接下來是仿全民奪寶搶購倒計時功能:
package com.losileeya.countdownmaster.view;

import android.content.Context;
import android.os.CountDownTimer;
import android.os.Handler;
import android.util.AttributeSet;
import android.view.LayoutInflater;
import android.view.View;
import android.widget.LinearLayout;
import android.widget.TextView;

import com.losileeya.countdownmaster.R;

/**
 * Created by losileeya on 2016/4/21.
 */
public class CommodityBuyView extends LinearLayout {
    private TextView tv_goods_desc,tv_status,tv_awardee;
    private MyCountDownTimer mc;
    private LinearLayout ll_result;
    private String awardee;
    public CommodityBuyView(Context context) {
        this(context, null);
    }

    public CommodityBuyView(Context context, AttributeSet attrs) {
        this(context, attrs, 0);
    }

    public CommodityBuyView(Context context, AttributeSet attrs, int defStyleAttr) {
        super(context, attrs, defStyleAttr);
        initView(context);
    }

    /**
     * find 控件,初始化
     * @param context
     */
    private void initView(Context context) {
        LayoutInflater inflater = (LayoutInflater) context
                .getSystemService(Context.LAYOUT_INFLATER_SERVICE);
        View view=inflater.inflate(R.layout.view_commodity_buying,this);
        tv_goods_desc= (TextView) view.findViewById(R.id.tv_goods_desc);
        tv_status= (TextView) view.findViewById(R.id.tv_status);
        tv_awardee= (TextView) view.findViewById(R.id.tv_awardee);
        ll_result= (LinearLayout) view.findViewById(R.id.ll_result);
        tv_status=(TextView) view.findViewById(R.id.tv_status);
        mc = new MyCountDownTimer(280000, 100);
        mc.start();
    }
    /**
     * 繼承 CountDownTimer 防范
     *
     * 重寫 父類的方法 onTick() 、 onFinish()
     */

    class MyCountDownTimer extends CountDownTimer {
        /**
         *
         * @param millisInFuture
         *      表示以毫秒為單位 倒計時的總數
         *
         *      例如 millisInFuture=1000 表示1秒
         *
         * @param countDownInterval
         *      表示 間隔 多少微秒 調用一次 onTick 方法
         *
         *      例如: countDownInterval =1000 ; 表示每1000毫秒調用一次onTick()
         *
         */
        public MyCountDownTimer(long millisInFuture, long countDownInterval) {
            super(millisInFuture, countDownInterval);
        }
        @Override
        public void onFinish() {
            tv_status.setText("揭曉中....");
               new Handler().postDelayed(new Runnable() {
                   @Override
                   public void run() {
                       tv_status.setVisibility(View.GONE);
                       ll_result.setVisibility(View.VISIBLE);
                       tv_awardee.setText(awardee);
                   }
               }, 5000);
        }
        /**
         * 處理時間倒計時進行頁面刷新
         * @param millisUntilFinished
         */
        @Override
        public void onTick(long millisUntilFinished) {
            int ss = 1000;
            int mi = ss * 60;
            long minute = millisUntilFinished/ mi;
            long second = (millisUntilFinished- minute * mi) / ss;
            long milliSecond = millisUntilFinished  - minute * mi - second * ss;
            String strMinute = minute < 10 ? "0" + minute : "" + minute;//分鐘
            String strSecond = second < 10 ? "0" + second : "" + second;//秒
            String strMilliSecond = milliSecond < 10 ? "0" + milliSecond : "" + milliSecond;//毫秒
            strMilliSecond = milliSecond >100 ? strMilliSecond.substring(0,strMilliSecond.length()-1) : "" + strMilliSecond;
            tv_status.setText(strMinute + " 分 "+strSecond+"秒"+strMilliSecond);
        }
    }
    /**
     * 設置獲獎人
     * @param awardee
     */
    public void setAwardee(String awardee){
        this.awardee= awardee;
    }
}
就寫到這裡吧,困覺。
 android4.0 USB Camera實例(四)CMOS
上一篇說了下usb camera uvc標准的 順便把CMOS做到一起 操作上基本一至 上一篇HAL層裡我已經提供了CMOS的相關接口 JNIEXPORT jint
 Android消息處理機制:源碼剖析Handler、Looper,並實現圖片異步加載
引言我們在做 Android 開發時,常常需要實現異步加載圖片/網頁/其他。事實上,要實現異步加載,就需要實現線程間通信,而在 Android 中結合使用 Handler
 Android組件之DrawerLayout實現抽屜菜單
DrawerLayout組件同樣是V4包中的組件,也是直接繼承於ViewGroup類,所以這個類也是一個容器類。抽屜菜單的擺放和布局通過android:layout_gr
 RecyclerView加載不同item並實現其item點擊事件,實現添加常用應用的功能
先上效果圖吧點擊加號勾選需要的應用點擊添加這裡出現了三種item的樣式,一種是加號,一種是應用圖標加文字,最後一種是應用圖標加文字還有個checkBox 這裡R