編輯:關於Android編程
有一套C寫的代號為“Shooter”的核心算法庫可以解決我們面臨的一些問題,只是這個庫一直用在其他平台。
我們現在的任務是將其復用到Android平台上。
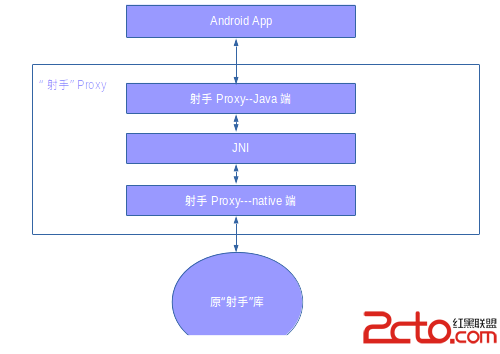
示意圖如下

共享庫是不能跨平台的,我們首要的工作就是用交叉編譯器將原Shooter庫編譯成可在Android平台下使用的so。Android下常用cpu架構是ARM,現在X86也多了起來,為了兼容多平台,我們要應對幾款不同的cpu架構。下面就先來演示ARM下的交叉編譯。
1、安裝交叉編譯工具
$ /opt/ndk/android-ndk-r10b/build/tools/make-standalone-toolchain.sh
Auto-config: --toolchain=arm-linux-androideabi-4.6
Copying prebuilt binaries...
Copying sysroot headers and libraries...
Copying c++ runtime headers and libraries...
Creating package file: /tmp/ndk-linc/arm-linux-androideabi-4.6.tar.bz2
Cleaning up...
Done.
將其解壓到你喜歡的位置(我放到了~/bin/build-tools/arm-linux-androideabi-4.6/),這樣就可以工作啦。
2、Shooter源碼重編譯
請參考《做一個動態鏈接庫》
gcc的編譯指令。
Shooter庫在Android下的調式請參考《Android實戰技巧之四十四:Hello,Native!》
下面將shooter源碼編譯:
$ ~/bin/build-tools/arm-linux-androideabi-4.6/bin/arm-linux-androideabi-gcc -c -fPIC -o ./arm/shooter.o shooter.c
$ cd arm/
$ ~/bin/build-tools/arm-linux-androideabi-4.6/bin/arm-linux-androideabi-gcc -shared -o libshooter.so shooter.o
$ ll
total 20
drwxrwxr-x 2 linc linc 4096 11月  1 13:49 ./
drwx------ 3 linc linc 4096 11月  1 13:47 ../
-rwxrwxr-x 1 linc linc 5932 11月  1 13:49 libshooter.so*
-rw-rw-r-- 1 linc linc 1764 11月  1 13:48 shooter.o
tips:
將此工具路徑加到環境變量中吧。
JNI技術是聯系Java和Native世界的橋梁,它由Java端和Native端構成。
1、ShooterProxy.java
package com.linc.lib;

public class ShooterProxy {
/*
    static {
        System.loadLibrary(ShooterProxy);
    }
*/
    public static native int A(int a);

}
編譯後再用javah工具生成c頭文件,參考:
第一個NDK程序
http://blog.csdn.net/lincyang/article/details/6705143
2、ShooterProxy.c
根據com_linc_lib_ShooterProxy.h,編寫c源文件。
#include com_linc_lib_ShooterProxy.h
//#include
#include shooter.h
#include

#define  LOG_TAG    ShooterProxy:
//#define  LOGD(...)  __android_log_print(ANDROID_LOG_DEBUG,LOG_TAG,__VA_ARGS__)
#define LOGD(...) ((void)__android_log_print(ANDROID_LOG_DEBUG, LOG_TAG, __VA_ARGS__))


JNIEXPORT jint JNICALL Java_com_linc_lib_ShooterProxy_A
  (JNIEnv *env, jclass obj, jint i) {
    //call shooter lib
    LOGD(method A() called! i: %d,i);
    if(i>0)
        return 54321;
    else {
        int result = A(0);
        LOGD(call shooter A method.result:%d,result);
        return result;
    }
}
注意Android.mk的寫法:
LOCAL_PATH := $(call my-dir)

include $(CLEAR_VARS)

LOCAL_MODULE    := ShooterProxy
LOCAL_SRC_FILES := ShooterProxy.c
LOCAL_LDLIBS := ./armeabi-v7a/libshooter.so
#LOCAL_LDLIBS    := -llog -landroid -lEGL -lGLESv1_CM
#LOCAL_STATIC_LIBRARIES := android_native_app_glue
LOCAL_LDLIBS     += -llog -ldl

include $(BUILD_SHARED_LIBRARY)
編譯:
$ ndk-build
Android NDK: WARNING:/home/linc/workspace/csdn_code/reusec/reuse-C/jni/Android.mk:ShooterProxy: non-system libraries in linker flags: ./armeabi-v7a/libshooter.so
Android NDK:     This is likely to result in incorrect builds. Try using LOCAL_STATIC_LIBRARIES
Android NDK:     or LOCAL_SHARED_LIBRARIES instead to list the library dependencies of the
Android NDK:     current module
[armeabi-v7a] Compile thumb  : ShooterProxy <= ShooterProxy.c
[armeabi-v7a] SharedLibrary  : libShooterProxy.so
[armeabi-v7a] Install        : libShooterProxy.so => libs/armeabi-v7a/libShooterProxy.so
此時我們有了兩個so文件,一個是libshooter.so,一個是libShooterProxy.so。接下來我們在App中動態加載這兩個動態庫。
就用一個最最簡單的例子來做此事好了,一個TextView在Activity啟動時調用A方法。
11-03 16:05:29.240 11203-11203/com.linc.shooterdemo D/ShooterProxy:: method A() called! i: 0
11-03 16:05:29.240 11203-11203/com.linc.shooterdemo D/ShooterProxy:: call shooter A method.result:4
比較遺憾的是,我的設備雖然root,但是stdout重定向後也沒能在logcat中看到輸出。重定向方法如下:
$ adb root
adbd is already running as root
$ adb shell stop
$ adb shell setprop log.redirect-stdio true
$ adb shell start
這篇文章早在今年6月份就開始起草,但事情一多就給耽擱了。
後來的經歷也讓我意識到,使用第三方so並沒有那麼簡單,我們需要在ShooterProxy這一層做很多事情。
這裡面要遇到很多Java與C的數據類型轉換,C中要使用Java中的類等等事情,扎實的JNI功底才是本項目成功的關鍵。
所以,Java與C/C++復合型人才很適合這個領域。
源碼在這裡!
 Android Studio官方文檔之構建和運行你的APP
前言默認情況下,Android Studio設置新的項目並且部署到模擬器或者真機設備上,只需要點擊幾下。使用即時運行,你並不需要構建一個新的APK即可將改變後的方法和現有
 Android 對話框 Dialog使用實例講解
對話框 Dialog什麼是對話框對話框是在當前的頁面之上彈出的小窗口, 用於顯示一些重要的提示信息, 提示用戶的輸入,確認信息,或顯示某種狀態.如 : 顯示進度條對話框,
 Android仿天天果園Splash
天天果園的App 開機Splash動畫有一個空心圓逐漸擴散的效果,仔細看天天果園的logo,在圓擴散期間還有一個漸變消失效果,建議大家使用surfaceView來實現這種
 Android連接Wifi詳細源碼
因項目需求,做一個有關wifi的Demo,現已經上傳到GitHub 上面地址:https://github.com/git-xuhao/WifiDemo源碼片段packa