編輯:關於Android編程
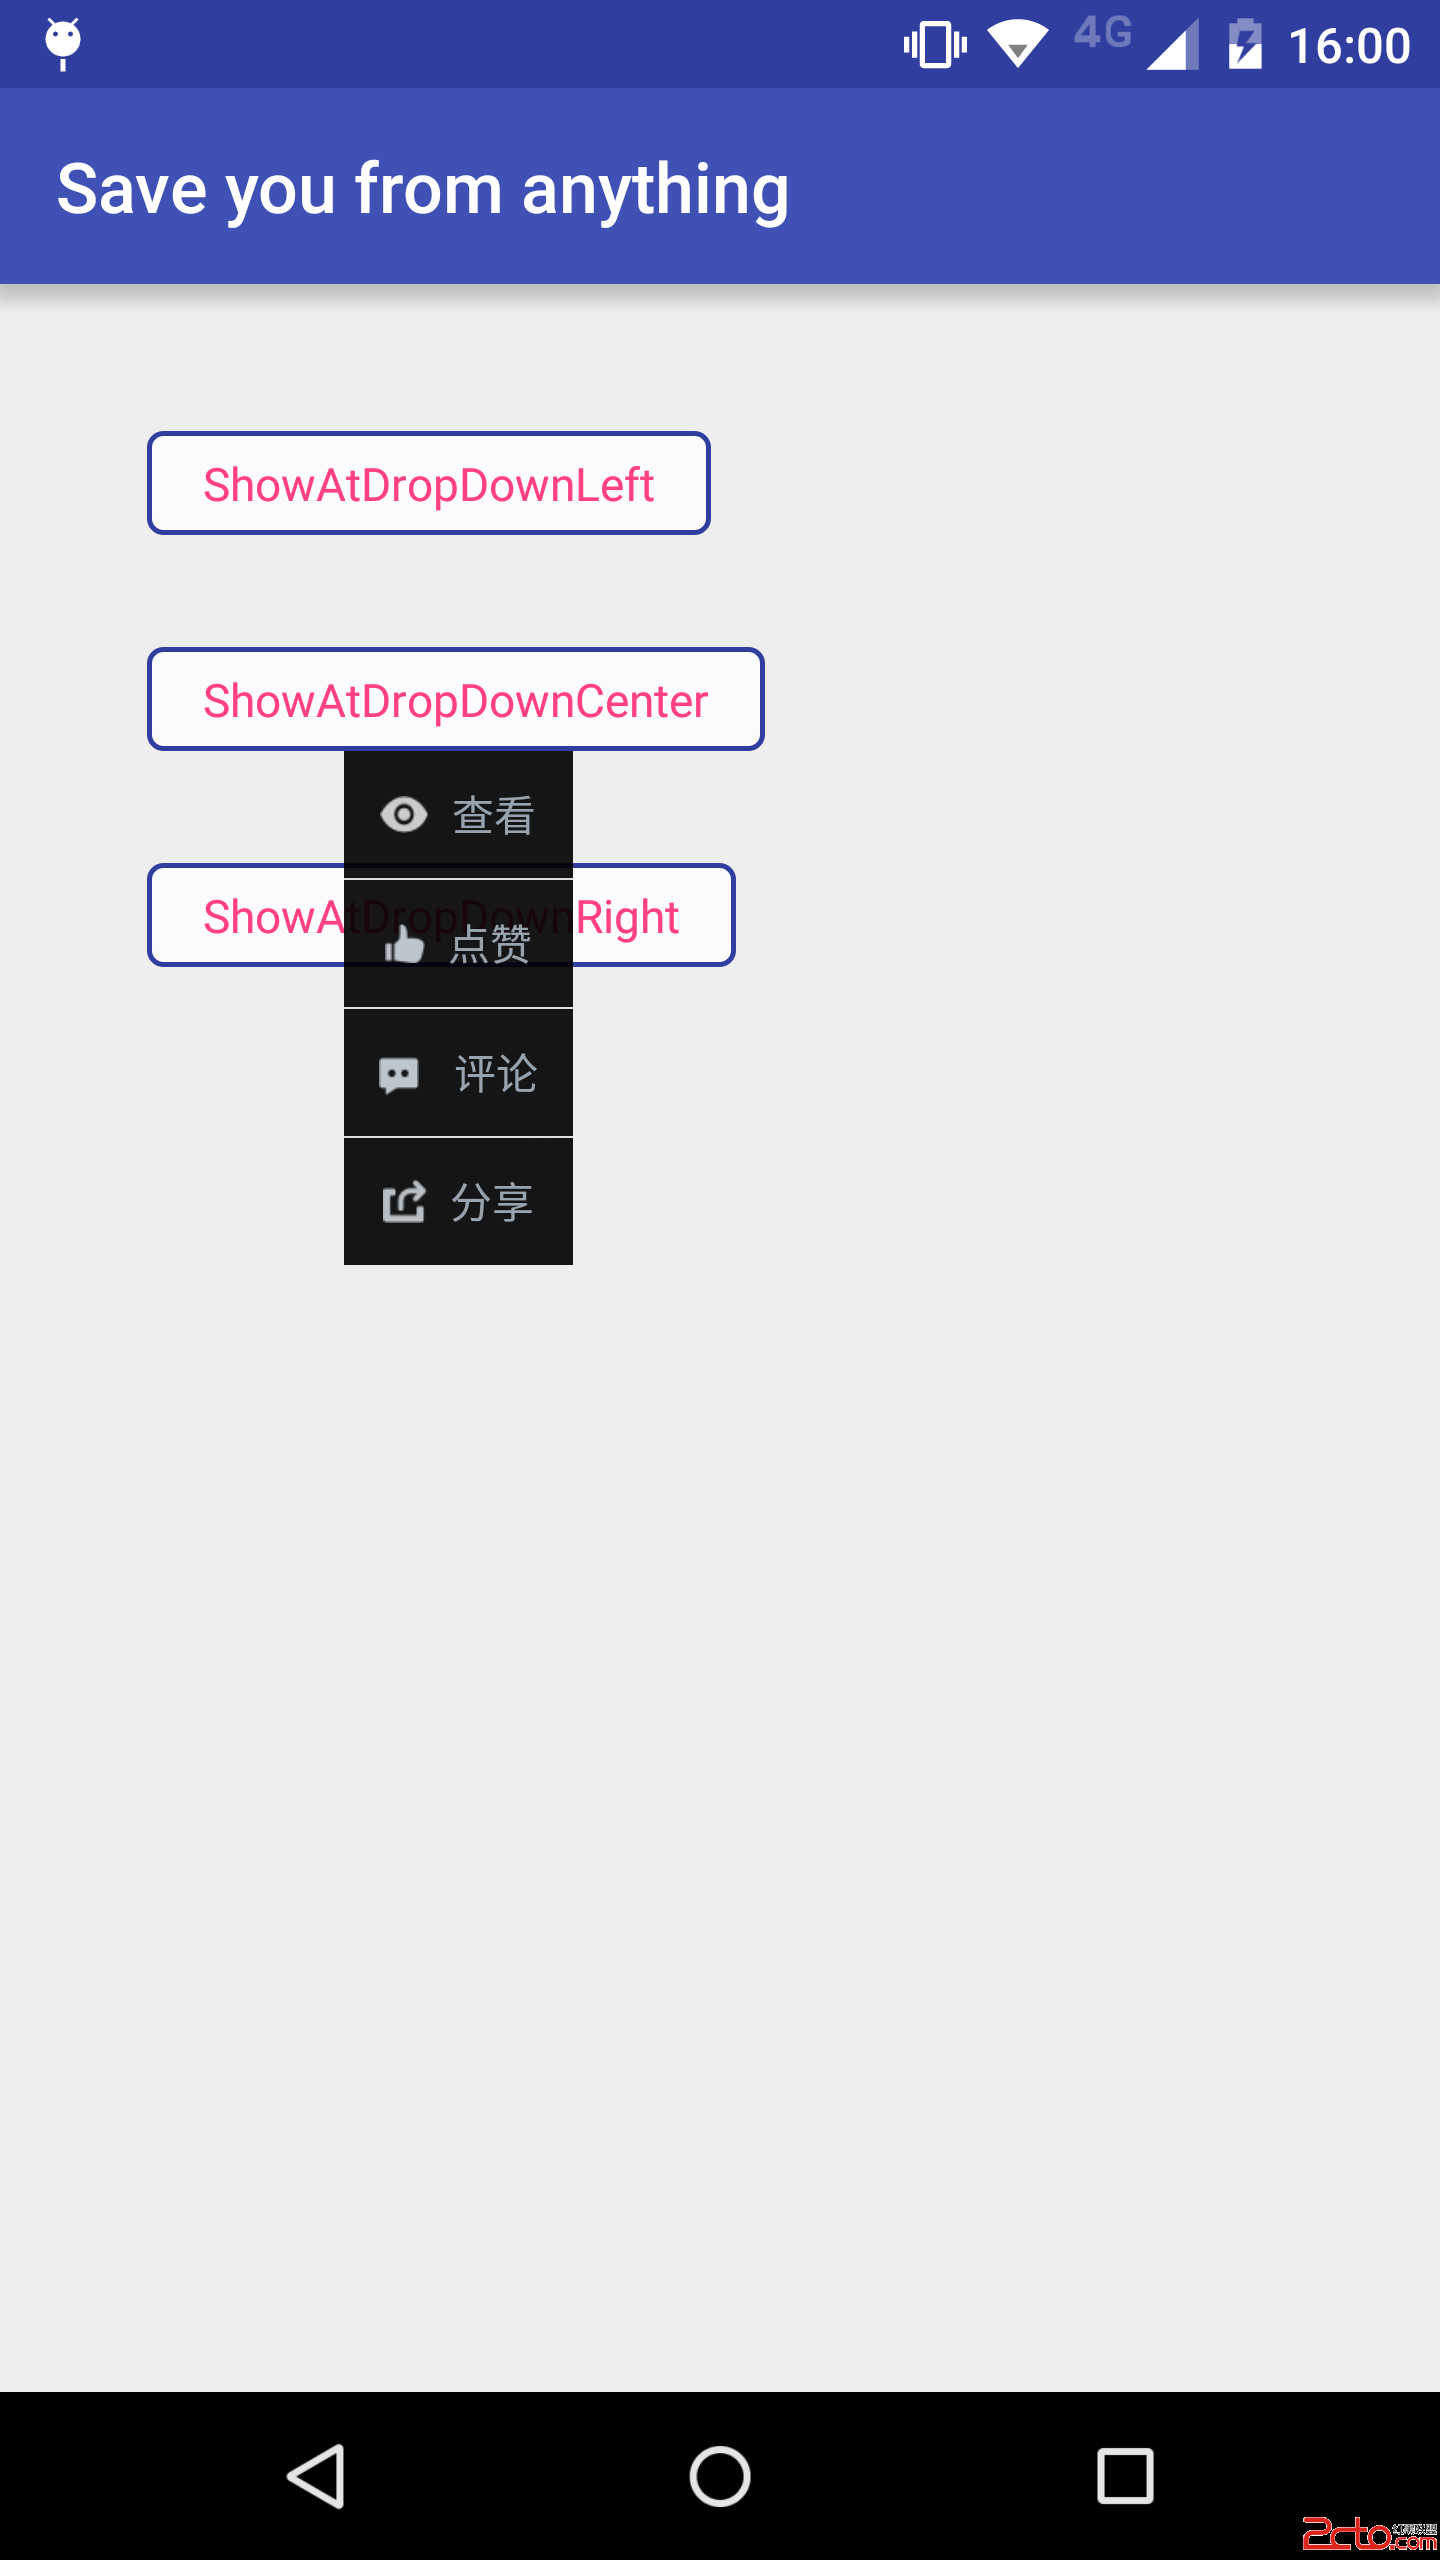
Android 自定義PopupWindow技巧 前言 PopupWindow的寬高 PopupWindow定位在下左位置 PopupWindow定位在下中位置 PopupWindow定位在下右位置 PopupWindow動畫 自定義PopupWindow 效果圖
其實PopupWindow自定義過程是很簡單的,唯一頭疼的是:PopupWindow顯示的定位問題。
定位問題尤為惡心一點:有時候要涉及到PopupWindow的寬高問題。我們都知道,在沒show之前是拿不到寬高的,show的時候定位需要寬高,如此矛盾。以下,都給予回答。
其次的問題也有:PopupWindow的顯示、消失動畫設計問題。
以下也在我自定義的PopupWindow中提供了三個簡單的定位方法:
顯示在控件的下左位置
顯示在控件的下中位置
顯示在控件的下右位置
我們可以在PopupWindow初始化的時候,強制繪制Layout,而拿到PopupWindow的寬高。
// 用於保存PopupWindow的寬度
private int width;
// 用於保存PopupWindow的高度
private int height;

public CustomPopupWindow(Activity activity) {
    super(activity);
    this.activity = activity;
    this.initPopupWindow();
}

private void initPopupWindow() {
    LayoutInflater inflater = (LayoutInflater) activity
            .getSystemService(Context.LAYOUT_INFLATER_SERVICE);
    this.contentView = inflater.inflate(R.layout.popupwindow_custom, null);
    this.setContentView(contentView);
    // 設置彈出窗體的寬
    this.setWidth(ViewGroup.LayoutParams.WRAP_CONTENT);
    // 設置彈出窗體的高
    this.setHeight(ViewGroup.LayoutParams.WRAP_CONTENT);
    // 設置彈出窗體可點擊
    this.setTouchable(true);
    this.setFocusable(true);
    // 設置點擊是否消失
    this.setOutsideTouchable(true);
    //設置彈出窗體動畫效果
    this.setAnimationStyle(R.style.PopupAnimation);
    //實例化一個ColorDrawable顏色為半透明
    ColorDrawable background = new ColorDrawable(0x4f000000);
    //設置彈出窗體的背景
    this.setBackgroundDrawable(background);
    // 繪制
    this.mandatoryDraw();
}

/**
 * 強制繪制popupWindowView,並且初始化popupWindowView的尺寸
 */
private void mandatoryDraw() {
    this.contentView.measure(View.MeasureSpec.UNSPECIFIED, View.MeasureSpec.UNSPECIFIED);
    /**
     * 強制刷新後拿到PopupWindow的寬高
     */
    this.width = this.contentView.getMeasuredWidth();
    this.height = this.contentView.getMeasuredHeight();
}
/**
 * 顯示在控件的下左方
 *
 * @param parent parent
 */
public void showAtDropDownLeft(View parent) {
    if (parent.getVisibility() == View.GONE) {
        this.showAtLocation(parent, 0, 0, 0);
    } else {
        // x y
        int[] location = new int[2];
        //獲取在整個屏幕內的絕對坐標
        parent.getLocationOnScreen(location);
        this.showAtLocation(parent, 0, location[0], location[1] + parent.getHeight());
    }
}
/**
 * 顯示在控件的下中方
 *
 * @param parent parent
 */
public void showAtDropDownCenter(View parent) {
    if (parent.getVisibility() == View.GONE) {
        this.showAtLocation(parent, 0, 0, 0);
    } else {
        // x y
        int[] location = new int[2];
        //獲取在整個屏幕內的絕對坐標
        parent.getLocationOnScreen(location);
        this.showAtLocation(parent, 0, location[0] / 2 + parent.getWidth() / 2 - this.width / 6, location[1] + parent.getHeight());
    }
}
/**
 * 顯示在控件的下右方
 *
 * @param parent parent
 */
public void showAtDropDownRight(View parent) {
    if (parent.getVisibility() == View.GONE) {
        this.showAtLocation(parent, 0, 0, 0);
    } else {
        // x y
        int[] location = new int[2];
        //獲取在整個屏幕內的絕對坐標
        parent.getLocationOnScreen(location);
        this.showAtLocation(parent, 0, location[0] + parent.getWidth() - this.width, location[1] + parent.getHeight());
    }
}
設計一個從PopWindow開始的時候右上角逐步展示,然後結束的時候往右上角逐步收起的動畫:
styles.xml
popwindow_in.xml
<code class="language-xml hljs "><set xmlns:android="http://schemas.android.com/apk/res/android" android:interpolator="@android:anim/decelerate_interpolator">

    <!--{cke_protected}{C}%3C!%2D%2D%0A%20%20%20%20%20%20%20%20%E6%97%B6%E9%97%B4%200.2%E7%A7%92%0A%20%20%20%20%20%20%20%20%E5%BC%80%E5%A7%8B%E7%9A%84%E6%97%B6%E5%80%99%20x%20y%20%E5%85%A8%E6%98%AF0%20%E6%B2%A1%E6%9C%89%E5%A4%A7%E5%B0%8F%0A%20%20%20%20%20%20%20%20%E7%BB%93%E6%9D%9F%E7%9A%84%E6%97%B6%E5%80%99%20x%20y%20%E5%85%A8%E6%98%AF1%20%E5%AE%9E%E9%99%85%E5%A4%A7%E5%B0%8F%0A%20%20%20%20%20%20%20%20pivotX%20100%25%20%E8%A1%A8%E7%A4%BA%E6%9C%80%E5%8F%B3%E8%BE%B9%0A%20%20%20%20%20%20%20%20pivotY%200%25%20%E8%A1%A8%E7%A4%BA%E6%9C%80%E9%A1%B6%E8%BE%B9%0A%20%20%20%20%20%20%20%20%E4%BB%A5%E4%B8%8A%E5%AE%9A%E4%BD%8D%E5%8F%B3%E4%B8%8A%E8%A7%92%20%E7%BC%A9%E6%94%BE%E6%97%B6%E4%B8%8D%E5%8F%98%E4%BD%8D%E7%BD%AE%0A%20%20%20%20%2D%2D%3E-->
    <scale android:duration="200" android:fromxscale="0.0" android:fromyscale="0.0" android:pivotx="100%" android:pivoty="0%" android:toxscale="1.0" android:toyscale="1.0">
    <!--{cke_protected}{C}%3C!%2D%2D%0A%20%20%20%20%20%20%20%20%E6%97%B6%E9%97%B4%200.2%E7%A7%92%0A%20%20%20%20%20%20%20%20%E5%BC%80%E5%A7%8B%E5%85%A8%E9%80%8F%E6%98%8E%0A%20%20%20%20%20%20%20%20%E7%BB%93%E6%9D%9F%E4%B8%80%E7%82%B9%E9%83%BD%E4%B8%8D%E9%80%8F%E6%98%8E%0A%20%20%20%20%2D%2D%3E-->
    <alpha android:duration="200" android:fromalpha="0.0" android:toalpha="1.0">
</alpha></scale></set></code>
popwindow_out.xml
<code class="language-xml hljs "><set xmlns:android="http://schemas.android.com/apk/res/android" android:interpolator="@android:anim/decelerate_interpolator">
    <!--{cke_protected}{C}%3C!%2D%2D%0A%20%20%20%20%20%20%20%20%E6%97%B6%E9%97%B4%200.2%E7%A7%92%0A%20%20%20%20%20%20%20%20%E5%BC%80%E5%A7%8B%E7%9A%84%E6%97%B6%E5%80%99%20x%20y%20%E5%85%A8%E6%98%AF1%20%E5%AE%9E%E9%99%85%E5%A4%A7%E5%B0%8F%0A%20%20%20%20%20%20%20%20%E7%BB%93%E6%9D%9F%E7%9A%84%E6%97%B6%E5%80%99%20x%20y%20%E5%85%A8%E6%98%AF0%20%E6%B2%A1%E6%9C%89%E5%A4%A7%E5%B0%8F%0A%20%20%20%20%20%20%20%20pivotX%20100%25%20%E8%A1%A8%E7%A4%BA%E6%9C%80%E5%8F%B3%E8%BE%B9%0A%20%20%20%20%20%20%20%20pivotY%200%25%20%E8%A1%A8%E7%A4%BA%E6%9C%80%E9%A1%B6%E8%BE%B9%0A%20%20%20%20%20%20%20%20%E4%BB%A5%E4%B8%8A%E5%AE%9A%E4%BD%8D%E5%8F%B3%E4%B8%8A%E8%A7%92%20%E7%BC%A9%E6%94%BE%E6%97%B6%E4%B8%8D%E5%8F%98%E4%BD%8D%E7%BD%AE%0A%20%20%20%20%2D%2D%3E-->
    <scale android:duration="200" android:fromxscale="1.0" android:fromyscale="1.0" android:pivotx="100%" android:pivoty="0%" android:toxscale="0.0" android:toyscale="0.0">

    <!--{cke_protected}{C}%3C!%2D%2D%0A%20%20%20%20%20%20%20%20%E6%97%B6%E9%97%B4%200.2%E7%A7%92%0A%20%20%20%20%20%20%20%20%E5%BC%80%E5%A7%8B%E4%B8%80%E7%82%B9%E9%83%BD%E4%B8%8D%E9%80%8F%E6%98%8E%0A%20%20%20%20%20%20%20%20%E7%BB%93%E6%9D%9F%E5%85%A8%E9%80%8F%E6%98%8E%0A%20%20%20%20%2D%2D%3E-->
    <alpha android:duration="200" android:fromalpha="1.0" android:toalpha="0.0">
</alpha></scale></set></code>
public class CustomPopupWindow extends android.widget.PopupWindow {

    private Activity activity;
    private View contentView;

    // 用於保存PopupWindow的寬度
    private int width;
    // 用於保存PopupWindow的高度
    private int height;

    public CustomPopupWindow(Activity activity) {
        super(activity);
        this.activity = activity;
        this.initPopupWindow();
    }

    private void initPopupWindow() {
        LayoutInflater inflater = (LayoutInflater) activity
                .getSystemService(Context.LAYOUT_INFLATER_SERVICE);
        this.contentView = inflater.inflate(R.layout.popupwindow_custom, null);
        this.setContentView(contentView);
        // 設置彈出窗體的寬
        this.setWidth(ViewGroup.LayoutParams.WRAP_CONTENT);
        // 設置彈出窗體的高
        this.setHeight(ViewGroup.LayoutParams.WRAP_CONTENT);
        // 設置彈出窗體可點擊
        this.setTouchable(true);
        this.setFocusable(true);
        // 設置點擊是否消失
        this.setOutsideTouchable(true);
        //設置彈出窗體動畫效果
        this.setAnimationStyle(R.style.PopupAnimation);
        //實例化一個ColorDrawable顏色為半透明
        ColorDrawable background = new ColorDrawable(0x4f000000);
        //設置彈出窗體的背景
        this.setBackgroundDrawable(background);
        // 繪制
        this.mandatoryDraw();
    }

    /**
     * 強制繪制popupWindowView,並且初始化popupWindowView的尺寸
     */
    private void mandatoryDraw() {
        this.contentView.measure(View.MeasureSpec.UNSPECIFIED, View.MeasureSpec.UNSPECIFIED);
        /**
         * 強制刷新後拿到PopupWindow的寬高
         */
        this.width = this.contentView.getMeasuredWidth();
        this.height = this.contentView.getMeasuredHeight();
    }

    /**
     * 顯示在控件的下右方
     *
     * @param parent parent
     */
    public void showAtDropDownRight(View parent) {
        if (parent.getVisibility() == View.GONE) {
            this.showAtLocation(parent, 0, 0, 0);
        } else {
            // x y
            int[] location = new int[2];
            //獲取在整個屏幕內的絕對坐標
            parent.getLocationOnScreen(location);
            this.showAtLocation(parent, 0, location[0] + parent.getWidth() - this.width, location[1] + parent.getHeight());
        }
    }

    /**
     * 顯示在控件的下左方
     *
     * @param parent parent
     */
    public void showAtDropDownLeft(View parent) {
        if (parent.getVisibility() == View.GONE) {
            this.showAtLocation(parent, 0, 0, 0);
        } else {
            // x y
            int[] location = new int[2];
            //獲取在整個屏幕內的絕對坐標
            parent.getLocationOnScreen(location);
            this.showAtLocation(parent, 0, location[0], location[1] + parent.getHeight());
        }
    }

    /**
     * 顯示在控件的下中方
     *
     * @param parent parent
     */
    public void showAtDropDownCenter(View parent) {
        if (parent.getVisibility() == View.GONE) {
            this.showAtLocation(parent, 0, 0, 0);
        } else {
            // x y
            int[] location = new int[2];
            //獲取在整個屏幕內的絕對坐標
            parent.getLocationOnScreen(location);
            this.showAtLocation(parent, 0, location[0] / 2 + parent.getWidth() / 2 - this.width / 6, location[1] + parent.getHeight());
        }
    }

    public static class PopupWindowBuilder {
        private static String activityHashCode;
        private static CustomPopupWindow popupWindow;
        public static PopupWindowBuilder ourInstance;

        public static PopupWindowBuilder getInstance(Activity activity) {
            if (ourInstance == null) ourInstance = new PopupWindowBuilder();
            String hashCode = String.valueOf(activity.hashCode());
            /**
             * 不同一個Activity
             */
            if (!hashCode.equals(String.valueOf(activityHashCode))) {
                activityHashCode = hashCode;
                popupWindow = new CustomPopupWindow(activity);
            }
            return ourInstance;
        }

        public PopupWindowBuilder setTouchable(boolean touchable) {
            popupWindow.setTouchable(touchable);
            return this;
        }

        public PopupWindowBuilder setAnimationStyle(int animationStyle) {
            popupWindow.setAnimationStyle(animationStyle);
            return this;
        }

        public PopupWindowBuilder setBackgroundDrawable(Drawable background) {
            popupWindow.setBackgroundDrawable(background);
            return this;
        }

        public CustomPopupWindow getPopupWindow() {
            popupWindow.update();
            return popupWindow;
        }

    }

}

 高仿微信5.2.1主界面及消息提醒
好久沒更新博客了,最近在做公司的項目,這也算是我接觸的第一個正式項目。通過項目的檢驗,發現自己積累了一年的知識還是遠遠不夠,想要提高,好的方法是 :項目+書+視頻+博客。
 Android系統篇之----解讀AMS遠端服務調用機制以及Activity的啟動流程
一、為何本文不介紹Hook系統的AMS服務在之前一篇文章中已經講解了 Android中Hook系統服務,以及攔截具體方法的功能了,按照流程本文應該介紹如何Hook系統的A
 Android自定義View實戰(SlideTab-可滑動的選擇器)
這篇博客我們來一發自定義控件的實戰,恰好前些天有一個小需求,效果圖如下:??根據效果圖,我們可以確定,用自定義View完全可以搞定,在自定義控件系列博客第一篇中,我們總結
 android仿最新6.2版本微信相冊
仿微信相冊選擇圖片,查看大圖,寫的不太好,希望評論指出不足,諒解,先介紹一下我的基本思路第一步獲取手機上的所有圖片路徑: Uri