編輯:關於Android編程
今天在維護公司的一個APP的時候,有如下場景。
彈出一個AlertDialog的時候,在系統語言是中文的時候,如下所示:
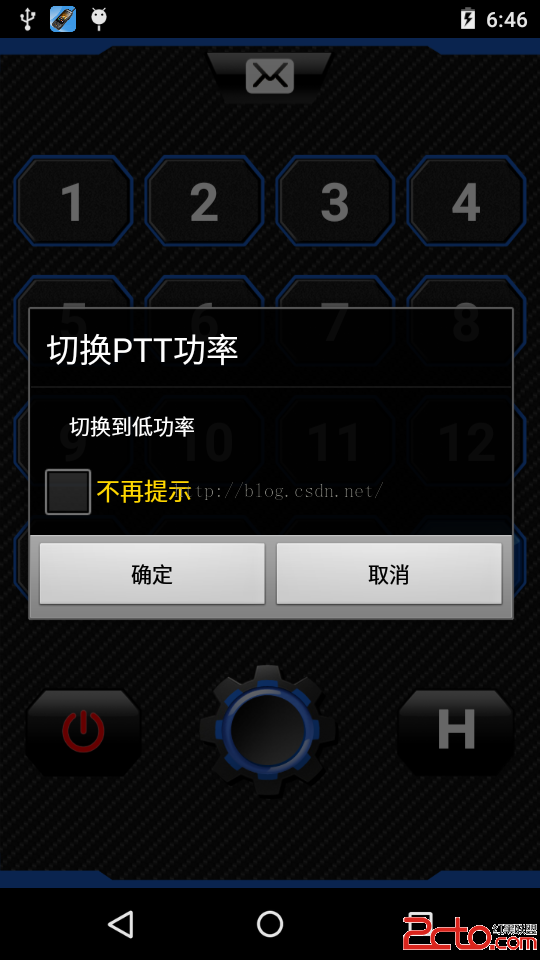
彈出一個AlertDialog的時候,在系統語言是English的時候,如下所示:
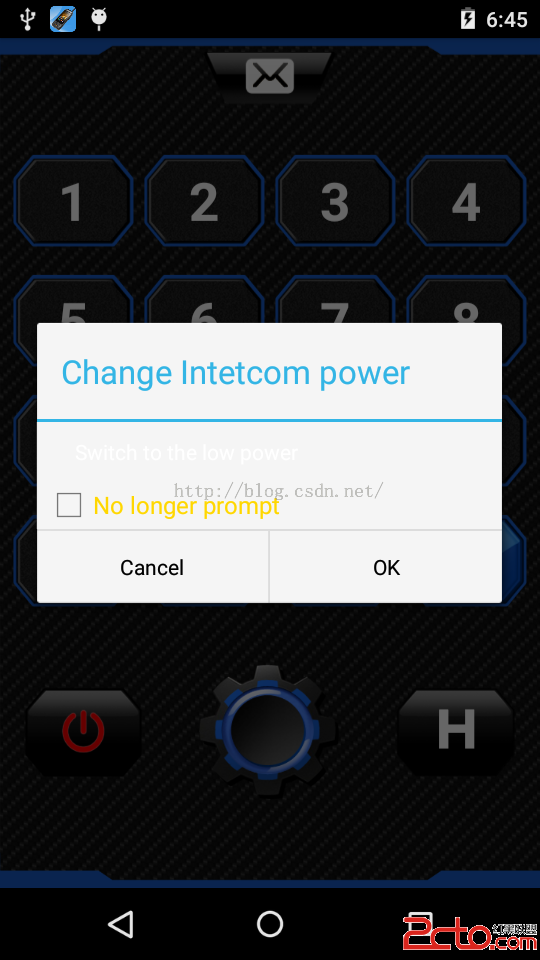
可以發現在系統語言為英語的時候,對話框中的白色文字已經完全看不清楚,對話框的背景顏色也變成了白色。因此需要修改對話框的主題。
修改之前代碼如下:
AlertDialog commedialog = new AlertDialog.Builder(
					WalkieTalkieActivity.this)
					.setTitle(title)
					.setView(vi_nolong)
					.setPositiveButton(
							WalkieTalkieActivity.this.getResources().getString(R.string.ok),
							new DialogInterface.OnClickListener() {
								public void onClick(DialogInterface dialog, int arg1) {

									int j = mSelectedGroupNum + 1;
									int power_last = mIntercomSharePrefs.getInt(CurrentPower_+j,0);
									Log.i(wxj, btn_power CurrentPower_+j+ : + power_last);
									if (power_last == 1) {
										mEditor.putInt(CurrentPower_+j,0).commit();
										mIntercom.setPowerLevel(0);
										btn_power.setBackgroundResource(R.drawable.power_high);

									} else if (power_last == 0) {
										mEditor.putInt(CurrentPower_+j,1).commit();
										mIntercom.setPowerLevel(1);
										btn_power.setBackgroundResource(R.drawable.power_low);
									}
									dialog.dismiss();
									((ViewGroup) vi_nolong.getParent()).removeView(vi_nolong);
								}
							})
					.setNegativeButton(
							WalkieTalkieActivity.this.getResources().getString(R.string.cancel),
							new DialogInterface.OnClickListener() {
								public void onClick(DialogInterface dialog,
										int whichButton) {

									dialog.dismiss();
									((ViewGroup) vi_nolong.getParent()).removeView(vi_nolong);
								}
							}).create();
			commedialog.setCanceledOnTouchOutside(false);
			commedialog.show();
可以發現,new AlertDialog.Builder的時候沒有指定主題,
AlertDialog commedialog = new AlertDialog.Builder(WalkieTalkieActivity.this)
我們可以在new AlertDialog.Builder的時候指定一個主題,如下所示:
AlertDialog commedialog = new AlertDialog.Builder(
					WalkieTalkieActivity.this,AlertDialog.THEME_HOLO_DARK)
完整代碼如下:
AlertDialog commedialog = new AlertDialog.Builder(
					WalkieTalkieActivity.this,AlertDialog.THEME_HOLO_DARK)
					.setTitle(title)
					.setView(vi_nolong)
					.setPositiveButton(
							WalkieTalkieActivity.this.getResources().getString(R.string.ok),
							new DialogInterface.OnClickListener() {
								public void onClick(DialogInterface dialog, int arg1) {

									int j = mSelectedGroupNum + 1;
									int power_last = mIntercomSharePrefs.getInt(CurrentPower_+j,0);
									Log.i(wxj, btn_power CurrentPower_+j+ : + power_last);
									if (power_last == 1) {
										mEditor.putInt(CurrentPower_+j,0).commit();
										mIntercom.setPowerLevel(0);
										btn_power.setBackgroundResource(R.drawable.power_high);

									} else if (power_last == 0) {
										mEditor.putInt(CurrentPower_+j,1).commit();
										mIntercom.setPowerLevel(1);
										btn_power.setBackgroundResource(R.drawable.power_low);
									}
									dialog.dismiss();
									((ViewGroup) vi_nolong.getParent()).removeView(vi_nolong);
								}
							})
					.setNegativeButton(
							WalkieTalkieActivity.this.getResources().getString(R.string.cancel),
							new DialogInterface.OnClickListener() {
								public void onClick(DialogInterface dialog,
										int whichButton) {

									dialog.dismiss();
									((ViewGroup) vi_nolong.getParent()).removeView(vi_nolong);
								}
							}).create();
			commedialog.setCanceledOnTouchOutside(false);
			commedialog.show();
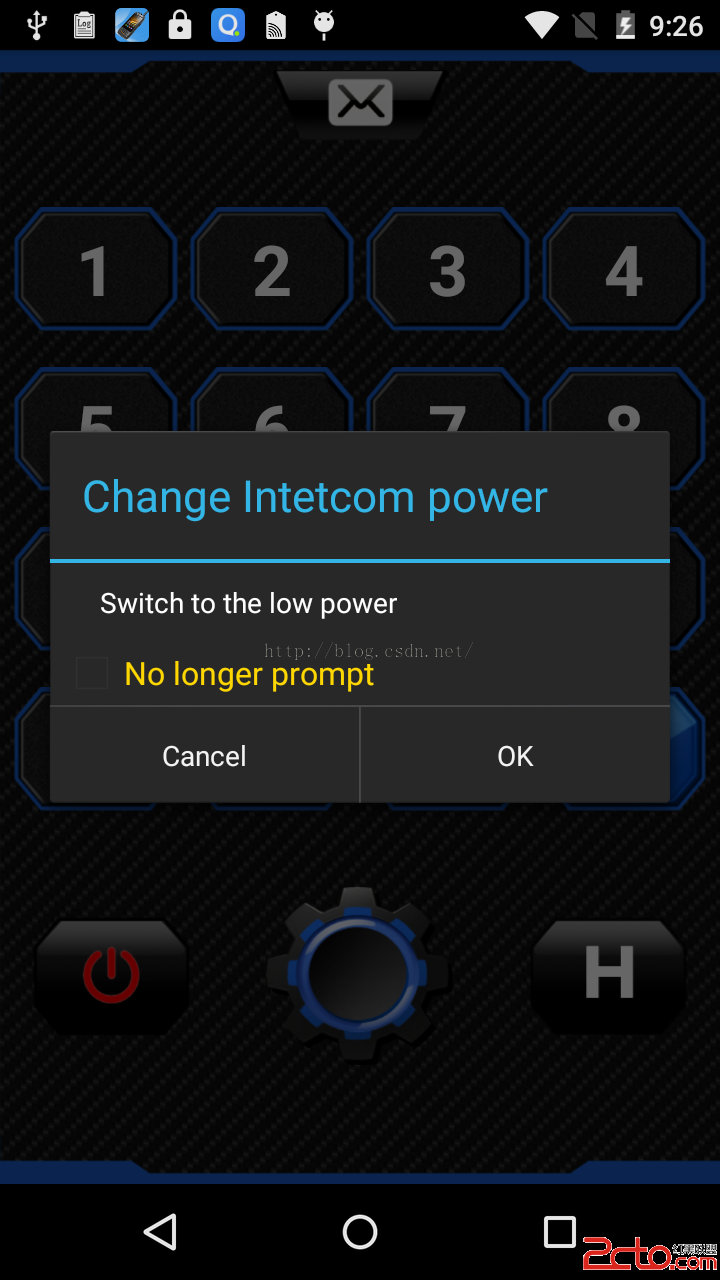
這樣的話就指定了一個黑色背景的主題,這樣在系統語言為英語的時候,背景也是黑色的,如下所示:
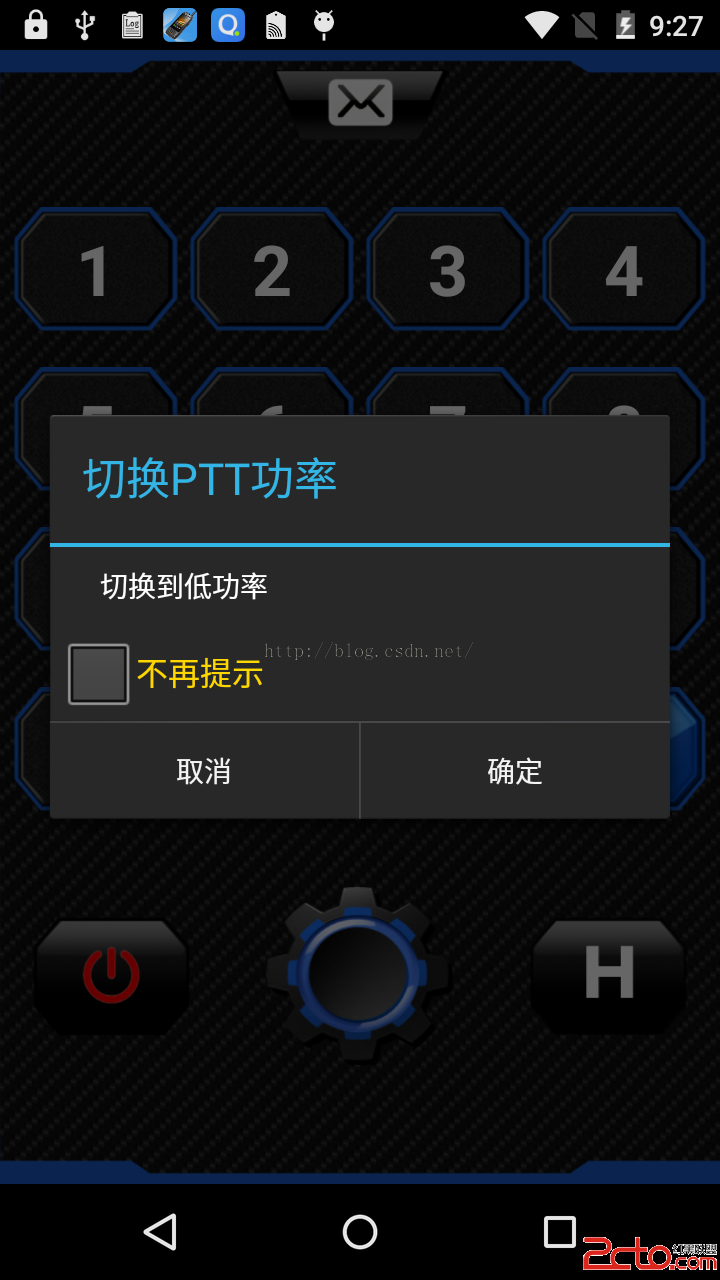
在系統語言為中文的時候,背景也是黑色的,如下所示:
====================================================================================================================================
下面從源碼角度來看看到底是怎麼回事,查看AlertDialog.Build代碼如下:
       /**
         * Constructor using a context for this builder and the {@link AlertDialog} it creates.
         */
        public Builder(Context context) {
            this(context, resolveDialogTheme(context, 0));
        }

        /**
         * Constructor using a context and theme for this builder and
         * the {@link AlertDialog} it creates.  The actual theme
         * that an AlertDialog uses is a private implementation, however you can
         * here supply either the name of an attribute in the theme from which
         * to get the dialog's style (such as {@link android.R.attr#alertDialogTheme}
         * or one of the constants
         * {@link AlertDialog#THEME_TRADITIONAL AlertDialog.THEME_TRADITIONAL},
         * {@link AlertDialog#THEME_HOLO_DARK AlertDialog.THEME_HOLO_DARK}, or
         * {@link AlertDialog#THEME_HOLO_LIGHT AlertDialog.THEME_HOLO_LIGHT}.
         */
        public Builder(Context context, int theme) {
            P = new AlertController.AlertParams(new ContextThemeWrapper(
                    context, resolveDialogTheme(context, theme)));
            mTheme = theme;
        }
resolveDialogTheme(Context context, int resid) 代碼如下:
    static int resolveDialogTheme(Context context, int resid) {
        if (resid == THEME_TRADITIONAL) {
            return com.android.internal.R.style.Theme_Dialog_Alert;
        } else if (resid == THEME_HOLO_DARK) {
            return com.android.internal.R.style.Theme_Holo_Dialog_Alert;
        } else if (resid == THEME_HOLO_LIGHT) {
            return com.android.internal.R.style.Theme_Holo_Light_Dialog_Alert;
        } else if (resid == THEME_DEVICE_DEFAULT_DARK) {
            return com.android.internal.R.style.Theme_DeviceDefault_Dialog_Alert;
        } else if (resid == THEME_DEVICE_DEFAULT_LIGHT) {
            return com.android.internal.R.style.Theme_DeviceDefault_Light_Dialog_Alert;
        } else if (resid >= 0x01000000) {   // start of real resource IDs.
            return resid;
        } else {
            TypedValue outValue = new TypedValue();
            context.getTheme().resolveAttribute(com.android.internal.R.attr.alertDialogTheme,
                    outValue, true);
            return outValue.resourceId;
        }
    }
幾個主題的值為:
 /**
     * Special theme constant for {@link #AlertDialog(Context, int)}: use
     * the traditional (pre-Holo) alert dialog theme.
     */
    public static final int THEME_TRADITIONAL = 1;

    /**
     * Special theme constant for {@link #AlertDialog(Context, int)}: use
     * the holographic alert theme with a dark background.
     */
    public static final int THEME_HOLO_DARK = 2;

    /**
     * Special theme constant for {@link #AlertDialog(Context, int)}: use
     * the holographic alert theme with a light background.
     */
    public static final int THEME_HOLO_LIGHT = 3;

    /**
     * Special theme constant for {@link #AlertDialog(Context, int)}: use
     * the device's default alert theme with a dark background.
     */
    public static final int THEME_DEVICE_DEFAULT_DARK = 4;

    /**
     * Special theme constant for {@link #AlertDialog(Context, int)}: use
     * the device's default alert theme with a dark background.
     */
    public static final int THEME_DEVICE_DEFAULT_LIGHT = 5;
由此可見,當我們不指定主題的時候,
AlertDialog commedialog = new AlertDialog.Builder(WalkieTalkieActivity.this)
系統給我們的主題是:
 TypedValue outValue = new TypedValue();
            context.getTheme().resolveAttribute(com.android.internal.R.attr.alertDialogTheme,
                    outValue, true);
            return outValue.resourceId;
====================================================================================================================================
下面分別來測試一下這幾個主題
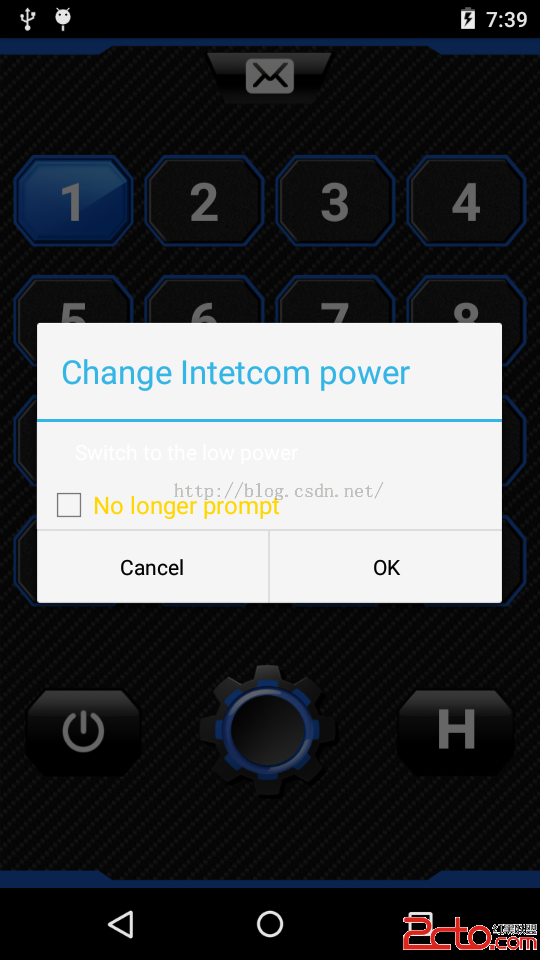
主題為:AlertDialog.THEME_HOLO_LIGHT
AlertDialog commedialog = new AlertDialog.Builder(
					WalkieTalkieActivity.this,AlertDialog.THEME_HOLO_LIGHT)
主題為:AlertDialog.THEME_TRADITIONAL
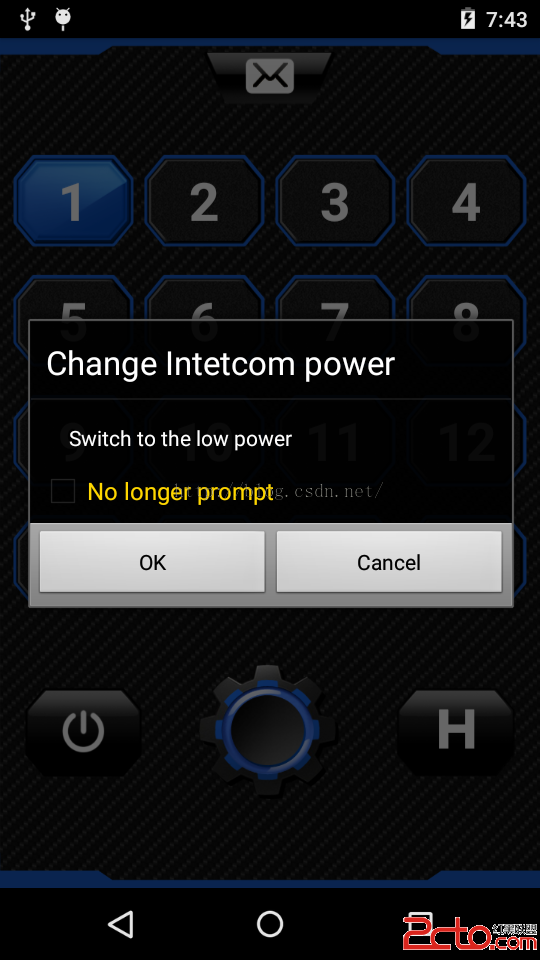
AlertDialog commedialog = new AlertDialog.Builder(
					WalkieTalkieActivity.this,AlertDialog.THEME_TRADITIONAL)
主題為:AlertDialog.THEME_DEVICE_DEFAULT_DARK
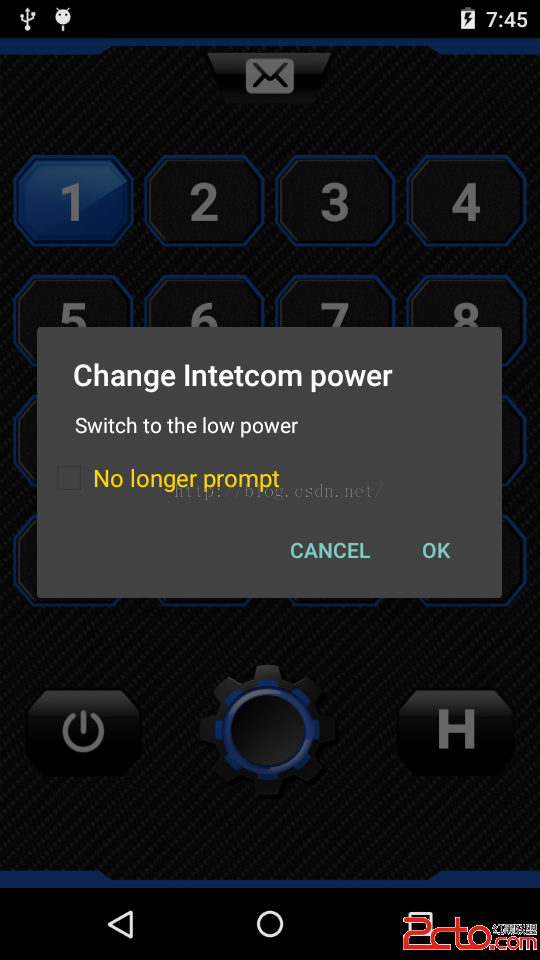
AlertDialog commedialog = new AlertDialog.Builder(
					WalkieTalkieActivity.this,AlertDialog.THEME_DEVICE_DEFAULT_DARK)
主題為:AlertDialog.THEME_DEVICE_DEFAULT_LIGHT
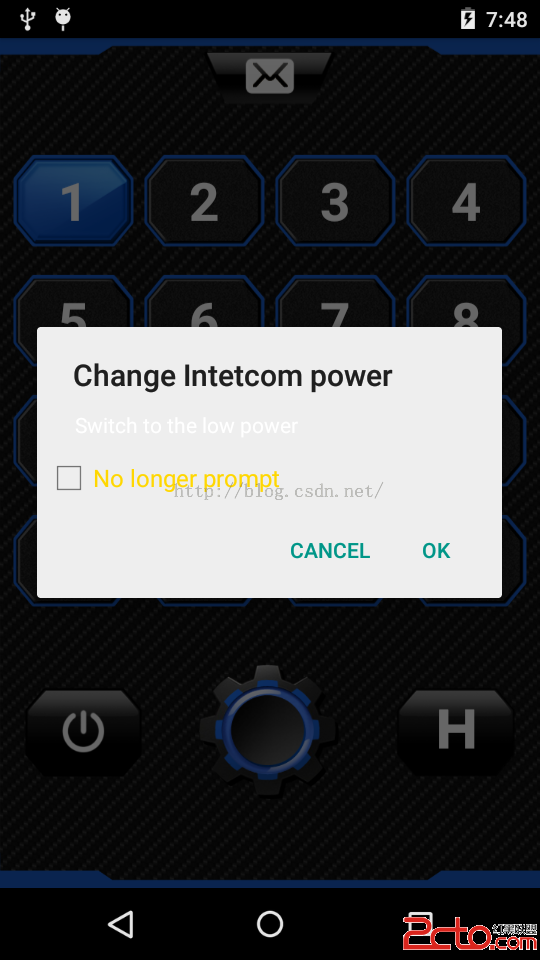
AlertDialog commedialog = new AlertDialog.Builder(
					WalkieTalkieActivity.this,AlertDialog.THEME_DEVICE_DEFAULT_LIGHT)
 Android最新動畫框架完全解析(二)——Transitions Framework(Transitions 框架)
前面一篇文章講解了Android動畫Animator,但是不知道你有沒有發現,前面講解的所有的動畫都是針對某一Object來進行的,雖然我們可以對整個Layout添加動畫
 android仿IOS,滑動隱藏底部ScrollView
在我們開發android app時,會有很多效果都需要模仿IOS,最近在做一個頁面時,其中用到了 ScrollView,但要做成IOS那種在ScrollView滑動時,浮
 [Android開發]使用XUtils框架出現的問題記錄
1、首先出現了這樣一個問題:百思不得其解,最後終於找到原因:返回的永遠是 “訪問失敗”我當時的服務器接口是這樣寫的:public static f
 ListView最全知識點總結
應該說沒有幾個從事android開發的人員能敢說自己完全掌握了ListView。本篇文章比較全面的總結了lisiview中容易被忽略但有用的基礎知識點(不包括如何在異步加