編輯:關於Android編程
在android app開發中,有的時候會有這樣的需求,就是當用戶卸載了我們的app的時候,如果可以搜集用戶的反饋信息,那樣是極好的,今天帶大家手把手實現這樣的功能,先說下原理:我們的app在安裝的時候會在/data/data/報名,下生成這樣的文件夾,一旦我們的應用被卸載,那麼該文件夾同樣會被移除,因此,我們可以通過利用底層c代碼不斷地查詢該文件夾是否來存在,來判斷app是否被卸載。
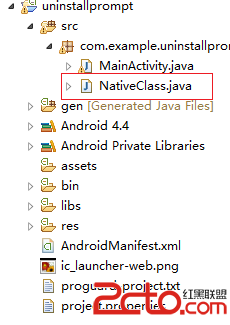
這裡創建一個NativeClass來生命一個本地方法,代碼如下:
package com.example.uninstallprompt;

public class NativeClass {

    public native String init();

}
在生成頭文件之前,首先需要生成.class文件

生成.h頭文件

注意這裡的格式是:javah -classpath src路徑 -jni 包名.類名稱
此時會在src路徑下生成.h頭文件

內容如下:
/* DO NOT EDIT THIS FILE - it is machine generated */
#include
/* Header for class com_example_uninstallprompt_NativeClass */

#ifndef _Included_com_example_uninstallprompt_NativeClass
#define _Included_com_example_uninstallprompt_NativeClass
#ifdef __cplusplus
extern "C" {
#endif
/*
 * Class:     com_example_uninstallprompt_NativeClass
 * Method:    init
 * Signature: ()Ljava/lang/String;
 */
JNIEXPORT jstring JNICALL Java_com_example_uninstallprompt_NativeClass_init
  (JNIEnv *, jobject);

#ifdef __cplusplus
}
#endif
#endif
在android工程中新建一個jni目錄,並且在該目錄下新建一個uninstall-jni.c文件,將剛才生成的.h文件的內容拷貝進來。並且將生成的”com_example_uninstallprompt_NativeClass.h”文件拷貝到該文件夾下。
uninstall-jni.c內容如下:
#include
#include
#include
#include
#include
#include
#include

#include "com_example_uninstallprompt_NativeClass.h"

/* 宏定義begin */
//清0宏
#define MEM_ZERO(pDest, destSize) memset(pDest, 0, destSize)

#define LOG_TAG "onEvent"

//LOG宏定義
#define LOGD(fmt, args...) __android_log_print(ANDROID_LOG_INFO, LOG_TAG, fmt, ##args)

JNIEXPORT jstring JNICALL Java_com_example_uninstallprompt_NativeClass_init(JNIEnv* env, jobject thiz) {

    //初始化log
    LOGD("init start...");

    //fork子進程,以執行輪詢任務
    pid_t pid = fork();
    if (pid < 0) {
        //出錯log
        LOGD("fork failed...");
    } else if (pid == 0) {
        //子進程注冊"/data/data/com.example.uninstallprompt"目錄監聽器
        int fileDescriptor = inotify_init();
        if (fileDescriptor < 0) {
            LOGD("inotify_init failed...");
            exit(1);
        }

        int watchDescriptor;
        watchDescriptor = inotify_add_watch(fileDescriptor,"/data/data/com.example.uninstallprompt", IN_DELETE);
        LOGD("watchDescriptor=%d",watchDescriptor);
        if (watchDescriptor < 0) {
            LOGD("inotify_add_watch failed...");
            exit(1);
        }

        //分配緩存,以便讀取event,緩存大小=一個struct inotify_event的大小,這樣一次處理一個event
        void *p_buf = malloc(sizeof(struct inotify_event));
        if (p_buf == NULL) {
            LOGD("malloc failed...");
            exit(1);
        }
        //開始監聽
        LOGD("start observer...");
        size_t readBytes = read(fileDescriptor, p_buf,sizeof(struct inotify_event));

        //read會阻塞進程,走到這裡說明收到目錄被刪除的事件,注銷監聽器
        free(p_buf);
        inotify_rm_watch(fileDescriptor, IN_DELETE);

        //目錄不存在log
        LOGD("uninstall");

        //執行命令am start -a android.intent.action.VIEW -d http://shouji.360.cn/web/uninstall/uninstall.html
        //execlp(
        //  "am", "am", "start", "-a", "android.intent.action.VIEW", "-d",
        //  "http://shouji.360.cn/web/uninstall/uninstall.html", (char *)NULL);
        //4.2以上的系統由於用戶權限管理更嚴格,需要加上 --user 0
        execlp("am", "am", "start", "--user", "0", "-a",
        "android.intent.action.VIEW", "-d", "https://www.baidu.com",(char *) NULL);

    } else {
        //父進程直接退出,使子進程被init進程領養,以避免子進程僵死
    }

    return (*env)->NewStringUTF(env, "Hello from JNI !");
}
這裡我在該應用被卸載的時候跳轉到百度的主界面。
在剛才新建的jni目錄下新建一個Android.mk文件,內容如下:
LOCAL_PATH := $(call my-dir)

include $(CLEAR_VARS)

LOCAL_MODULE    := uninstall-jni
LOCAL_SRC_FILES := uninstall-jni.c

LOCAL_C_INCLUDES := $(LOCAL_PATH)/include
LOCAL_LDLIBS += -L$(SYSROOT)/usr/lib -llog

include $(BUILD_SHARED_LIBRARY)
說明一下:
LOCAL_MODULE := uninstall-jni 表示編譯出來的模塊,這個模塊名稱是隨意給的,在java文件紅引入的時候需要和該名稱相同,不過一般和需要編譯的.c文件名稱保持一致。
LOCAL_SRC_FILES := uninstall-jni.c 表示需要編譯的.c文件
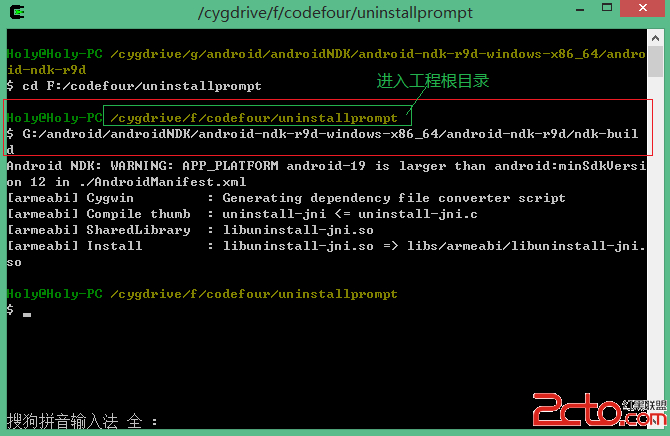
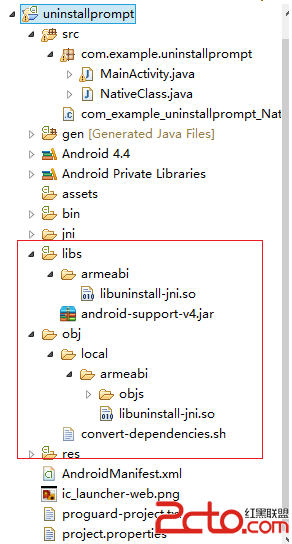
可以看到,這裡首先進入工程的根目錄,然後執行ndk-build編譯該工程中Android.mk中聲明的c代碼。編譯完成可以看到在工程中多了如下文件夾和文件。
這裡,如果有哪些步驟不是很清楚,或者是不太懂的地方,可以看我的另一篇博客一步一步學習androidNDK編程(hello wZ喎?/kf/ware/vc/" target="_blank" class="keylink">vcmxkKTwvcD4NCjxwPm9ro6zP1tTasLLXsNLUuvOjrNTa0LbU2LjDYXBwtcTKsbryo6y74bWvs/bkr8DAxvfX1LavzPjXqrW9sNm2yLXE1vfSs8PmoaM8YnIgLz4NCjxpbWcgYWx0PQ=="這裡寫圖片描述" src="/uploadfile/Collfiles/20150623/20150623100757433.gif" title="" />
好了,今天就到這裡了,希望大家能夠喜歡。
 Android拆輪子系列之寫驗證碼控件的方法
前言先看看效果怎麼樣不錯吧?別急下面我就一步一步的教你實現。用到的知識點總結:1.Canvas和pint的使用,我們用它畫點,線,字2.View的基本用法其實做這個東西還
 Android Window、PhoneWindow、WindowManager、Activity學習心得 第一彈
Android Window、PhoneWindow、WindowManager、Activity學習心得 第一彈閱讀本文,你首先需要理解 Context 上下文環境,W
 Android開發5:應用程序窗口小部件App Widgets的實現(附demo)
前言本次主要是實現一個Android應用,實現靜態廣播、動態廣播兩種改變 widget內容的方法,即在上篇博文中實驗的基礎上進行修改,所以此次實驗的重點是AppWidge
 從零開始學android(Intent初步.四十.)
Intent意圖是android中非常重要的部分,他在Activity,service中有較為廣泛的應用。 1 public void startActiv