編輯:關於Android編程
2.JSON的使用
3.檢查網絡連接
4.AsyncTask的使用
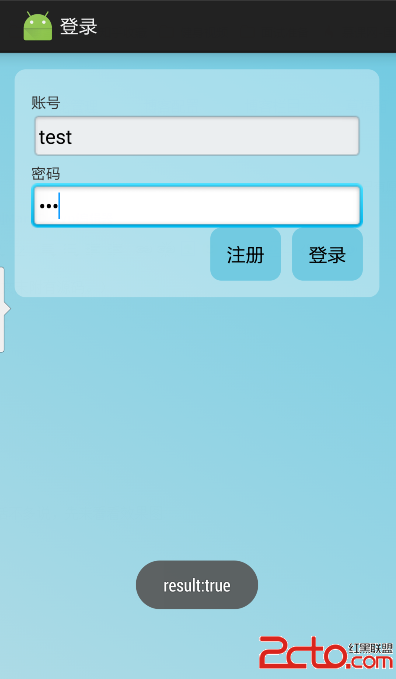
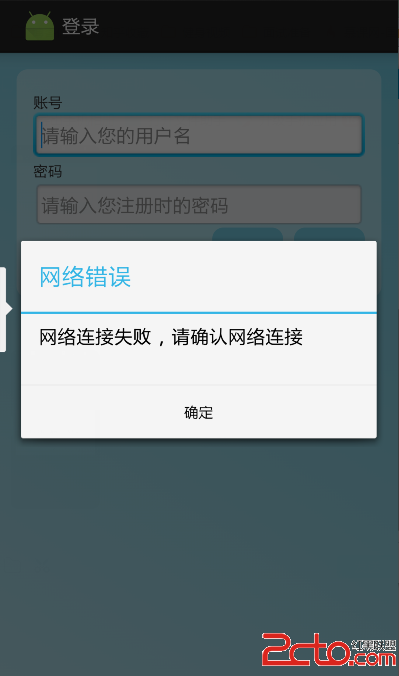
我們簡單的以登錄為例,來實現整個的流程。話不多說,先來看看效果圖:
/**
 * Created by Hyman on 2015/6/11.
 */
public class CallService {

    /**
     * check net connection before call
     *
     * @param context
     * @return
     */
    private static boolean checkNet(Context context) {
        ConnectivityManager connectivity = (ConnectivityManager) context
                .getSystemService(Context.CONNECTIVITY_SERVICE);
        if (connectivity != null) {
            // 獲取網絡連接管理的對象
            NetworkInfo info = connectivity.getActiveNetworkInfo();
            if (info != null && info.isConnected()) {
                // 判斷當前網絡是否已經連接
                if (info.getState() == NetworkInfo.State.CONNECTED) {
                    return true;
                }
            }
        }
        return false;
    }

    /**
     * call service by net
     *
     * @param urlString url
     * @param content   a string of json,params
     * @return the result,a string of json
     */
    public static String call(String urlString, String content, Context context) {
        if (!checkNet(context)) {
            return null;
        }
        try {
            URL url = new URL(urlString);
            HttpURLConnection conn = (HttpURLConnection) url.openConnection();
            conn.setConnectTimeout(5000);
            conn.setDoOutput(true);
            conn.setRequestMethod("POST");
            conn.setRequestProperty("User-Agent", "Fiddler");
            conn.setRequestProperty("Content-Type", "application/json");
            conn.setRequestProperty("Charset", "utf-8");
            OutputStream os = conn.getOutputStream();
            os.write(content.getBytes());
            os.close();
            int code = conn.getResponseCode();
            if (code == 200) {
                BufferedReader in = new BufferedReader(new InputStreamReader(conn.getInputStream(), "utf-8"));
                String retData;
                String responseData = "";
                while ((retData = in.readLine()) != null) {
                    responseData += retData;
                }
                in.close();
                return responseData;
            }
        } catch (MalformedURLException e) {
            e.printStackTrace();
        } catch (UnsupportedEncodingException e) {
            e.printStackTrace();
        } catch (ProtocolException e) {
            e.printStackTrace();
        } catch (IOException e) {
            e.printStackTrace();
        }
        return null;
    }

    public static void showNetErr(Context context){
        new AlertDialog.Builder(context)
                .setTitle("網絡錯誤")
                .setMessage("網絡連接失敗,請確認網絡連接")
                .setPositiveButton("確定", new DialogInterface.OnClickListener() {
                    @Override
                    public void onClick(DialogInterface arg0, int arg1) {

                    }
                }).show();
    }

}
/**
 * Created by Hyman on 2015/6/11.
 */

public class Login {

    private static final String urlString = GetServerUrl.getUrl() + "index.php?r=period/login";
    private static final String TAG = "Login";

    private ProgressBar progressBar;
    private Context context;

    private String userName;
    private String password;

    public Login( Context context,ProgressBar progressBar) {
        this.progressBar=progressBar;
        this.context = context;
    }

    public void login(String userName,String password) {
        Log.i(TAG, "call login");
        this.userName=userName;
        this.password=password;
        new LoginTask().execute();
    }

    class LoginTask extends AsyncTask {
        @Override
        protected String doInBackground(Void... params) {
            JSONObject tosendsObject = new JSONObject();
            Log.i(TAG, "start put json!");
            try {
                //add account info
                tosendsObject.put("username", userName);
                tosendsObject.put("password", password);
            } catch (JSONException e) {
                e.printStackTrace();
            }
            //change json to String
            String content = String.valueOf(tosendsObject);
            Log.i(TAG, "send :" + content);
            String responseData = CallService.call(urlString, content,context);
            if(responseData==null || responseData.equals("")){
                return null;
            }
            Log.i(TAG, "res:" + responseData);
            JSONObject resultObject = null;
            String result=null;
            try {
                resultObject = new JSONObject(responseData);
                result = resultObject.getString("result");
                Log.i(TAG, "result:" + result);
            } catch (JSONException e) {
                e.printStackTrace();
            }
            return result;
        }

        @Override
        protected void onPreExecute() {
            progressBar.setVisibility(View.VISIBLE);    //show the progressBar
            super.onPreExecute();
        }

        @Override
        protected void onPostExecute(String  result) {
             progressBar.setVisibility(View.GONE);    //hide the progressBar
            if(result==null){
                CallService.showNetErr(context);
                return;
            }
            Toast.makeText(context,"result:"+result,Toast.LENGTH_SHORT).show();
            //here you can do anything you want after login
        }
    }
}

            JSONArray jsonArray = new JSONArray();
            SimpleDateFormat sdf = new SimpleDateFormat("yyyy-MM-dd hh:mm:ss");
            try {
                for (PeriodPO peroid : localPeriods) {      //這是一個我自定義的數據結構的list
                    JSONObject periodObject = new JSONObject();
                    periodObject.put("date", sdf.format(peroid.getDate()));
                    periodObject.put("tag", peroid.getTag());
                    periodObject.put("length", peroid.getLength());
                    jsonArray.put(periodObject);            //把每一個對象轉成JsonObject,再把每個object放入Array
                }
                tosendsObject.put("periods", jsonArray);
                //add account info
                tosendsObject.put("username", "test");
            } catch (JSONException e) {
                e.printStackTrace();
            }
 android多分辨率適配
前一階段開發android項目,由於客戶要求進行多分辨率適配,能夠支持國內主流的分辨率手機。因此經過了幾次開發走了很多彎路,目前剛剛領略了android多分辨率適配的一些
 APP漏洞自動化掃描專業評測報告(中篇)
前言樣本測試後的掃描時間對比和漏洞項專業對比後,本篇將以各個廠商的掃描能力作為分析維度展開。測試方法使用自己編寫的測試APP測試各個掃描平台的掃描能力。這些掃描能力主要分
 Android性能優化之被忽視的Memory Leaks
起因寫博客就像講故事,得有起因,經過,結果,人物,地點和時間。今天就容我給大家講一個故事。人物呢,肯定是我了。故事則發生在最近的這兩天,地點在coder君上班的公司。那天
 自定義View之繪圖篇(三):文字(Text)
一、文字相關方法預覽://普通設置paint.setAntiAlias(true); //指定是否使用抗鋸齒功能 如果使用會使繪圖速度變慢 默認falsesetStyl
 android studio for android learning (二十一 )異步任務AsyncTask加載美女圖片攻略及AsyncTask源碼詳解
1.android 的UI線程阻超過5秒就會引發ANR(Applicat