編輯:關於Android編程
算來學習Android開發已有2年的歷史了,在這2年的學習當中,基本掌握了Android的基礎知識。越到後面的學習越感覺困難,一來是自認為android沒啥可學的了(自認為的,其實還有很多知識科學),二來網絡上的很多框架已經幫我們做了太多的事情了,我們只需要畫畫UI就可以了,感覺Android開發沒有太多的技術含金量。最近閒來無事,開始總結之前學過的知識點,想著是否應該學點其他的東西呢?總不能局限於Android基礎知識吧。慢慢的探索發現在大的項目工程中,一個好的框架,好的設計模式,能減少很大的工作量。因此接下來兩篇博客來學習一下Android中常用的兩種框架設計模式 MVC和MVP。
MVC全名是Model View Controller,是模型(model)-視圖(view)-控制器(controller)的縮寫,一種軟件設計典范,用一種業務邏輯、數據、界面顯示分離的方法組織代碼,將業務邏輯聚集到一個部件裡面,在改進和個性化定制界面及用戶交互的同時,不需要重新編寫業務邏輯。其中M層處理數據,業務邏輯等;V層處理界面的顯示結果;C層起到橋梁的作用,來控制V層和M層通信以此來達到分離視圖顯示和業務邏輯層。說了這麼多,聽著感覺很抽象,廢話不多說,我們來看看MVC在Android開發中是怎麼應用的吧!
在Android開發中,比較流行的開發框架模式采用的是MVC設計模式,采用MVC模式的好處是便於UI界面部分的顯示和業務邏輯,數據處理分開。那麼Android項目中哪些代碼來充當M,V,C角色呢?
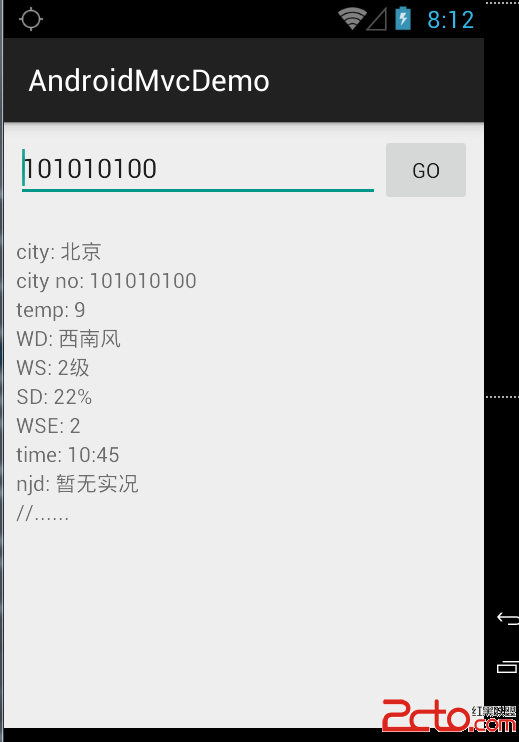
M層:適合做一些業務邏輯處理,比如數據庫操作,網絡操作,復雜的算法,耗時的任務等都在model層處理。 V層:界面UI的顯示,XML布局可以視為V層,當然還包括對界面UI顯示邏輯處理數據的結果的操作代碼。 C層:在Android中,Activity可以認為是控制器,Activity發起業務邏輯請求處理,等待業務處理結果,然後將結果通知View更新界面。接下來我們通過一個獲取天氣預報數據的小項目來解讀 MVC for Android。先上一個界面圖:

我們開始寫代碼,先從Activity實現看起:
package com.xjp.androidmvcdemo.controller;

import android.app.Dialog;
import android.app.ProgressDialog;
import android.os.Bundle;
import android.support.annotation.Nullable;
import android.support.v7.app.ActionBarActivity;
import android.view.View;
import android.widget.EditText;
import android.widget.TextView;

import com.xjp.androidmvcdemo.R;
import com.xjp.androidmvcdemo.entity.Weather;
import com.xjp.androidmvcdemo.entity.WeatherInfo;
import com.xjp.androidmvcdemo.model.OnWeatherListener;
import com.xjp.androidmvcdemo.model.WeatherModel;
import com.xjp.androidmvcdemo.model.WeatherModelImpl;

/**
 * Description:
 * User: xjp
 * Date: 2015/6/3
 * Time: 16:26
 */

public class WeatherActivity extends ActionBarActivity  {

    private Dialog loadingDialog;
    private EditText cityNOInput;
    private TextView city;
    private TextView cityNO;
    private TextView temp;
    private TextView wd;
    private TextView ws;
    private TextView sd;
    private TextView wse;
    private TextView time;
    private TextView njd;

    @Override
    protected void onCreate(@Nullable Bundle savedInstanceState) {
        super.onCreate(savedInstanceState);
        setContentView(R.layout.activity_main);
        initView();
    }

    /**
     * 初始化View
     */
    private void initView() {
        cityNOInput = (EditText) findViewById(R.id.et_city_no);
        city = (TextView) findViewById(R.id.tv_city);
        cityNO = (TextView) findViewById(R.id.tv_city_no);
        temp = (TextView) findViewById(R.id.tv_temp);
        wd = (TextView) findViewById(R.id.tv_WD);
        ws = (TextView) findViewById(R.id.tv_WS);
        sd = (TextView) findViewById(R.id.tv_SD);
        wse = (TextView) findViewById(R.id.tv_WSE);
        time = (TextView) findViewById(R.id.tv_time);
        njd = (TextView) findViewById(R.id.tv_njd);

        loadingDialog = new ProgressDialog(this);
        loadingDialog.setTitle(加載天氣中...);

        findViewById(R.id.btn_go).setOnClickListener(this);

    }
    /**
     * 顯示結果
     *
     * @param weather
     */
    public void displayResult(Weather weather) {
        WeatherInfo weatherInfo = weather.getWeatherinfo();
        city.setText(weatherInfo.getCity());
        cityNO.setText(weatherInfo.getCityid());
        temp.setText(weatherInfo.getTemp());
        wd.setText(weatherInfo.getWD());
        ws.setText(weatherInfo.getWS());
        sd.setText(weatherInfo.getSD());
        wse.setText(weatherInfo.getWSE());
        time.setText(weatherInfo.getTime());
        njd.setText(weatherInfo.getNjd());
    }
}

@Override
    public void onClick(View v) {
        switch (v.getId()) {
            case R.id.btn_go:
                loadingDialog.show();
                //執行網絡請求
                break;
        }
    }
從上面代碼可以看到,Activity負責了View視圖UI的響應事件和請求結果視圖顯示。以上代碼看起來貌似沒什麼問題,但是從代碼的可擴展性,可維護性考慮,這樣寫代碼就有弊端:當客戶的View視圖顯示需求發生改變之後,我們不得不去修改Activity中的代碼,來修改View視圖顯示。當界面顯示修改比較大的時候,Activity裡的代碼修改也很大,這麼一來導致Activity代碼臃腫,不利於維護,也很有可能在修改Activity的時候導致Activity中其他部分代碼出錯。因此,我們不提倡在Activity中來寫View界面顯示。根據MVC設計模式開發,將View視圖分離出來,減輕Activity的負擔,讓Activity來擔任Controller角色。看看代碼實現如下:
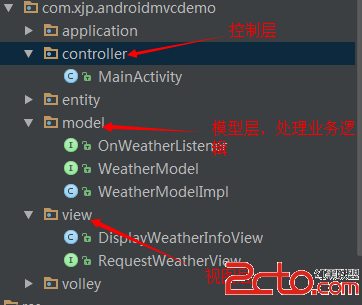
看看工程目錄結構如圖:

package com.xjp.androidmvcdemo.view;

import android.app.Dialog;
import android.app.ProgressDialog;
import android.support.v7.app.ActionBarActivity;
import android.view.View;
import android.widget.EditText;
import android.widget.TextView;

import com.xjp.androidmvcdemo.R;
import com.xjp.androidmvcdemo.entity.Weather;
import com.xjp.androidmvcdemo.entity.WeatherInfo;

/**
 * Description:將天氣信息顯示到View
 * User: xjp
 * Date: 2015/6/3
 * Time: 14:55
 */

public class DisplayWeatherInfoView {

    private ActionBarActivity activity;
    RequestWeatherView iRequest;

    private Dialog loadingDialog;
    private EditText cityNOInput;
    private TextView city;
    private TextView cityNO;
    private TextView temp;
    private TextView wd;
    private TextView ws;
    private TextView sd;
    private TextView wse;
    private TextView time;
    private TextView njd;

    public DisplayWeatherInfoView(ActionBarActivity activity, RequestWeatherView iRequest) {
        this.activity = activity;
        this.iRequest = iRequest;
        initView();
    }

    /**
     * 初始化View
     */
    private void initView() {
        cityNOInput = (EditText) activity.findViewById(R.id.et_city_no);
        city = (TextView) activity.findViewById(R.id.tv_city);
        cityNO = (TextView) activity.findViewById(R.id.tv_city_no);
        temp = (TextView) activity.findViewById(R.id.tv_temp);
        wd = (TextView) activity.findViewById(R.id.tv_WD);
        ws = (TextView) activity.findViewById(R.id.tv_WS);
        sd = (TextView) activity.findViewById(R.id.tv_SD);
        wse = (TextView) activity.findViewById(R.id.tv_WSE);
        time = (TextView) activity.findViewById(R.id.tv_time);
        njd = (TextView) activity.findViewById(R.id.tv_njd);

        loadingDialog = new ProgressDialog(activity);
        loadingDialog.setTitle(加載天氣中...);

        activity.findViewById(R.id.btn_go).setOnClickListener(new View.OnClickListener() {
            @Override
            public void onClick(View v) {
                loadingDialog.show();
                iRequest.sendRequest(cityNOInput.getText().toString().trim());
            }
        });

    }

    /**
     * 顯示結果
     *
     * @param weather
     */
    public void displayResult(Weather weather) {
        WeatherInfo weatherInfo = weather.getWeatherinfo();
        city.setText(weatherInfo.getCity());
        cityNO.setText(weatherInfo.getCityid());
        temp.setText(weatherInfo.getTemp());
        wd.setText(weatherInfo.getWD());
        ws.setText(weatherInfo.getWS());
        sd.setText(weatherInfo.getSD());
        wse.setText(weatherInfo.getWSE());
        time.setText(weatherInfo.getTime());
        njd.setText(weatherInfo.getNjd());
    }

    /**
     * 隱藏進度對話框
     */
    public void hideLoadingDialog() {
        loadingDialog.dismiss();
    }


}
我們將View界面控制提成一個DisplayWeatherInfoView類,這個類實現了View的查找初始化和View界面結果的顯示,以及View響應事件的接口。所有的界面操作都在這個類了。
接下來看看Activity是怎麼調用DisplayWeatherInfoView類的。
package com.xjp.androidmvcdemo.controller;

import android.os.Bundle;
import android.support.v7.app.ActionBarActivity;
import android.widget.Toast;

import com.xjp.androidmvcdemo.R;
import com.xjp.androidmvcdemo.model.OnWeatherListener;
import com.xjp.androidmvcdemo.entity.Weather;
import com.xjp.androidmvcdemo.model.WeatherModel;
import com.xjp.androidmvcdemo.model.WeatherModelImpl;
import com.xjp.androidmvcdemo.view.DisplayWeatherInfoView;
import com.xjp.androidmvcdemo.view.RequestWeatherView;


public class MainActivity extends ActionBarActivity implements RequestWeatherView, OnWeatherListener {

    private DisplayWeatherInfoView displayView;
    private static WeatherModel weatherModel = null;

    @Override
    protected void onCreate(Bundle savedInstanceState) {
        super.onCreate(savedInstanceState);
        setContentView(R.layout.activity_main);

        displayView = new DisplayWeatherInfoView(this, this);
        if (null == weatherModel) {
            weatherModel = new WeatherModelImpl();
        }
    }

    @Override
    public void sendRequest(String number) {
        weatherModel.getWeather(number, this);
    }

    @Override
    public void onSuccess(Weather weather) {
        displayView.hideLoadingDialog();
        displayView.displayResult(weather);
    }

    @Override
    public void onError() {
        displayView.hideLoadingDialog();
        Toast.makeText(this, 獲取天氣信息失敗, Toast.LENGTH_SHORT).show();
    }
}
以上代碼可以看出,Activity持有了DisplayWeatherInfoView對象引用,並且實現了RequestWeatherView控件響應事件接口。當View視圖有類似用戶點擊響應事件的時候,會以接口通信的方式通知Activity,View發生了用戶響應事件,讓Activity去做相應的處理,此時Activity充當Controller角色,來將用戶的響應請求發送到 model層,讓model層來處理網絡請求。因此Activity 同時持有model的對象引用WeatherModelImpl。
來看看WeatherModelImpl代碼實現
package com.xjp.androidmvcdemo.model;

/**
 * Description:請求網絡數據接口
 * User: xjp
 * Date: 2015/6/3
 * Time: 15:40
 */

public interface WeatherModel {
    void getWeather(String cityNumber, OnWeatherListener listener);
}

................


package com.xjp.androidmvcdemo.model;

import com.android.volley.Response;
import com.android.volley.VolleyError;
import com.xjp.androidmvcdemo.entity.Weather;
import com.xjp.androidmvcdemo.volley.VolleyRequest;

/**
 * Description:從網絡獲取天氣信息接口實現
 * User: xjp
 * Date: 2015/6/3
 * Time: 15:40
 */

public class WeatherModelImpl implements WeatherModel {

    @Override
    public void getWeather(String cityNumber, final OnWeatherListener listener) {

        /*數據層操作*/
        VolleyRequest.newInstance().newGsonRequest(http://www.weather.com.cn/data/sk/ + cityNumber + .html,
                Weather.class, new Response.Listener() {
                    @Override
                    public void onResponse(Weather weather) {
                        if (weather != null) {
                            listener.onSuccess(weather);
                        } else {
                            listener.onError();
                        }
                    }
                }, new Response.ErrorListener() {
                    @Override
                    public void onErrorResponse(VolleyError error) {
                        listener.onError();
                    }
                });
    }
}
以上代碼看出,這裡設計了一個WeatherModel模型接口,然後實現了接口WeatherModelImpl類。controller控制器activity調用WeatherModelImpl類中的方法發起網絡請求,然後通過實現OnWeatherListener接口來獲得網絡請求的結果,然後activity繼續調用DisplayWeatherInfoView中的displayView.displayResult(weather);方法將網絡請求結果顯示到View界面 。至此,activity擔當contronller完成了model和view之間的協調作用。
至於這裡為什麼不直接設計成類裡面的一個getWeather()方法直接請求網絡數據?你考慮下這種情況:現在代碼中的網絡請求是使用Volley框架來實現的,如果哪天老板非要你使用Afinal框架實現網絡請求,你怎麼解決問題?難道是修改 getWeather()方法的實現? no no no,這樣修改不僅破壞了以前的代碼,而且還不利於維護, 考慮到以後代碼的擴展和維護性,我們選擇設計接口的方式來解決著一個問題,我們實現另外一個WeatherModelWithAfinalImpl類,繼承自WeatherModel,重寫裡面的方法,這樣不僅保留了以前的WeatherModelImpl類請求網絡方式,還增加了WeatherModelWithAfinalImpl類的請求方式。Activity調用代碼無需要任何修改。
利用MVC設計模式,使得這個天氣預報小項目有了很好的可擴展和維護性,當需要改變UI顯示的時候,無需修改Contronller(控制器)Activity的代碼和Model(模型)WeatherModel模型中的業務邏輯代碼,很好的將業務邏輯和界面顯示分離。
在Android項目中,業務邏輯,數據處理等擔任了Model(模型)角色,XML界面顯示等擔任了View(視圖)角色,Activity擔任了Contronller(控制器)角色。contronller(控制器)是一個中間橋梁的作用,通過接口通信來協同 View(視圖)和Model(模型)工作,起到了兩者之間的通信作用。
什麼時候適合使用MVC設計模式?當然一個小的項目且無需頻繁修改需求就不用MVC框架來設計了,那樣反而覺得代碼過度設計,代碼臃腫。一般在大的項目中,且業務邏輯處理復雜,頁面顯示比較多,需要模塊化設計的項目使用MVC就有足夠的優勢了。
MVC的優點:
(1)耦合性低。所謂耦合性就是模塊代碼之間的關聯程度。利用MVC框架使得View(視圖)層和Model(模型)層可以很好的分離,這樣就達到了解耦的目的,所以耦合性低,減少模塊代碼之間的相互影響。
(2)可擴展性好。由於耦合性低,添加需求,擴展代碼就可以減少修改之前的代碼,降低bug的出現率。
(3)模塊職責劃分明確。主要劃分層M,V,C三個模塊,利於代碼的維護。
 android開發之自定義AutoCompleteTextView
AutoCompleteTextView,很多人都用過,有些情況下使用Google提供的ArrayAdapter作為適配器就可以完成需求,但是在實際開發中,我們經常需要開
 Android優化——UI優化(三)
使用ViewStub延遲加載1.ViewStub延遲加載 ViewStub是一個不可見的,大小為0的View,最佳用途就是實現View的延遲加載,在需要的時候再加載Vie
 Android中添加思源字體/NotoSansCJK/SourceHanSans
系統版本:Android 4.2.2_r1 本文主要是在Android中添加思源字體的過程記錄。思源字體是Google和Adobe在2014.07.18發布的中文字體。
 使用eclipse打包app以及AndroidStudio和Eclipse中app簽名修改等問題(SH1和MD5)
一,使用eclipse打包app內容新建keystore:1、先在eclipse中創建一個新的keystore看詳細圖2、接下來設置一些打包必要參數:3.設置好內容後點擊