編輯:關於Android編程
PullToRefresh 這個庫用的是非常至多,github 今天主要分析一下源碼實現.
我們通過ListView的下拉刷新進行分析,其它的類似。
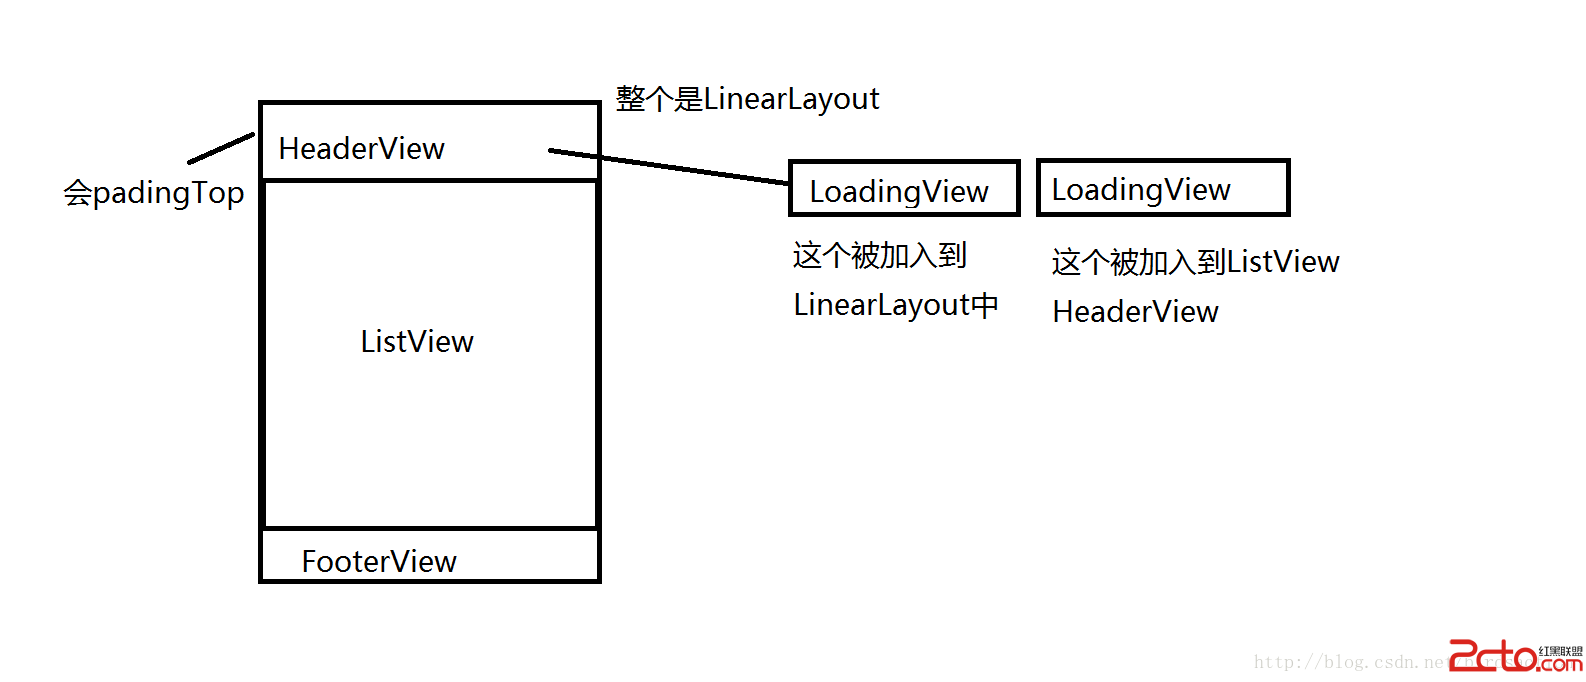
整個下拉刷新 父View是LinearLayout, 在LinearLayout添加了Header View ,Footer View,和ListView
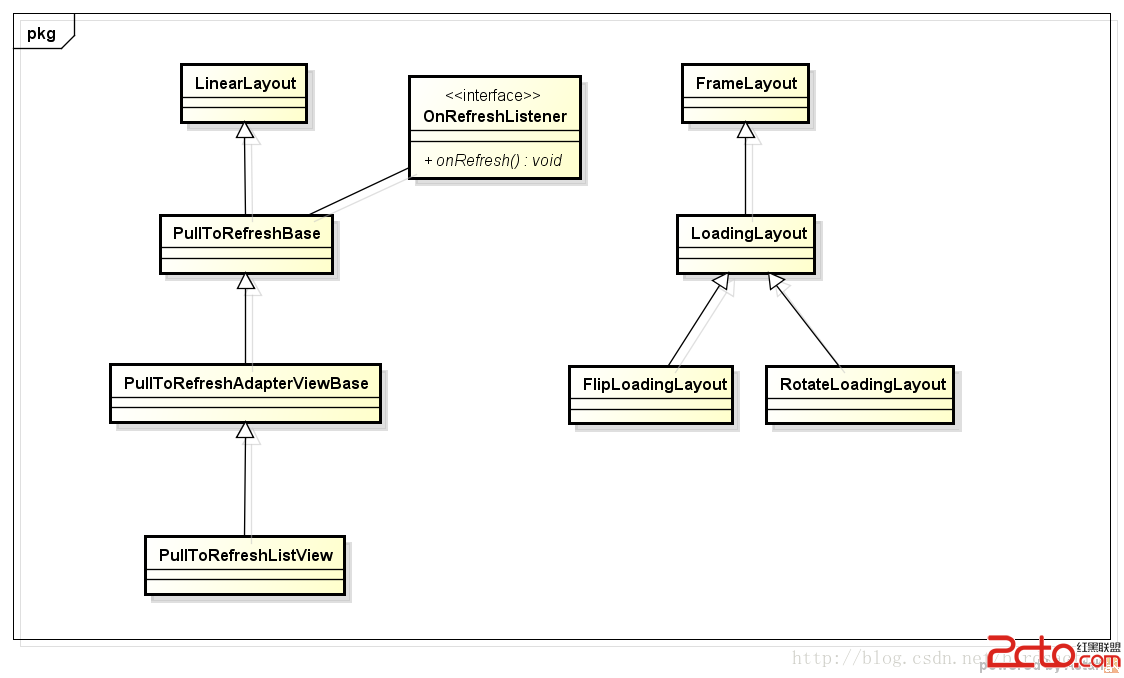
PullToRefreshBase 是父類 擴展了 LinearLayout水平布局 如果我們使用ListView 需要觀看子類 PullToRefreshAdapterViewBase -> PullToRefreshListView

初始化代碼在PullToRefreshBase init方法中
重點代碼:
		// Refreshable View
		// By passing the attrs, we can add ListView/GridView params via XML
		mRefreshableView = createRefreshableView(context, attrs);//通過子類傳入的View,ListView或者ScrollView等
		addRefreshableView(context, mRefreshableView);//添加view到布局中

		// We need to create now layouts now  創建Header和Footer視圖,默認是INVISIBLE,要添加到父窗口
		mHeaderLayout = createLoadingLayout(context, Mode.PULL_FROM_START, a);
		mFooterLayout = createLoadingLayout(context, Mode.PULL_FROM_END, a);


		handleStyledAttributes(a);//添加loadingView效果,這裡是把View添加到ListView HeaderView裡面去
		updateUIForMode(); //把布局添加到父View中
	protected void updateUIForMode() {
		final LinearLayout.LayoutParams lp = getLoadingLayoutLayoutParams();
		// Remove Header, and then add Header Loading View again if needed
		if (this == mHeaderLayout.getParent()) {
			removeView(mHeaderLayout);
		}
		if (mMode.showHeaderLoadingLayout()) {
			addViewInternal(mHeaderLayout, 0, lp);//加入View到LinearLayout
		}

		// Remove Footer, and then add Footer Loading View again if needed
		if (this == mFooterLayout.getParent()) {
			removeView(mFooterLayout);
		}
		if (mMode.showFooterLoadingLayout()) {
			addViewInternal(mFooterLayout, lp);//加入View到LinearLayout
		}

		// Hide Loading Views
		refreshLoadingViewsSize();//把headerView隱藏起來,其實用的是padding的方式 設置為負值 就到屏幕頂部的外面了

		// If we're not using Mode.BOTH, set mCurrentMode to mMode, otherwise
		// set it to pull down
		mCurrentMode = (mMode != Mode.BOTH) ? mMode : Mode.PULL_FROM_START;
	}
看看handleStyledAttributes方法 定位到子類復寫的地方
FrameLayout frame = new FrameLayout(getContext());
mHeaderLoadingView = createLoadingLayout(getContext(), Mode.PULL_FROM_START, a);
mHeaderLoadingView.setVisibility(View.GONE);
frame.addView(mHeaderLoadingView, lp);
mRefreshableView.addHeaderView(frame, null, false);//添加LoadingView到ListView Header上
//headerView一共有2個LoadingView,一個是被加入到LinearLayout一個是被加入到ListView的HeaderView
addViewInternal方法就是加入到LinearLayout父類中
看看LoadingLayout 有2種 FlipLoadingLayout 和 RotateLoadingLayout 一般我們用旋轉的加載動畫
左邊一個旋轉圖片,右邊是文字和時間提示
第一個LoadingLayout主要顯示 :下拉刷新,放開以刷新
第二個LoadingLayout顯示松手後的文字:正在載入...
結構是這樣

當UI初始化好,下面看看onTouch 下拉捕獲事件
	public final boolean onTouchEvent(MotionEvent event) {
		if (!isPullToRefreshEnabled()) {
			return false;
		}
		// If we're refreshing, and the flag is set. Eat the event
		if (!mScrollingWhileRefreshingEnabled && isRefreshing()) {
			return true;
		}
		if (event.getAction() == MotionEvent.ACTION_DOWN && event.getEdgeFlags() != 0) {
			return false;
		}
		switch (event.getAction()) {
			case MotionEvent.ACTION_MOVE: {
				if (mIsBeingDragged) {
					mLastMotionY = event.getY();
					mLastMotionX = event.getX();
					pullEvent();//開始下拉,移動
					return true;
				}
				break;
			}

			case MotionEvent.ACTION_DOWN: {
				if (isReadyForPull()) {//按下 開始下拉
					mLastMotionY = mInitialMotionY = event.getY();
					mLastMotionX = mInitialMotionX = event.getX();
					return true;
				}
				break;
			}

			case MotionEvent.ACTION_CANCEL:
			case MotionEvent.ACTION_UP: { //停止下拉的時候
				if (mIsBeingDragged) {
					mIsBeingDragged = false;
					if (mState == State.RELEASE_TO_REFRESH
							&& (null != mOnRefreshListener || null != mOnRefreshListener2)) {
						setState(State.REFRESHING, true);//放下手指開始回調,執行我們的回調任務
						return true;
					}

					// If we're already refreshing, just scroll back to the top
					if (isRefreshing()) {
						smoothScrollTo(0);
						return true;
					}

					// If we haven't returned by here, then we're not in a state
					// to pull, so just reset
					setState(State.RESET); //恢復到原來的UI狀態

					return true;
				}
				break;
			}
		}

		return false;
	}
看看pullEvent方法
	private void pullEvent() {
		final int newScrollValue;
		final int itemDimension;
		final float initialMotionValue, lastMotionValue;

		switch (getPullToRefreshScrollDirection()) {
			case HORIZONTAL:
				initialMotionValue = mInitialMotionX;
				lastMotionValue = mLastMotionX;
				break;
			case VERTICAL:
			default:
				initialMotionValue = mInitialMotionY;
				lastMotionValue = mLastMotionY;
				break;
		}
		//計算下拉移動了多少
		switch (mCurrentMode) {
			case PULL_FROM_END://上拉
				newScrollValue = Math.round(Math.max(initialMotionValue - lastMotionValue, 0) / FRICTION);
				itemDimension = getFooterSize();
				break;
			case PULL_FROM_START://下拉
			default:
				newScrollValue = Math.round(Math.min(initialMotionValue - lastMotionValue, 0) / FRICTION);
				itemDimension = getHeaderSize();
				break;
		}

		//顯示HeaderView 得到移動的值,可以讓LoadingView顯示出來
		setHeaderScroll(newScrollValue);

		if (newScrollValue != 0 && !isRefreshing()) {
			float scale = Math.abs(newScrollValue) / (float) itemDimension;
			switch (mCurrentMode) {
				case PULL_FROM_END:
					mFooterLayout.onPull(scale);
					break;
				case PULL_FROM_START:
				default:
				 mHeaderLayout.onPull(scale);//旋轉左邊的加載圖片,顯示文字和圖片 這個地方最終會執行LoadingLayout中的 onPullImpl方法
					break;
			}
			//更新狀態 包括2中 釋放按下觸摸,還有就是 沒釋放手的觸摸
			if (mState != State.PULL_TO_REFRESH && itemDimension >= Math.abs(newScrollValue)) {
				setState(State.PULL_TO_REFRESH);
			} else if (mState == State.PULL_TO_REFRESH && itemDimension < Math.abs(newScrollValue)) {
				setState(State.RELEASE_TO_REFRESH);//下拉松手 可以松手了
			}
		}
	}
再看看setHeaderScroll方法代碼
	protected final void setHeaderScroll(int value) {
		if (DEBUG) {
			Log.d(LOG_TAG, "setHeaderScroll: " + value);
		}

		if (DEBUG) {
			Log.d(LOG_TAG, "setHeaderScroll:" + value );
		}

		// Clamp value to with pull scroll range
		final int maximumPullScroll = getMaximumPullScroll();
		value = Math.min(maximumPullScroll, Math.max(-maximumPullScroll, value));

		if (mLayoutVisibilityChangesEnabled) {
			if (value < 0) { //有位移才顯示
				mHeaderLayout.setVisibility(View.VISIBLE);
			} else if (value > 0) {  //有位移才顯示
				mFooterLayout.setVisibility(View.VISIBLE);
			} else {
				mHeaderLayout.setVisibility(View.INVISIBLE);
				mFooterLayout.setVisibility(View.INVISIBLE);
			}
		}

		if (USE_HW_LAYERS) {
			/**
			 * Use a Hardware Layer on the Refreshable View if we've scrolled at
			 * all. We don't use them on the Header/Footer Views as they change
			 * often, which would negate any HW layer performance boost.
			 */
			ViewCompat.setLayerType(mRefreshableViewWrapper, value != 0 ? View.LAYER_TYPE_HARDWARE
					: View.LAYER_TYPE_NONE);
		}

		//回到最原始的scrollTo 最常用的 移動布局
		switch (getPullToRefreshScrollDirection()) {
			case VERTICAL:
				scrollTo(0, value);
				break;
			case HORIZONTAL:
				scrollTo(value, 0);
				break;
		}
	}
protected void onRefreshing(final boolean doScroll) {
		if (mMode.showHeaderLoadingLayout()) {
			mHeaderLayout.refreshing();
		}
		if (mMode.showFooterLoadingLayout()) {
			mFooterLayout.refreshing();
		}

		if (doScroll) {
			if (mShowViewWhileRefreshing) {

				// Call Refresh Listener when the Scroll has finished
				OnSmoothScrollFinishedListener listener = new OnSmoothScrollFinishedListener() {
					@Override
					public void onSmoothScrollFinished() {
						callRefreshListener();//回調接口執行
					}
				};

				switch (mCurrentMode) {
					case MANUAL_REFRESH_ONLY:
					case PULL_FROM_END:
						smoothScrollTo(getFooterSize(), listener);
						break;
					default:
					case PULL_FROM_START:
						smoothScrollTo(-getHeaderSize(), listener);
						break;
				}
			} else {
				smoothScrollTo(0);//回到原來的位置
			}
		} else {
			// We're not scrolling, so just call Refresh Listener now
			callRefreshListener();//回調接口執行
		}
	}
	private void callRefreshListener() {
		if (null != mOnRefreshListener) {
			mOnRefreshListener.onRefresh(this);//回調
		} else if (null != mOnRefreshListener2) { //這個是上拉,下拉都可以的情況,使用 onRefreshListener2
			if (mCurrentMode == Mode.PULL_FROM_START) {
				mOnRefreshListener2.onPullDownToRefresh(this);
			} else if (mCurrentMode == Mode.PULL_FROM_END) {
				mOnRefreshListener2.onPullUpToRefresh(this);
			}
		}
	}
主要的就這些,還有很多細節沒有分析。若有問題請指出謝謝。
 扣丁音樂(七)——音樂進度條拖動 循環模式 專輯圖片倒影功能實現
一丶效果演示 二丶實現功能介紹及思路設計前幾篇的博客被指出:純貼代碼沒什麼用,解釋下,本博客是由視頻轉博客的筆記及自己加深的一些功能,覺得提供代碼是最有效的,雖然如此還是
 自定義View系列教程02--onMeasure源碼詳盡分析
大家知道,自定義View有三個重要的步驟:measure,layout,draw。而measure處於該鏈條的首端,占據著極其重要的地位;然而對於measur
 ViewDragHelper詳解(側滑欄)
一、概述Drag拖拽;ViewDrag拖拽視圖,拖拽控件;ViewDragHelper拖拽視圖助手,拖拽操作類。利用ViewDragHelper類可以實現很多絢麗的效果,
 實例講解Android App使用自帶的SQLite數據庫的基本方法
SQLite數據庫是android系統內嵌的數據庫,小巧強大,能夠滿足大多數SQL語句的處理工作,而SQLite數據庫僅僅是個文件而已。雖然SQLite的有點很多,但並不